Paper Quilling for Beginners: Coil Your First Christmas Card

Paper Quilling for Beginners: Coil Your First Christmas Card

DariaCurated by Daria
Jump to the 7 picks

Roll It, Let Go, Watch It Spring

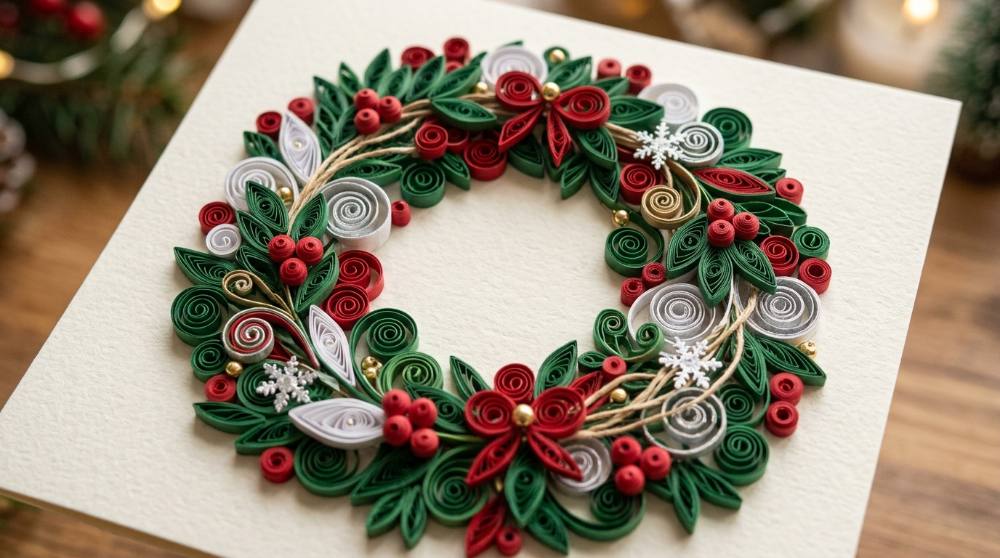
Wind a narrow strip of paper around a thin metal tool, let go, and it relaxes into a spiral you can pinch into a teardrop, an eye or a tiny diamond. Glue a few dozen of those shapes together and you've got a snowflake that looks far fussier than it was to make. The craft goes back centuries. Nuns in France and Italy once wrapped the gilded edges of old holy books around goose quills to decorate reliquaries, which is where the name comes from. By Jane Austen's time it was a parlor pastime, and in Sense and Sensibility Lucy Steele is busy rolling papers for a filigree basket.

If you've tried folding origami from a single square, quilling works the other way round. Nothing gets folded into shape. You build the design from lots of separate coils and glue each one down. It isn't card making either, though the two go together: quilling is one way to decorate a card, and a snowflake glued to a folded blank is where most people start. A Christmas card is honestly the ideal first project. It's small, and nobody expects perfection from something handmade.

Keep the first kit tiny. Narrow strips, a slotted tool, a circle sizer and a glue bottle with a fine tip will fill your first card, and everything else can wait until you know you're hooked.

Nothing below costs more than a takeout dinner, so if quilling isn't for you, you're only left with a drawer of pretty paper.

Don't throw away the offcuts. Short leftover bits of strip add lovely texture to mixed-paper collage art, so keep a jar for them on the desk.

Four Little Things That Make Every Coil

It's tempting to grab the biggest boxed kit with a dozen gadgets. Don't. The strips matter more than the tool count, because real quilling paper is a touch heavier and softer than printer paper and it's cut with the grain, so it rolls smooth instead of kinking. Stick with the 1/8 inch (3 mm) width that most patterns are written for. If you marble your own paper, a swirly sheet makes a gorgeous card front behind a plain white snowflake.

Disclosure: This section may contain affiliate links to Amazon. We may earn a small commission from qualifying purchases at no extra cost to you.
Narrow 1/8-inch paper quilling strips in mixed colors

Pick 01 of 07

Narrow 1/8-inch paper quilling strips in mixed colors

Pre-cut strips of text-weight paper that roll into smooth, even coils. Most quilling patterns, snowflakes included, are written for the 1/8 inch (3 mm) width. Look for long strips grouped in color families, so you can trim several coils from one strip and shade a design without hunting for matches.

Why we picked this exact one: We picked the JUYA 60-color set of 3 mm strips, a brand quilling bloggers already point beginners to. It holds 1,200 strips at 54 cm each, enough for a whole season of cards. It's rated 4.8 stars. The catch is that each shade only gets 20 strips, so a run of all-white snowflakes will use up the whites first.

See it on Amazon
Slotted and needle quilling tools with tweezers

Pick 02 of 07

Slotted and needle quilling tools with tweezers

A slotted tool holds the end of the strip in a small slit while you twirl it into a coil. A needle tool is a plain fine point that's a little harder to learn but leaves a round center with no crimp, and it's handy for dabbing glue into tight spots. Tweezers let you place small coils without squashing them.

Why we picked this exact one: The Pimoys 12-pack puts slotted tools, needle tools and a pair of tweezers in one cheap set, so you can try both rolling styles before settling on one. It's rated 4.7 stars from more than 3,700 reviews. Any slotted tool leaves a small crimp at the center of the coil; if that starts to bug you, the needle tools in this set avoid it.

See it on Amazon
Circle sizer and shape board for matching quilling coils

Pick 03 of 07

Circle sizer and shape board for matching quilling coils

A flat board with a row of graduated round holes. You drop a freshly rolled coil into a hole and let it relax until it fills that size, which keeps repeated pieces identical. This style also has shape guides and a pin surface for holding pieces while you shape them.

Why we picked this exact one: The YURROAD 3-in-1 quilling board combines circle sizes, heart and teardrop guides, and a pinning surface in one piece. It's rated 4.6 stars across 338 reviews. The board is small, so it's for sizing and shaping coils; a full card-sized pattern needs a bigger surface underneath.

See it on Amazon
Precision-tip clear-drying glue for sealing coil ends

Pick 04 of 07

Precision-tip clear-drying glue for sealing coil ends

A water-based craft glue in a small squeeze bottle with a fine metal tip, so a single drop lands exactly on the end of a strip. It dries clear, which matters when glue sits right on the edge of a white coil. A small bottle goes a long way because each join needs so little.

Why we picked this exact one: Bearly Art Precision Craft Glue comes with a kit of interchangeable fine tips and dries clear. It's rated 4.8 stars from over 9,400 reviews. It costs more per ounce than school glue, so if you'd rather save, plain white craft glue picked up with a pin from a dab on a lid works too.

See it on Amazon

With these four you can roll the handful of shapes a first snowflake uses: rings, marquises (the pointy eye shape), diamonds and tight coils. Expect the first dozen to look lopsided. Rolling starts to feel natural after a couple of hours, and a slightly wonky coil disappears once it's part of a snowflake. Once it's dry, a greeting in simple hand lettering under the snowflake finishes the card.

For When the Snowflakes Get Ambitious

None of this is needed for a first card. Once you start working from printed patterns, though, you'll want somewhere to pin pieces while the glue sets, or the six arms drift out of line. Lay the pattern on cork, cover it with wax paper or cling wrap so nothing sticks, and pin each coil down as you go. Husking is the other thing you'll want to try. You wrap one long strip back and forth around a row of pins, and it feels oddly like weaving.

Husking pin board for wrapping quilled petals and leaves

Pick 05 of 07

Husking pin board for wrapping quilled petals and leaves

A small board drilled with a grid of holes that holds steel pins in any arrangement, plus a row of parallel grooves. You loop a strip around one pin after another to build husked petals, which have crisp, even loops rather than a coiled center. Moving the pins changes the size and shape of each petal.

Why we picked this exact one: The JUYA 2-in-1 Quilling Knitting Board comes with 30 stainless steel pins and a slotted copper pin that holds the start of the strip, which is the fiddliest part of husking. It's rated 4.7 stars across more than 1,200 reviews. The layout is compact, so it suits petals and leaves better than big husked shapes.

See it on Amazon
Wide 10 mm quilling strips for fringed flowers and folded roses

Pick 06 of 07

Wide 10 mm quilling strips for fringed flowers and folded roses

Wide strips in shaded color runs, used when a design needs height instead of a flat coil. Snip one long edge into a fine fringe and roll it up, and it opens into a fluffy flower; fold and roll a wide strip and you get a rose. Sets with gradual shade steps let petals run from light to dark.

Why we picked this exact one: This JUYA set of 10 mm strips gives you 720 strips in 36 colors, arranged in six shaded series. It's rated 4.8 stars. Ten millimeters makes big, bold flowers; if you'd like daintier ones, the same set is sold in 5 and 7 mm widths too.

See it on Amazon
Cork boards for pinning coils over a printed pattern

Pick 07 of 07

Cork boards for pinning coils over a printed pattern

Plain cork tiles you lay a printed snowflake or card pattern on, covered with wax paper or plastic wrap, so each coil can be pinned in place while the glue dries. Cork grips pins well and closes up around the holes afterward. Thicker cork, or two layers, holds pins more firmly.

Why we picked this exact one: The Quartet natural cork tiles are 12 inches square, which fits a card-sized pattern with room to spare. They're rated 4.3 stars by nearly 9,000 buyers. Each tile is only 3/16 inch thick, so stack two if your pins start poking through.

See it on Amazon

Wider strips open the door to fringed flowers and folded roses, which look just as good on a scrapbook page as on a card. I'd hold off on a fringing gadget, though. Even a big quilling supplier refuses to stock one because it hasn't found a model good enough. Chunky 3D flowers also look sweet on the cover of a junk journal, as long as it doesn't get squashed in a bag.

Shrinking Coils, Wandering Arms and Other Snowflake Surprises

Why does my coil stay tiny and tight when I slide it off the tool?

You're almost certainly rolling too tight. Most beginners grip hard because the strip feels like it'll slip, so the coil has no room to relax once you let go. The result is a dense little button instead of an open spiral you can pinch into a shape. Keep the tension gentle and even, then let the coil loosen before you glue the end.

Why do my coils come out different sizes when the strips are all the same length?

Because strip length isn't really a standard. The same three-inch strip makes a slightly different coil for every person, and even for you on different days, depending on how tightly you roll. That's why a pattern's coils won't always match yours. Let every coil for one design relax in the same hole of your circle sizer and they'll come out the same diameter.

How much glue should I actually use?

Far less than you'd think. A normal bead of craft glue is too much for a strip end that's only 3 mm wide, and the extra ends up on your fingers and then on the next coil. Squeeze a small dab onto a plastic lid and pick up a speck with a pin, or use a fine-tip bottle. Keep a damp cloth nearby so your fingertips stay clean.

Can I fix a snowflake arm I glued in the wrong place?

Usually, yes, even after it's dried overnight. People tend to scrap the whole piece, but you can very gently pull the coils apart instead. Rub the torn sides with a barely damp cloth to smooth the rough edges, then glue the coil back where it belongs. The mistake rarely shows.

Will a quilled card survive the mail?

Not in a plain envelope, and a bubble mailer on its own isn't enough either, because the card can still bend and crush the coils. Sandwich the card between two sheets of cardboard before it goes in the envelope, or send it in a shallow box lined with bubble wrap. It's a bit of extra effort, but it's better than a flattened snowflake.

Love what you see here? Save individual picks with on any item, or copy everything to a list of your own in one click — great for coming back to later, or dropping as a not-so-subtle hint.

Disclosure: This section may contain affiliate links to Amazon. We may earn a small commission from qualifying purchases at no extra cost to you.