Cane is bark. The glossy strands in an old bistro chair are the peeled skin of a rattan vine that climbs 150 to 300 feet through Southeast Asian rainforest, hooking itself tree to tree on its own thorns. London's first caned chairs turned up around 1660 and the craft boomed after the Great Fire of 1666, partly because basketmakers got their rattan for nothing: it arrived as dunnage, the packing waste wedged around tea crates to stop them sliding in a ship's hold on the run from China. For two centuries after that, chair caners walked town to town and rewove seats on people's doorsteps. Then it nearly vanished, because between the world wars British caning survived mostly as occupational therapy taught to injured soldiers and blind adults, who were never asked to train anyone after them.
Here's the part nobody mentions first: which seat you have decides everything you buy. Turn the chair over. A shallow groove routed around the seat opening means you want a sheet of pre-woven cane and a strip of spline, and you can be done in an evening. A ring of small drilled holes, roughly half an inch apart, means hand caning instead, one strand at a time through every hole, which is a different shopping list and a much longer sit. And a seat that's already a woven cord in four fat triangles over four rails is rush, which is its own craft again. None of these is the beginner version of the others. They're three answers to three kinds of chair, which is also why the thrifted-furniture flipping route with paint and hardware doesn't help you here at all.
My advice: buy for the one chair in front of you, not for the hobby you're imagining. A sheet of cane, the right spline, a mallet, a handful of wooden wedges and a knife with a fresh blade will bring a groove-style seat all the way back. Everything else is a second chair's problem.
Nothing below costs enough to sting if you decide after one evening that you'd rather have just bought a new chair, which is roughly the test we'd apply to any first creative hobby you're weighing up.
Where This Little Kit Can Take You
A few real moments and results from this hobby — made with tools no fancier than the ones below.
A seat woven back to newThe open hexagon pattern is the standard seat weave, and it is the one a pre-woven sheet gives you.
Rush seats on ladder-back chairsFour triangles of twisted cord meet at the centre of every rush seat, built one wrap at a time.
Measure before you order anything, groove width above all, because spline comes in sizes that look identical in a photo and only one of them fits. If there's still a scrap of the old spline in the chair, keep it. Matching a sample beats guessing from a chart, and you'll want the old cane as a colour reference anyway.
Everything a Pressed Cane Seat Actually Takes
Five things, and three of them are tools you'll keep. The webbing arrives stiff and smelling faintly of hay; half an hour in warm water turns it into something closer to wet fabric, and it stays workable for a good while after that. Soak it at least thirty minutes and up to four hours, and use plain tap water. The warm-water-and-glycerin trick you'll read about belongs to hand caning, where glycerin lubricates each strand sliding past the others; machine-woven sheet doesn't need it. Buy the sheet two inches past the groove on every side. The precision in this craft lives in the measuring rather than the cutting, which will feel familiar if you've done the kind of fine lattice work where a fraction of a millimetre shows.
Disclosure: This section may contain affiliate links to Amazon. We may earn a small commission from qualifying purchases at no extra cost to you.
01Pick 01 of 11
Pre-Woven Cane Webbing Sheet
Machine-woven sheet cane is the material that drops into the routed groove around a chair seat and gets locked down by a strip of spline. It arrives off the roll stiff as a doormat and has to be soaked before it will bend anywhere. Buy it two inches larger than the groove on all four sides, and match the hole pattern to what came out: the open hexagon weave is the standard seat material, while a dense close weave belongs on fancier frames.
Why we picked this exact one: The Juilsioa 18-inch natural rattan webbing is the straightforward pick here, because it's real cane rather than the PE plastic mesh that fills most of these search results. At 18 inches wide and 3.3 feet long it covers two average dining-chair seats with the two-inch margin you need on every side. It runs lighter than aged cane, so a repair on one chair of a matched set will read new for a season until it darkens.
Spline is the rounded reed strip that wedges in on top of the cane and holds the sheet under tension inside the groove. Its size is set by the width of the groove rather than by preference, and the common sizes sit close enough together that they're genuinely hard to tell apart by eye. Measure the groove, or pull out a scrap of the old spline and match that.
Why we picked this exact one: The Wesiti three-piece set covers 1/8, 3/16 and 1/4 inch grooves in a single order, which is the honest answer for anyone who hasn't measured yet and doesn't fancy waiting on a second delivery. Six feet of each is plenty for one seat with offcuts left over. The reed is rougher than what a dedicated supply house sells, so expect to dress a length with a block plane now and then.
A rubber-headed mallet drives spline down into the groove with enough force to seat it and not enough to bruise the wood around it. Weight matters more than brand: about a pound gives you a controlled tap instead of a bounce. A steel hammer doing the same job leaves little half-moon dents along the seat edge, and they show up the moment any finish goes on.
Why we picked this exact one: The GreatNeck 16-ounce rubber mallet is the plain, unglamorous choice: hardwood handle, non-marring head, the sort of tool that turns up in half the workshops doing this work. Sixteen ounces is heavy enough to seat spline in two or three taps rather than ten. The handle comes rough out of the box and is worth a minute with sandpaper.
Caning wedges are tapered wooden sticks used to ease wet webbing into the groove before the spline goes in. They're deliberately softer than the cane, so the edge bears on the material without cutting it. Angle the wedge so the pressure lands against the outer wall of the groove, and go round the seat in three passes instead of forcing one side down in a single go.
Why we picked this exact one: The Treela set gives you ten wedges at just under four inches, so a couple can stay sharp for the corners while the rest blunt down on the straights. Ten also allows for the two or three that will split, which is realistic rather than pessimistic. They arrive with square shoulders and want a few strokes of sandpaper before the first seat.
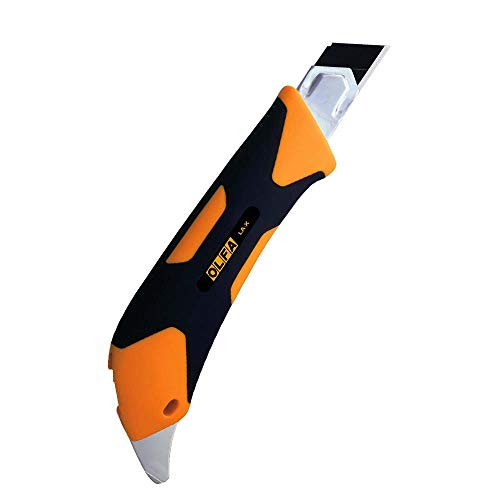
A sharp knife does two separate jobs on a caned seat: slicing the old spline free of the groove wall at the start, and trimming the new webbing flush at the end. Snap-off blades suit the work because the tip dulls fast against dried glue, and breaking off a segment is quicker than hunting for a replacement. A dull blade makes people push harder, and pushing harder is what breaks grooves.
Why we picked this exact one: The OLFA LA-X is an 18 mm heavy-duty knife with a fibreglass-reinforced body and an auto-lock, which counts for something when you're leaning on a blade a few inches from your own fingers. The wider 18 mm blade holds its edge longer through old glue than a slim craft blade does. It's heavier than a disposable box cutter, and some people find that tiring over a long trimming session.
With these five you can strip a dead seat, soak it, set it and spline it in an evening, though the first chair always runs long and it's almost always the old spline fighting you rather than the new one. Lay the wet cane in taut but relaxed, not drum-tight: it shrinks as it dries and does the tightening itself. Then leave the chair three days before anyone sits on it, so the cane, the spline and the glue in the groove are all properly dry. That patience with materials is the same habit that makes working with leather go well, and it's the thing beginners skip first.
When Your Chair Has Four Rails and No Groove
Rush is the other half of this craft and it shares almost nothing with caning but the chair. There's no sheet and no groove; you wrap a continuous twisted cord round four rails, corner after corner, and four triangles grow inward until they meet in the middle. Fiber rush, the twisted kraft paper most seats use, spread in the early 1900s as a cheaper stand-in for natural bulrush, which had to be cut, mellowed and hand-twisted before you could weave with it at all. The repetitive over-and-under rhythm will feel familiar to anyone who's spent an evening knotting cord into a wall hanging, except here the tension is doing structural work and your hands will tell you about it the next morning.
06Pick 06 of 11
Twisted Paper Fiber Rush Cord
Fiber rush is tightly twisted kraft paper sold as one continuous cord, and it's the material most rush seats made since the early 1900s actually use. It gets wrapped around the four seat rails in a pattern that builds four triangles meeting at the centre, working inward until the rails fill up. The 5/32 inch diameter is the usual starting size, and an average 13 by 13 inch seat takes around two pounds.
Why we picked this exact one: This VIRC coil in 5/32 kraft brown ships with the supplier's own instruction booklet, which is worth more than it sounds for a pattern that's genuinely hard to follow from photographs. V.I. Reed & Cane has been supplying seat weavers since 1981. The paper twist gives a uniform colour and diameter all the way along, unlike natural rush, which varies strand to strand even within one seat.
Rush weaving starts and finishes with the cord tacked to the inside face of a seat rail, where the fastening never shows. Cut tacks get used instead of staples because the wedge-shaped shank grips end grain in old softwood rails without splitting them. A pound is a lifetime supply for seat work, and most of the box will end up in other repairs around the house.
Why we picked this exact one: The Therwen #3 cut tacks are 3/8 inch and blued against rust, at roughly 900 to the pound, which is far more than one seat needs and still costs less than a small craft packet. Blued steel earns its keep on a chair that spends summers in a damp room. The heads are plain and flat rather than decorative, which is right for a surface nobody ever sees.
A tack hammer has a narrow head with one magnetised face that picks a tack up and holds it, so you can start the tack one-handed. On a chair seat you're often reaching under a rail at an awkward angle with nowhere to put a second hand. The light head also means a miss leaves a small dent rather than a crater.
Why we picked this exact one: The IVY Classic 15005 is a 5-ounce magnetic tack hammer on a contoured hickory handle, the shape upholsterers have been using for about a century. Five ounces is light enough for controlled taps in a confined space under a rail. The magnet grabs the blued steel tacks above happily but won't hold a brass or copper one.
A rush seat is woven by eye and drifts without you noticing: the four triangles creep out of alignment one round at a time until the centre sits off-axis. Laying a square across the weave every few rounds catches that drift while you can still pull it back. The sliding head also covers the ordinary measuring in this work, from groove widths to webbing margins.
Why we picked this exact one: The Arrow 12-inch combination square pairs a stainless rule with a cast head and a bubble level, at roughly the price of a decent tape measure. The head locks positively, which is the one thing that actually matters in a square at this end of the market. It's no machinist's reference square, so don't take it to an argument about thousandths.
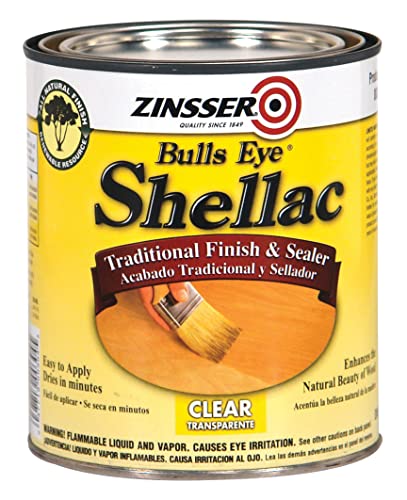
Two thin coats of shellac over a finished fiber rush seat seal the paper against moisture and handling, and leave a low sheen in place of a papery matte. Shellac gets used here rather than a modern varnish because it stays reversible, so a later repairer can take it off again. It dries quickly enough that two coats fit comfortably into one afternoon.
Why we picked this exact one: Zinsser Clear Shellac in a quart is the ordinary workshop choice: thin enough to brush straight from the tin and quick enough that you aren't waiting overnight between coats. Clear keeps the kraft brown where it is, where an amber cut would push the seat orange. A quart is far more than one chair needs, which is either good value or a cupboard problem depending on how many chairs you own.
One thing to get right before you start: as the rails fill, stuff cardboard triangles into the four pockets, top and bottom. Round dowel rails take about three layers per pocket, flat rails often need only one, and rasping the sharp edges off the rails first stops them sawing through the strands. Skip the stuffing and the seat sags into the hollow and the cord breaks where it bends. It's a repair-rather-than-replace instinct, the same one behind patching jeans so the mend shows, and it's what makes a rush seat last decades instead of a year.
One Book Worth Having on the Bench
Most of what's online about caning covers the groove method and stops, because that's the one that photographs well in eight steps. A book earns its place the moment you hit a chair that isn't square, a corner that won't take the spline, or a rush pattern that's drifted. Buy it before the first seat rather than after, the way you would with any craft where the sequence of steps is the whole skill.
11Pick 11 of 11Book worth reading
Chair Caning and Seat Weaving Handbook
This is a method book rather than a project book: it works through the main seat-weaving techniques with step-by-step drawings, covering pre-woven webbing, hand caning hole to hole, and rush. Drawings suit this craft better than photographs, because what you need to see is where a strand goes next, not what the finished thing looks like. It's a reference to keep open on the bench with wet hands.
Why we picked this exact one: The Chair Caning & Seat Weaving Handbook, written by Skills Institute Press for Fox Chapel, costs about what a coil of spline does and still covers cane, rush and tape in one volume, which is unusual at this price. Practitioners generally point beginners at The Caner's Handbook by Bruce Miller and Jim Widess as the deeper reference, but that one drifts in and out of stock and costs three times as much. This paperback is thin on the rarer weaves, which is a fair trade for a first chair.
Keep it somewhere it can get splashed, because it will. The pages you use most are the ones you reach for with wet hands halfway through a seat.
What Nobody Mentions Until the Cane Is Already Wet
My chair has drilled holes, not a groove. Can I just rout one in?
People ask because the pre-woven method is so much faster, and a router makes it look like a ten-minute problem. It isn't. Cutting a groove through a hole-drilled seat rail removes the original structure and wrecks whatever the chair was worth, and restorers treat it as straightforward vandalism, not a shortcut. The holes are there because the chair was built to be woven strand by strand. Either learn hand caning for that chair, or leave it alone and find a groove-style chair to practise on first.
I pulled the new seat drum-tight and it still came out saggy. Or it split. Why?
The instinct is that tight now means tight later, so beginners stretch the wet webbing as hard as they dare. Cane does the opposite of what that assumes: it shrinks as it dries, so a sheet installed drum-tight keeps contracting and ends up straining the strands and the spline, which is how a brand-new seat pops or splits the groove within weeks. Lay it in taut but relaxed, press it home with wedges in three passes around the seat rather than one, and let drying do the tensioning.
What glue goes in the groove?
Whatever's on the shelf, usually, which means yellow carpenter's glue. That's the one choice here you can't undo. Yellow wood glue and superglue don't release, so the next person to recane the chair, quite possibly you in fifteen years, has to chisel a hardened groove out and will break the edge doing it. Use a white water-soluble glue, hide glue or fish glue, a thin bead run into the groove on top of the seated cane, and wipe the squeeze-out with a warm wet rag before it sets.
Do I soak fiber rush the way I soak cane?
No, and this one catches almost everyone, because it's reasonable to assume all seat materials want a bath. Fiber rush is twisted paper. Soak it and the twist unwinds, the fibres go mushy, and the damage shows on the top surface where you can't hide it. A light dampening is the most it wants, and plenty of weavers work it essentially dry. Real bulrush and pre-twisted rush cord are the ones that genuinely need wetting and mellowing first.
Why can't anyone sit on it the same evening?
Because two separate things are still wet: the water in the cane and the glue in the groove. Sitting on a seat that hasn't dried pulls the half-set spline up out of its bed, and once it lifts it never goes back cleanly. Give a pressed cane seat at least three days before it takes weight. A shellacked rush seat wants its coats properly hard too, which is less about strength than about not printing the weave of your trousers into the finish.
People Worth Following Into This Hobby
Real practitioners we found while researching this setup — people who do the work, show their process, and publish on sites they run themselves. No sponsorships, no affiliations; we just think they're worth your time.
Brandy Clements and Dave Klingler run a chair caning school, restoration shop and free chair museum in Weaverville, North Carolina, and teach pressed and laced caning to students who bring their own chairs.
Their classes FAQ walks through how to choose a chair for a pressed-caning class versus a laced-caning class, which is exactly the groove-versus-drilled-holes decision this setup asks you to make before you buy anything.
A Raleigh furniture restoration shop that documents its own repairs, including woven chair seats in cane, rush, reed and Shaker tape, with before-and-after photographs of the actual chairs.
Their woven-seat article is the clearest side-by-side of hand-woven cane, pressed mat cane and rush, so a reader who still isn't sure which seat is sitting in their hallway can settle it there before ordering webbing.
Fifty years of seat weaving and wicker restoration, now published as a free article library on chair caning, rush, splint and wicker, including the mistakes she made learning each one.
Her cane webbing walkthrough is the step-by-step behind the five essentials on this page, right down to the soak time, which side faces up and the warning about trimming on the wrong edge of the groove.
A family workshop in Dorset with more than thirty years of seat weaving for private clients, museums, stately homes and the National Trust, working in cane, rush, Danish cord and seagrass.
They weave paper fibre rush commercially and explain plainly why it only needs a light dampening while real rush has to be wetted, mellowed and hand-twisted, which is the distinction behind this page's rush section.
Love what you see here? Save individual picks with on any item, or copy everything to a list of your own in one click — great for coming back to later, or dropping as a not-so-subtle hint.