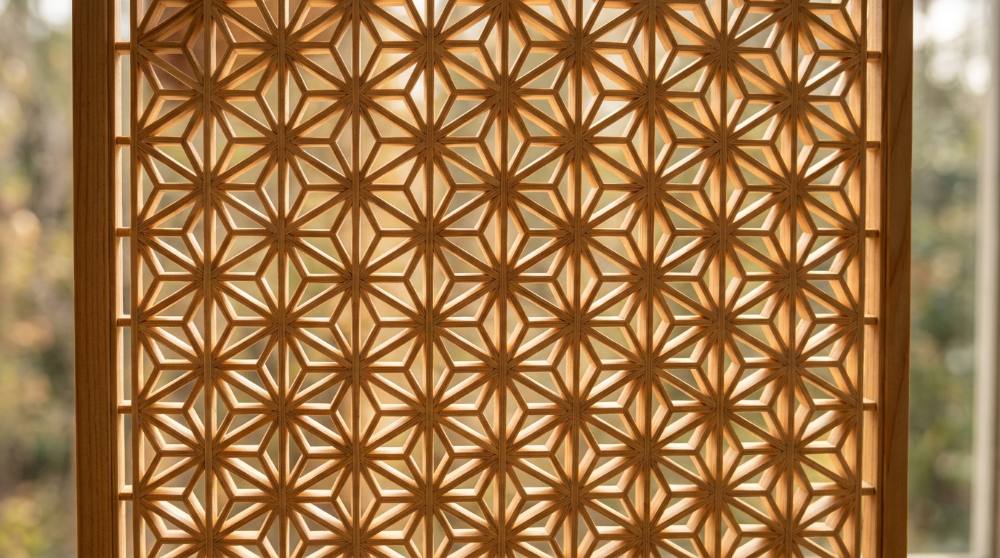
Kumiko is the Japanese craft of notching thin wood strips into a grid, then wedging dozens of tiny angled slivers into the openings until a geometric pattern appears. You've probably walked past it without noticing. It fills the sliding shoji doors, transom panels and folding screens of traditional Japanese rooms, and it has done so for centuries. Here's the part nobody expects: the technique isn't originally Japanese at all, but arrived about 1,400 years ago from the Korean kingdom of Baekje along with Buddhist temple builders and their tools. The hemp-leaf pattern almost everyone starts with has been in use since the Heian period, a thousand years before anyone thought to sell a jig for it.
The gap between how hard kumiko looks and how hard it actually is might be the widest in woodworking. The joinery idea is almost embarrassingly simple: cut a notch halfway through each strip, cross them, and the grid holds itself. The infill pieces are just short sticks with angles pared onto their ends. What's genuinely hard is doing that two hundred times to the same tolerance, which is why this craft rewards patience far more than talent, and worth knowing if you're still weighing up which craft to take up first.
Our take: buy the fewest things that let you finish one coaster-sized panel. An angle jig, a fine pull saw, two chisels and a bundle of basswood strips will get you there. Everything else can wait until you've actually wedged a pattern together and decided you want more of it.
We kept the list cheap on purpose, so that walking away after one panel costs you an afternoon and not much else.
Where This Little Kit Can Take You
A few real moments and results from this hobby — made with tools no fancier than the ones below.
Light caught in a hemp-leaf latticeEach six-pointed star is six separate slivers, wedged in by friction alone.
A lattice screen at a sunlit windowHalf the work a finished panel does is the shadow it throws on the wall behind it.
Start with a coaster. A four-inch panel teaches every move a full screen needs, and when you botch one you've wasted a few cents of basswood rather than a weekend. That ratio of quiet effort to visible payoff is exactly what makes kumiko worth a look when you're picking a craft to start as an adult.
The Five Things Between You and a First Panel
Here's the slightly annoying truth about kumiko: you can't fudge any of these five. Skip the jig and your angles wander, and a wandering angle means the infill piece either falls straight out or splits the grid when you push it home. Skip the right wood and the chisel tears where it should slice. I'd rather say that now than have you buy a twelve-inch combination square and wonder why nothing seats. The good news is that the list genuinely stops at five.
Disclosure: This section may contain affiliate links to Amazon and eBay. We may earn a small commission from qualifying purchases at no extra cost to you. Product listings from eBay are provided for discovery purposes and link directly to eBay.
01Pick 01 of 16
Kumiko Joinery Angle Guide Jigs
An angle guide jig is a set of blocks with faces cut at the angles kumiko patterns need, usually 45, 22.5 and 67.5 degrees for square grids and 30 and 60 for diamond ones. You clamp the block down, drop a strip into its channel against an adjustable stop, then pare the end until the chisel rides flat on the block's face. Look for a set whose stops actually lock, because the stop is what makes every piece come out the same length.
Why we picked this exact one: The Tordale four-piece kumiko joinery jig set covers the common square-grid and diamond angles in one box, which is the cheapest honest way in short of cutting your own blocks from scrap hardwood. It is moulded plastic rather than machined metal, so keep the chisel edge off the corners and treat the faces gently. Every Amazon listing for these jigs is currently low-stock, so this eBay seller with a visible sales history and 100% positive feedback is the steadier buy.
A dozuki is a Japanese back saw with a stiffening spine along the top and a very thin blade that cuts on the pull stroke rather than the push. The thin kerf matters here because the half-lap notch has to match the thickness of the strip that crosses it, and a thick Western kerf leaves the joint loose from the first cut. Replaceable-blade models are worth preferring, since nobody sharpens teeth this fine.
Why we picked this exact one: The Gyokucho 770-3500 Razor Dozuki is a long-standing favourite for fine joinery, and its blade is only 0.3 mm thick. Replacement blades cost a few dollars, which is the point of the design: you snap the worn one off and clip a fresh one on. The handle is a plain rattan-wrapped stick with no shaping to it, which looks spartan next to a Western backsaw.
The notch in a kumiko grid bar is only as wide as the strip crossing it, which on standard stock is an eighth of an inch. Clearing waste from a slot that narrow needs a chisel that fits inside it, so 3 mm is the working width. Japanese bench chisels of this size have a hollow-ground back, which makes them quick to keep flat on a stone.
Why we picked this exact one: The KAKURI 1/8 in. (3mm) Oire Nomi is a laminated yellow-steel chisel priced close to a hardware-store blade, in exactly the width the half-lap needs. Its 4.3-star average sits below the tidy Western sets, mostly from buyers surprised that a Japanese chisel arrives unsharpened and wants its back flattened before first use. Do that once and it holds an edge through a whole panel.
Once the grid is assembled, every infill piece gets its ends pared to an angle while the blade rides on a guide block. That job wants a chisel wider than the strip being cut, so the edge can sit flat on the block and leave one clean facet rather than a stepped one. A set spanning roughly a quarter inch to an inch covers kumiko and most joinery you drift into afterwards.
Why we picked this exact one: The Narex four-piece bevel-edge set runs 6, 12, 20 and 26 mm in Cr-Mn steel, and the 12 mm is the one that will live in your hand for kumiko. These arrive with a usable but unpolished edge, so budget half an hour on a stone before the first panel. The handles are plain turned wood with no lacquer, which some people refinish and most simply use.
Kumiko strips are usually an eighth of an inch thick and half an inch wide, which gives a grid bar deep enough to take a half-lap and thin enough to still look delicate. Basswood is the standard choice because it has almost no visible grain lines, a consistent pale colour, and enough give to compress slightly into a tight joint. Buying strips already milled to section skips the hardest part of the job.
Why we picked this exact one: These Manchester Wood Works basswood strips come ten to a bundle at 1/8 by 1/2 by 22 inches, which is the section practitioners actually work in. The seller has shipped hundreds of these bundles and has held 99.8% positive feedback on eBay since 2004, which matters for a listing you will want to reorder. No Amazon listing carries this section in stock, so the plain eBay item is the buy.
Buy these five and you can make a panel tonight. Well, an evening, realistically, and a good chunk of it will go on recutting infill pieces you pared a hair too short. It stops being the main activity faster than you'd think. If what appeals here is precision hand tools rather than the Japanese pattern specifically, the same slow patience pays off in cutting and stitching leather by hand.
Picking a Pattern, and What Each One Costs You
There are hundreds of named kumiko patterns, and they fall into two families: those built on a square grid and those built on a hexagonal or diamond one. Asanoha, the hemp leaf, is where nearly everyone begins, and it lives on a square grid using 45, 22.5 and 67.5 degree ends. Go hexagonal and you're into 30 and 60 degrees, a grid that is fiddlier to assemble but, oddly, quicker to fill with the same pattern. That pull of repeating one motif until a whole surface comes alive is the thing that hooks people on stamping carved blocks across fabric, except here the repetition is holding the piece together.
06Pick 06 of 16
Digital Angle Finder Protractor
A digital protractor reads the angle between two arms and shows it on a small screen. In kumiko it earns its place the moment you want a pattern your bought jig does not cover, because you can set a bevel, check the number, and cut a new guide block from scrap hardwood. Pick one that locks, so the reading does not drift while you carry it to the wood.
Why we picked this exact one: The GemRed 82305 is a stainless protractor and ruler in one, accurate to about three tenths of a degree, which is far finer than the guide block it helps you cut. It is battery-powered and the display sleeps on its own, so you will occasionally wake it mid-measurement and lose a reading. It costs less than most single chisels, which makes it easy to own before you strictly need it.
A mini miter box is a slotted block that holds a thin strip and guides a saw through it at a fixed angle. Paired with an ultra-fine razor saw it gives square and mitred ends that come out the same every time, in stock up to about a quarter inch thick. It is a volume tool, useful from the moment a pattern asks you to cut the same short piece fifty times.
Why we picked this exact one: The Zona 35-251 pairs a 32 TPI razor saw with a miter box rated for stock a quarter inch and under, which is exactly where kumiko strips sit. The box is plastic and its slots widen with use, so treat it as a consumable rather than a lifetime tool. Its 4.3-star rating comes mostly from modellers doing the same kind of repetitive small cuts.
Shoji paper is the thin washi sheet used behind lattice in Japanese doors and screens. Backing a kumiko panel with it turns an open grid into a glowing surface: light spreads evenly and the pattern reads as a silhouette instead of a set of holes. It goes on with a very thin layer of glue and gets trimmed flush with a fresh blade once dry.
Why we picked this exact one: The ONAO natural white roll is Japanese-made shoji gami 11 inches wide, enough to back a stack of coaster and box-lid panels. It is genuinely thin, and a wet paste will wrinkle it, which is why most makers roll a very thin smear of ordinary wood glue onto the frame instead. Its 4.3-star average mostly reflects people repairing real shoji doors rather than making panels.
A light pad is a thin, evenly lit panel originally made for tracing. Under a kumiko panel it does two jobs: while you are still dry-fitting it turns every gap and unseated joint into a bright line, and once you are finished it lights the piece from behind the way a shoji door would. An A4 size is big enough for coasters, box lids and small framed panels.
Why we picked this exact one: The LitEnergy A4 copy board is about 5 mm thick with stepless dimming, and sits under a coaster-sized panel with room to spare. Brightness is set by holding a touch pad rather than turning a dial, which is fiddly, and the USB cable is short enough that you will want your own. Its 4.5-star average comes from a very large pool of tracing and craft users, not from anyone doing kumiko.
Pattern choice is really a time choice. A square-grid asanoha coaster is a few dozen pieces; a big hexagonal panel runs into the hundreds, and people do fit more than three hundred of them into something that sits in your palm. Start square, finish something, then get ambitious. Anyone who has carved a block and pulled the same motif across a sheet already knows the feeling, and the carve-once-print-forever logic of linocut is the same instinct with a gouge instead of a chisel.
What to Add Once the First Panel Is Done
None of this will make your first panel better. It makes your tenth one faster and a lot less annoying. The order matters, though, and sharpening comes first: a dull chisel in basswood doesn't cut, it crushes, and you can hear the difference across the room. A sharp blade leaves a dry whisper. A dull one makes a sound like tearing damp cardboard, and leaves an end that looks furry under the light. Most people buy a stone much later than they should have.
10Pick 10 of 16
Combination Water Sharpening Stone
A combination water stone has a coarser side for reshaping an edge and a finer side for polishing it. For kumiko the fine side does most of the work, because you are touching up a chisel that is still nearly sharp rather than repairing damage. Soak it, flatten the back of the blade first, then work the bevel, keeping the surface wet throughout.
Why we picked this exact one: The Sharp Pebble 1000/6000 combination stone ships with an angle guide and a non-slip bamboo base, which removes the two things that put beginners off sharpening entirely. Its 4.6-star average comes largely from kitchen-knife owners, so read the instructions with that in mind: a chisel back has to be flattened on the coarse side first, which knife guides rarely mention. Like any water stone it will dish with use and need flattening.
A double square is a short hardened blade that slides through a stock and locks at any length against a true right angle. In kumiko it sets where each half-lap goes and checks that the notch walls are square to the face. The small size is deliberate, since a twelve-inch combination square is unwieldy over a half-inch strip.
Why we picked this exact one: The iGaging 4 in. precision double square is the usual small-shop answer when a Starrett costs several times as much, with a satin chrome blade graduated to 64ths. The locking knob is the weak point and can work loose, so check it before trusting a setting. Nearly 900 reviews put it at 4.4 stars.
A marking knife severs the wood fibres along a layout line rather than darkening them the way a pencil does. On a half-inch strip the width of a pencil line is a meaningful fraction of the joint, and a knifed line does double duty: the saw or chisel drops straight into the groove it leaves. A double bevel lets you work against a square from either side.
Why we picked this exact one: The Big Horn 19061 is a small rosewood-handled double-bevel marking knife priced about the same as a decent pencil set, which is why it turns up in so many first tool rolls. The blade arrives sharpened but not polished, so it benefits from a minute on the stone. Nearly two thousand reviews sit at 4.6 stars.
Small quick-release bar clamps squeeze with a trigger and let go with a lever, so you can reposition work without setting a tool down. In kumiko they hold the guide block to the bench and keep a panel flat while glue dries. Four is the useful minimum, because you often want two on a jig and two on a panel at once.
Why we picked this exact one: The IRWIN Quick-Grip mini bar clamps come four to a pack at six inches with non-marring pads, the size that fits around a guide block without fouling the chisel. The resin bodies flex if you really lean on the trigger, so treat them as positioning clamps rather than glue-up clamps. They have been rated 4.8 stars across tens of thousands of purchases.
This is the same working width as a basic narrow chisel, built to a higher specification: a cryogenically treated chrome-vanadium blade, thinner side lands and a finer grind. The practical result is an edge that stays usable longer before it wants the stone again. At this width the blade is delicate, so it is a paring and clearing tool rather than something to strike hard.
Why we picked this exact one: The Narex Richter 1/8 in. is the step up from the budget 3 mm chisel in the essentials, hardened to HRc 62 where the standard Narex bench chisels reach 59. It is worth buying once you have finished a few panels and noticed how often you are sharpening, and not before, because a cheap chisel kept sharp cuts exactly as well as an expensive one that is dull. The thin side lands reach into a notch corner more easily, and it costs roughly half again what the basic chisel does.
None of it is urgent. If you find yourself back at the stone every ten pieces, that's the signal to upgrade steel; if your notches keep coming out a touch off square, that's the signal to buy the square. And if you like working wood but want something that finishes in an hour rather than an evening, burning a design into a blank scratches a surprisingly similar itch.
Sharp, Small, and Pointed at Your Thumb
Kumiko isn't a dangerous craft, but it has an unusual risk shape. The pieces are tiny, the blades are very sharp, and the cutting direction is almost always toward the hand holding the work. The usual workshop line is that dull tools cause the injuries. Here it runs the other way: a properly sharpened chisel goes through a 3 mm sliver of basswood with so little resistance that it is still moving when the wood runs out.
Three habits cover nearly all of it. Clamp the guide block and clamp the work, so that neither hand is doing the holding. Keep both hands behind the edge, which with a short strip usually means letting a stop, not your thumb, decide where the piece stops. And lay the chisel flat on the bench rather than standing it in a jar, because a 3 mm blade is almost invisible point-up.
The other thing worth saying plainly is that sharpening is a safety job, not a performance one. A dull chisel needs force, force slips, and a slip with a sharp tool is a thin clean cut while a slip with a forced one is something you remember.
Two Books Worth Owning Before the Fifth Panel
Kumiko is one of the few crafts where a book beats a video, because the thing you most need is the pattern geometry: which angle goes where, and how long each infill piece has to be for a given grid spacing. That's a drawing, not a demonstration. Both of these come up whenever people who actually make this stuff are asked what to read.
15Pick 15 of 16Book worth reading
Kumiko Panel Making Guide
A project-led introduction that works through ten patterns in rising order of difficulty, giving the jigs, angles and piece lengths for each. It assumes a bench and basic hand tools but no prior knowledge of Japanese joinery. Cutting diagrams for several finished wall panels are included at the back.
Why we picked this exact one: Matt Kenney's The Art of Kumiko is the title that comes up most often when someone asks where to start, and its method deliberately mixes machine accuracy for the grid with hand work for the infill. It is a modest paperback rather than an encyclopaedia, so treat it as a course you work through rather than a reference you keep dipping into. Its 4.7-star average comes from more than six hundred readers.
The first volume of a four-book series covering shoji construction and the lattice patterns that fill it, worked entirely with hand tools. It builds three screens of increasing complexity with step-by-step diagrams and photographs. Later volumes move on to hexagonal and diamond pattern families.
Why we picked this exact one: Desmond King's Shoji and Kumiko Design: Book 1 is the hand-tool counterpart to the machine-leaning guides, which makes it the better buy if there is no table saw in your life. It is self-published and the layout is plain, so judge it on the drawings rather than the design. Nearly three hundred readers rate it 4.6 stars.
Between them these two cover the two routes into the craft, one assuming a small machine shop and the other assuming a bench and a sharp chisel. If you only buy one, buy the one that matches the tools already sitting on your bench.
Why Won't My Pieces Stay In?
My infill pieces keep falling out of the grid. What am I doing wrong?
Almost always they're a fraction too short. Beginners pare the angled ends cautiously, checking the fit after each pass, and one pass too many drops the piece below the length that wedges. A piece that's slightly long can be shaved down; a short one is firewood. The fix is to set the adjustable stop on your guide block and let that, rather than your eye, decide when to stop paring, and to cut a few spare strips for every pattern because you will lose some.
Is kumiko really glue-free, or is everyone quietly gluing?
Both, honestly. The joinery genuinely holds by friction: the half-laps lock the grid and the angled infill pieces wedge into their openings with nothing else involved. But most makers do put a tiny dab of wood glue on the half-laps and the pared ends once they're happy with the dry fit, especially if the panel will become a box lid or a cabinet door that gets handled. Dry-fit the whole thing first either way, because glue in a joint you haven't tested is how you find out a piece was wrong.
Why does my chisel tear the wood instead of slicing it?
Two causes, and they're easy to tell apart. If the cut surface looks furry, the edge is dull: basswood is soft enough that a blunt blade crushes fibres rather than severing them, and you'll feel the extra push in your wrist. If instead the wood splits away ahead of the edge, you're cutting against the grain direction on that particular piece. Turn the strip end for end and try again before blaming the tool.
Can I just use pine or balsa instead of basswood?
Pine will fight you and balsa will crumble. Basswood is standard for three specific reasons: almost no visible grain lines to compete with the pattern, a consistent pale colour, and enough softness to compress a little into a tight joint without being so soft that it tears. White pine tears out at exactly the scale kumiko works at, and balsa is too weak to hold a half-lap under any pressure. Lime, which is what the same wood is called outside North America, works identically.
How accurate do my cuts actually have to be?
More accurate than feels reasonable, and that, rather than any particular skill, is the real difficulty of the craft. Makers talk about holding strip thickness to within about five hundredths of a millimetre, and the traditional description is that a deviation the thickness of a sheet of paper will show in the finished panel. That sounds intimidating, but in practice it means one thing: use a stop or a jig for anything you do more than twice, and never measure the same dimension two different ways.
People Worth Following Into This Hobby
Real practitioners we found while researching this setup — people who do the work, show their process, and publish on sites they run themselves. No sponsorships, no affiliations; we just think they're worth your time.
Makes kumiko panels and small boxes in a one-person shop and writes down exactly why he uses basswood and nothing else.
His getting-started post answers the two questions this setup leans on hardest: why basswood rather than pine or maple, and why a chisel plus guide blocks beats buying a specialised kumiko plane.
Teaches kumiko classes, makes jigs for it, and publishes a growing illustrated library of square and hexagonal patterns as a free PDF.
The specialty section here is about choosing a first pattern, and his pattern library is the clearest place to see what each square and hexagonal family actually looks like before committing a weekend to one.
A London not-for-profit documenting traditional Japanese carpentry, its masters, tools and techniques, and pointing people towards courses in the UK and Japan.
Their kumiko page names the two broad families a beginner has to choose between, hishi and koshi, and puts a number on the accuracy question the FAQ here ends on.
Writes long first-hand posts about making things, including a beginner kumiko class where her first infill pieces came out too short and fell straight out of the panel.
Her account is the closest thing to watching someone else's first panel go wrong, which is exactly the mistake the FAQ here opens with.
Love what you see here? Save individual picks with on any item, or copy everything to a list of your own in one click — great for coming back to later, or dropping as a not-so-subtle hint.
Disclosure: This section may contain affiliate links to Amazon and eBay. We may earn a small commission from qualifying purchases at no extra cost to you. Product listings from eBay are provided for discovery purposes and link directly to eBay.
Your next hobby might be in here
Every so often I stumble on a hobby too good not to share. Get new hobby setups and guides by email — no spam, unsubscribe anytime.