Make Your Own Christmas Cards: Stamping, Embossing, Dies

Make Your Own Christmas Cards: Stamping, Embossing, Dies

DariaCurated by Daria
Jump to the 14 picks

Powder, Heat and One Very Smug Wreath

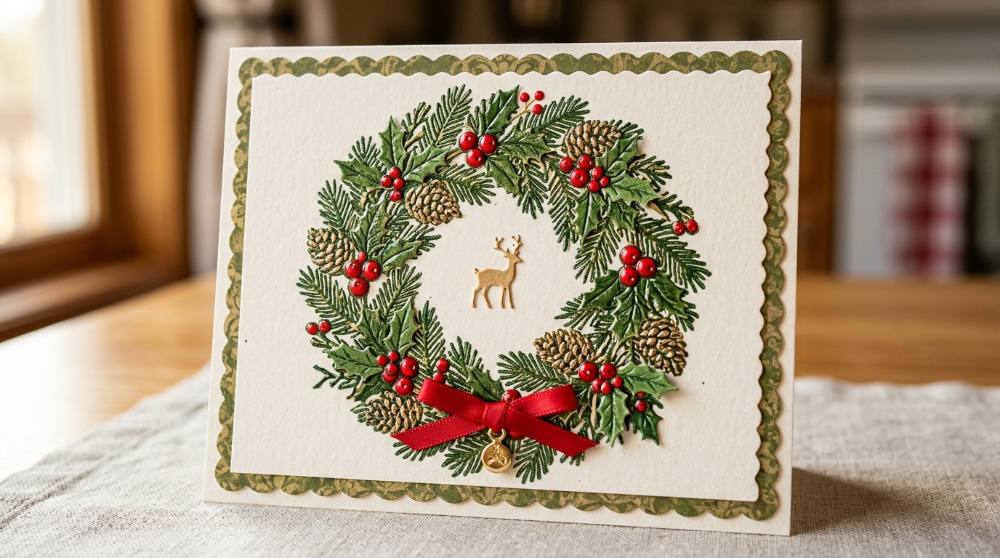
Stamp a wreath in sticky ink, pour on a spoonful of what looks like fine sugar, then hit it with hot air: the powder melts into a raised, glassy line you can feel with a fingertip. That powder is plastic resin. It's the same trick commercial printers use for raised lettering on stationery. People do this at kitchen tables, at weekend stamping retreats and in craft-store classes, often making a whole batch in one sitting. The habit's older than it looks, too. The first known Christmas card was made by hand in 1611, a greeting to King James I laid out in the shape of a rose, long before printed cards went on sale in London in 1843.

This isn't pen lettering or carving. The block printing setup is about cutting your own design into a block; here the design comes ready-made on a clear stamp, and your job is inking, layering and melting. Most beginners think the stamp set is the big decision. It isn't. Paper and ink decide how a stamped image looks far more than the design does, and cheap versions of both show it straight away as blotchy solids and fuzzy edges.

Start small. One Christmas stamp set, a block to hold it, a good black ink pad, heavy white cardstock and a tape runner will make a real card tonight. The heat tool and the die machine can wait until you know you're hooked.

The first kit is deliberately cheap, the kind of spend you won't mind if the hobby only lasts one December.

One warning before you shop: this hobby breeds stamps. Longtime stampers keep telling newcomers to buy a set or two they truly love and use them hard before buying more. If you end up enjoying the words more than the pictures, hand lettering is a lovely companion skill for the greeting inside.

Five Things That Make a Real Card Tonight

Clear stamps are the friendly way in. You press the tacky sheet onto a clear acrylic block and can see exactly where the wreath will land, which takes a lot of the guesswork out of a first card. Ask a room of longtime stampers what to buy first and "a good black ink" comes up before almost anything else. I'd put the ink and the paper ahead of a second stamp set every time. If you'd rather write the greeting yourself, the brush calligraphy starter kit pairs beautifully with a stamped front.

Disclosure: This section may contain affiliate links to Amazon. We may earn a small commission from qualifying purchases at no extra cost to you.
Clear Christmas stamp set with holiday images and greetings

Pick 01 of 14

Clear Christmas stamp set with holiday images and greetings

Clear stamps are thin, slightly tacky photopolymer designs that cling to an acrylic block, so you can see exactly where the image will land on the card. A Christmas set with both pictures and greetings lets one purchase cover the front design and the words. Look for crisp, clean lines on the sheet and a mix of small and medium images you can combine.

Why we picked this exact one: We picked the Kesoto six-sheet Clear Christmas Stamps set because it bundles festive images and greetings in one pack for under ten dollars. It holds a 4.6-star rating across nearly 500 reviews. Budget clear stamps can be a little less crisp than boutique brands on large solid areas, but for outline images and greetings they're a sensible place to learn before spending more.

See it on Amazon
Acrylic stamping blocks in assorted sizes for clear stamps

Pick 02 of 14

Acrylic stamping blocks in assorted sizes for clear stamps

Acrylic blocks are clear, rigid handles that clear stamps stick to while you ink and press them. A set in several sizes lets you match the block to the stamp, which gives more even pressure than a block that is much bigger than the image. Grid lines on one face help you line up greetings straight.

Why we picked this exact one: The Whaline six-piece Acrylic Stamp Block set covers everything from a tiny greeting to a long border in one pack. Its 4.7-star rating comes from more than 5,000 reviewers. The blocks are plain acrylic with no grip or bevel, so they feel a bit basic, but they're thick, clear and cheap enough to own every size.

See it on Amazon
Crisp black pigment ink pad for stamped images and greetings

Pick 03 of 14

Crisp black pigment ink pad for stamped images and greetings

A black pigment ink pad lays down a dense, sharp outline that shows off fine detail in stamped images and small lettering. Pigment ink sits on top of smooth cardstock rather than soaking in, which keeps edges crisp. Choose a full-size pad so larger stamps can be inked in one go.

Why we picked this exact one: The Tsukineko VersaFine Clair pad in Nocturne is a pigment black made for picking up fine detail. It carries a 4.8-star rating from over 4,500 reviews. It costs more than a craft-store generic, but a good black is the one ink worth paying a little extra for.

See it on Amazon
Smooth heavyweight white cardstock for sturdy card bases

Pick 04 of 14

Smooth heavyweight white cardstock for sturdy card bases

Heavy cover-weight cardstock around 100 lb holds a crisp fold and lets a finished card stand up on a shelf without sagging. A smooth surface matters for stamping, because textured or linen finishes leave solid stamped areas patchy. A ream of 200 letter-size sheets makes 400 standard A2 card bases when each sheet is cut in half and folded.

Why we picked this exact one: We chose Accent Opaque 100 lb White cardstock for its smooth, bright finish at a far lower per-sheet price than boutique card-making paper. It holds a 4.7-star rating from more than 1,800 reviewers. It's a single weight, so for thinner layering panels you may eventually want an 80 lb pack as well.

See it on Amazon
Permanent tape runner for layering stamped panels

Pick 05 of 14

Permanent tape runner for layering stamped panels

A tape runner rolls a thin line of double-sided adhesive straight onto paper, with no drying time and no wrinkling the way wet glue can cause. It is how stamped panels get fixed flat onto card bases and mats. Pick a permanent, refillable one so the cost per card stays low.

Why we picked this exact one: The Tombow MONO Permanent Adhesive Applicator bonds instantly and takes snap-in refill cartridges. It has a 4.7-star rating from nearly 8,000 reviews. The starter cartridge doesn't last long once you're making cards in batches, so plan on buying refills.

See it on Amazon

With these five you can fold a card base, stamp a wreath and a greeting, and tape a stamped panel on top. Cut a letter-size sheet in half and fold each piece, and you've got two A2 card bases, the size standard A2 envelopes are made for. Score the fold line first and it snaps shut with a satisfying crisp edge. Once plain white feels safe, a hand-made sheet from the paper marbling setup makes a gorgeous background panel.

The Heat Gun Moment, Plus a Few Friends

Heat embossing is the bit that makes people gasp at the craft table. You stamp in slow-drying clear ink, pour powder over it and tip the excess back into the jar. Then you heat. The dull grains suddenly go liquid and shiny, and it never really gets old. A hair dryer won't do it, by the way: it isn't hot enough, and it blows loose powder all over the table.

The trimmer sits here too, though it's usually the first thing people buy once the basic kit is getting used. Scissors wander on heavy cardstock. A crooked panel is obvious once it's framed on a card base.

Sliding-blade paper trimmer for square card panels

Pick 06 of 14

Sliding-blade paper trimmer for square card panels

A paper trimmer holds cardstock against a straight rail while a blade slides across it, giving square edges that scissors can't match on heavy stock. A grid and ruler on the base make it quick to cut matching panels in batches. A 12-inch cut length handles letter-size sheets in both directions.

Why we picked this exact one: The Fiskars Recycled SureCut Portable Paper Cutter uses a wire cut-line that shows exactly where the blade will run. It carries a 4.6-star rating from about 3,800 reviews. It's a lightweight portable trimmer, so it cuts cardstock one sheet at a time rather than a thick stack.

See it on Amazon
Mini craft heat tool for melting embossing powder

Pick 07 of 14

Mini craft heat tool for melting embossing powder

A craft heat tool blows a narrow stream of very hot air at low speed, enough to melt embossing powder without scattering it the way a hair dryer would. A compact body with a built-in stand is easy to set down safely between cards. A long cord gives you room to work across the table.

Why we picked this exact one: The Homidic 300W Mini Heat Gun holds a 4.6-star rating from over 14,000 reviews. It has a single heat setting, which keeps things simple for a beginner. The trade-off is that you can't turn it down for gentler jobs like drying ink.

See it on Amazon
Clear sticky embossing ink pad for heat embossing

Pick 08 of 14

Clear sticky embossing ink pad for heat embossing

Embossing ink is a slow-drying, nearly clear ink that stays tacky long enough for embossing powder to stick to the stamped image. Stamped on its own, it also leaves a subtle tone-on-tone watermark on colored cardstock. A full-size pad fits most Christmas stamps.

Why we picked this exact one: The Tsukineko VersaMark Watermark pad is the embossing ink card makers mention again and again. It holds a 4.8-star rating from nearly 5,700 reviews. Because the ink is clear, it can be tricky to see which parts of the stamp you've inked, so check the stamp in the light before pressing.

See it on Amazon
Clear embossing powder for glossy raised images

Pick 09 of 14

Clear embossing powder for glossy raised images

Embossing powder is fine plastic granules that melt under a heat tool into a raised, glossy coating over wet stamped ink. Clear powder takes on whatever color is beneath it, so it works over black ink, colored ink or a watermark stamp. Keep the jar lidded and pour excess back in to waste very little.

Why we picked this exact one: We chose Ranger Clear Embossing Powder because it melts smoothly and comes from a well-established stamping supply brand. It has a 4.7-star rating from over 350 reviews. It's a regular grain, so very small greeting fonts will look sharper with a super-fine powder later on.

See it on Amazon
Double-sided foam squares for popping up card layers

Pick 10 of 14

Double-sided foam squares for popping up card layers

Foam squares are small double-sided adhesive pads with a spongy middle that lift a panel or die cut off the card surface. That lift creates a shadow and a sense of depth that flat adhesive can't. Two sizes let you use tiny squares behind small greetings and larger ones behind panels.

Why we picked this exact one: The Outus two-size Foam Squares pack gives you 1,320 pads across eight sheets for a few dollars. It carries a 4.7-star rating from about 1,600 reviews. The foam is fairly thick, so a card with several popped layers needs a slightly larger envelope or a gentle hand in the mail.

See it on Amazon

Foam squares are the cheapest way to make a card look expensive. Pop a stamped greeting up on a few of them and it throws a little shadow that flat tape never will. If you catch yourself hoarding offcuts and tape runner refills, the scrapbooking setup runs on nearly the same adhesives.

Die-Cutting: Snowflakes From a Hand Crank

A die is a thin metal shape with a sharp edge, and on its own it does nothing. You sandwich it with cardstock between two plastic cutting plates and crank the lot through a manual machine, which squeezes hard enough to cut a whole snowflake in one pass. Scissors could never get round those tiny arms. The same machine presses embossing folders, giving a panel raised texture without any ink.

Here's the trap. Small portable machines handle narrow dies but can't fit a standard embossing folder, and plenty of people outgrow them within a year. A standard 6-inch machine takes wafer-thin dies from any brand, so you're not locked into one company's shapes.

Manual die-cutting and embossing machine with starter dies

Pick 11 of 14

Manual die-cutting and embossing machine with starter dies

A manual die-cutting machine uses a hand crank to roll a sandwich of plates, metal die and cardstock through heavy rollers, cutting intricate shapes in one pass. The same machine runs embossing folders for raised background texture. A standard 6-inch-wide opening takes thin dies from almost any brand plus standard-size folders.

Why we picked this exact one: The Sizzix Big Shot Starter Kit is the machine card makers most often name for taking thin dies from every brand. The kit comes with cutting pads, platform, a thin die adapter, starter dies and an embossing folder, so nothing else is needed on day one. It's the biggest single spend in this setup, and its 6-inch opening won't fit extra-wide card fronts.

See it on Amazon
Christmas wreath and snowflake cutting dies for tags and ornaments

Pick 12 of 14

Christmas wreath and snowflake cutting dies for tags and ornaments

Thin cutting dies are etched metal shapes that cut detailed designs from cardstock, vellum or foil when run through a die machine. A wreath and snowflake set gives you card fronts, gift tags and hanging ornaments from the same shapes. Detailed layered bows and sprigs are best cut from smooth cardstock.

Why we picked this exact one: We chose the Sizzix Wreath and Snowflake Thinlits set designed by Tim Holtz because it pairs classic holiday shapes with a layered bow. It holds a 4.7-star rating from about 95 reviews. The finest snowflake arms can take a second pass or a paper shim in the machine.

See it on Amazon
Snowflake embossing folder for textured card backgrounds

Pick 13 of 14

Snowflake embossing folder for textured card backgrounds

An embossing folder is a hinged plastic sleeve with a raised pattern on one side and a matching recess on the other. Run cardstock through a die machine inside it and the paper comes out with raised snowflake texture, no ink needed. A folder around 4.8 by 6 inches covers a standard card front.

Why we picked this exact one: The ALIBBON Christmas Snowflake Background folder is an inexpensive way to try dry embossing before investing in branded folders. It has a 4.7-star rating from 240 reviews. Budget folders can press a little shallower than premium ones, so heavier cardstock shows the pattern best.

See it on Amazon
Nesting rectangle dies for framing card panels

Pick 14 of 14

Nesting rectangle dies for framing card panels

Nesting dies are sets of the same shape in graduated sizes, used to cut panels, mats and frames that sit neatly inside one another. Rectangles are the workhorse of card layouts, framing a stamped wreath or cutting a window. A wide range of sizes lets one set cover tags, panels and card fronts.

Why we picked this exact one: The Hero Arts Nesting Rectangle Infinity dies are built with small size steps, so you can mat and frame a panel with an even border. They're rated 4.8 stars across more than 700 reviews. At around twenty dollars they cost more than generic sets, but you'll use them on nearly every card.

See it on Amazon

If a thin die leaves a few uncut spots, slip a sheet of scrap paper into the sandwich as a shim and run it again. Save the lacy bits that fall out of snowflake dies, because they look great scattered through a junk journal. Honestly, the machine is the one big spend here, so wait until you've made a dozen stamped cards and still want more.

Before You Plug In the Heat Tool

A craft heat tool looks like a toy hair dryer, but the air coming out is hot enough to melt plastic in seconds. The metal nozzle stays hot for a while after you switch it off. Don't hold a small tag steady with your fingertips in the airflow; pin it down with a craft pick, tweezers or the end of a pencil instead.

Paper scorches too. Keep the tool moving and stop as soon as the powder turns glossy, because parking it in one spot browns the cardstock and can flatten the embossing until the shine is gone. Stand the tool on its end on a heat-safe surface between uses and keep the cord away from your elbow. With kids at the table, the grown-up does the heating.

Treat it with the respect you'd give a hot glue gun and it's a tame little tool. A toasted corner on a scrap panel is a cheap way to learn how little heat the powder actually needs.

Why Is There Glitter Where It Shouldn't Be?

Why did tiny glossy dots appear all over my embossed card?

Static and the oils from your fingers make embossing powder cling to bare paper, not just the inked image. Once you heat it, every stray speck melts into a permanent little bump. Wipe the panel with an anti-static pouch before stamping, then flick the back of the card after tipping off the powder. Sweep what's left with a soft dry brush, and touch any stubborn specks with a metal pick, since static-charged powder jumps onto metal.

Why do my small greeting words come out blobby when I emboss them?

Regular embossing powder has grains big enough to bridge the gaps inside small letters, so fine fonts fill in. Pressing hard on the ink pad makes it worse by loading extra ink into those gaps. Ink the stamp lightly and press without rocking. For small greetings, switch to a powder labeled super fine or detail and save regular powder for bold images.

My card warped while I was heating it. Did I buy the wrong paper?

Usually it's the heat tool, not the paper. Pointing a tool that hasn't warmed up at the card heats the paper long before the powder melts, and the panel buckles. Switch the tool on while you're tidying stray specks so it's properly hot. Start in one spot and slowly follow the melt across the image rather than waving it around.

Will my dies work in someone else's die-cutting machine?

Wafer-thin metal dies from most brands cut fine in any standard manual machine, which is why brand loyalty matters less than beginners fear. What changes between machines is the sandwich of plates and platform you stack around the die. Thick wood-backed dies are the exception and only fit machines built to take them. If a thin die cuts patchily, add a sheet of paper as a shim.

Why do the solid parts of my stamps look speckled and patchy?

Textured and linen-finish cardstock looks lovely in the pack, but ink can't reach the dips in the surface, so solid areas stamp unevenly. Beginners often blame the stamp or the ink. Stamp onto smooth cardstock and save textured paper for mats and layers that don't carry an image.

Love what you see here? Save individual picks with on any item, or copy everything to a list of your own in one click — great for coming back to later, or dropping as a not-so-subtle hint.

Disclosure: This section may contain affiliate links to Amazon. We may earn a small commission from qualifying purchases at no extra cost to you.