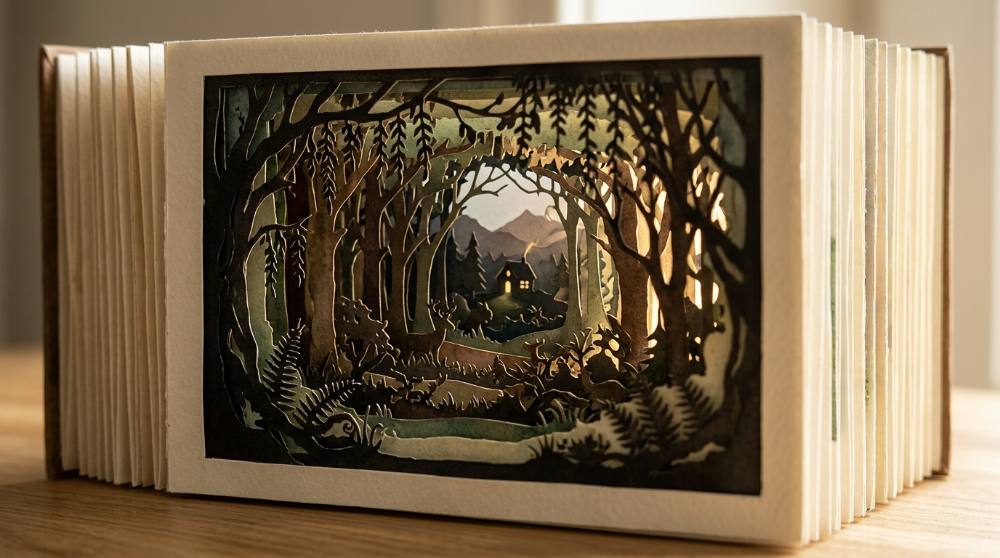
A tunnel book is a stack of paper panels with holes cut through them, hinged at both edges by folded strips so the whole thing opens like a bellows and shuts flat as a greetings card. Put your eye to the opening in the front and the cut layers line up into one scene with real air between them. The form is older than photography. Martin Engelbrecht was printing perspective theatres in Augsburg from 1719 under an imperial monopoly his family held until 1804, and the name we use now comes from the Thames Tunnel in London, where sightseers bought souvenir paper peepshows of the brick arches. Some of those souvenirs were sold as flat printed sheets to colour in, cut out and glue together at home, which makes this one of the oldest flat-pack craft kits around.
What surprises people is how little of the effect comes from drawing ability. The depth is a structural trick: the front frame crops your view, the panels sit at fixed distances, and your eye does the rest without being asked. I have watched complete beginners make something genuinely startling out of four pieces of cardstock and a magazine. What they get wrong is almost never the art. It is the folding.
Our take: buy as little as you can get away with. A knife that takes fresh blades, something to cut on, a straight metal edge, a few sheets of card and a small pot of glue will build a real tunnel book this weekend. Everything else on this page is a later problem.
Nothing below costs enough to sulk about if the hobby turns out not to be yours.
Where This Little Kit Can Take You
A few real moments and results from this hobby — made with tools no fancier than the ones below.
A forest that keeps recedingEvery tree further back is a separate sheet of paper, cut and set a few millimetres behind the one in front of it.
The view down the original tunnelSouvenir peepshows of these brick arches are where the modern name for the whole craft came from.
If you have already tried cut-and-fold kirigami pop-ups, half the skills carry straight over, though the two behave differently: a pop-up springs out of a page you turn, while a tunnel book sits still and asks you to look into it from one fixed spot. Being seen from a single angle is a gift to a beginner. The front frame crops the view, so the ragged edges nobody was proud of end up hidden behind it.
What It Takes to Cut a Clean Window
Nearly every tunnel book problem is a cutting problem or a folding problem. Cutting is the easier one to fix: a sharp blade, a surface that does not fight back, and a metal edge the knife can lean on. Beginners buy one knife with one blade and then wonder why the curves tear instead of slicing. Workshop supply lists for this craft tell you to bring spare blades, which says most of what you need to know. And there is a particular quiet satisfaction the first time a cut window drops cleanly out of a sheet instead of hanging on by one fuzzy corner.
Disclosure: This section may contain affiliate links to Amazon. We may earn a small commission from qualifying purchases at no extra cost to you.
01Pick 01 of 15
Precision Craft Knife Set
A precision knife is a scalpel-style handle holding a small pointed blade, and it is the tool that makes interior windows possible, because scissors cannot start a cut in the middle of a sheet. The blade is the part you use up, so a set that arrives with a generous pile of spares matters more than a clever handle. Look for the standard number 11 blade shape, which every supplier stocks.
Why we picked this exact one: This JTIEO 74-piece set puts four hobby knife handles and seventy spare number 11 blades on the desk for pocket change. The point is not the handles, it is the blade count: someone who owns seventy blades will actually swap one when it starts dragging, and that single habit is what separates clean windows from torn ones. The handles are plain aluminium rather than the cushioned grips on a branded knife, so wrap one in a little tape if you are cutting for an hour.
A self-healing mat is a layered plastic board that closes back over each cut, so the surface stays smooth instead of collecting grooves. The printed grid matters as much as the surface does, because panels have to come out square and identical or they will not sit true behind one another. Twelve by eighteen inches covers a letter-size sheet with room to turn the work as you cut a curve.
Why we picked this exact one: The Dahle Vantage 10471 has five bonded layers where most budget mats have three, which is the difference between a mat that closes over cuts and one that collects scars. Its half-inch grid lines up with the panel measurements you will be marking anyway. Green on black is not the handsomest thing on a desk, but pencil shows up on it, and that beats handsome.
A steel rule gives the knife something hard to run against, where a plastic one gets shaved into a wavy edge on the first long cut. The cork strip underneath lifts the metal clear of the paper and stops it sliding, which matters more than it sounds, because a slipping rule is how most craft knife injuries happen. Having both a short and a long rule covers panel edges and the longer accordion strips.
Why we picked this exact one: This WSICSE pair gives you a twelve inch and an eighteen inch cork-backed steel rule, which is the right combination because the accordion strips run longer than the panels do. It sits at 4.9 stars, though across a modest review count, since it is a newer listing than the mat. The markings are printed rather than etched and will wear in time; the cutting edge is solid steel, and that is the part that has to last.
Cardstock at around 65 lb cover, roughly 176 gsm, is the weight this craft is built on: stiff enough that a cut-out panel holds its shape standing up, thin enough to fold into clean hinges. Printer paper sags forward and thick board will not crease. Buy a large pack, because you will cut several versions of the same panel before one of them works.
Why we picked this exact one: Neenah Bright White hits the exact weight the workshop handouts call for, 65 lb cover at 176 gsm, rather than leaving you to guess from a vague description. The 250-sheet pack looks excessive until you have binned a third attempt at a front frame. It is uncoated, so it takes pencil, ink and a light watercolour wash; colour sheets are a separate purchase.
PVA is the standard adhesive in bookbinding because it dries clear, stays slightly flexible rather than going brittle, and does not yellow the paper later. Here it gets brushed thinly onto the half-inch flaps where each panel meets its accordion hinge. Thin is the whole technique, since a wet layer swells the paper fibres on one face and the panel dries with a wave in it.
Why we picked this exact one: The Books By Hand pH Neutral PVA comes in a 4 ounce bottle, the right size for a craft that uses glue by the brushful rather than the handful. It is acid-free and dries clear and flexible, which is what keeps a hinge working after a hundred openings. Some binders skip glue here entirely and attach panels with double-sided tape to dodge the moisture; tape never warps, but it will not let you lift and reseat a panel that went on crooked.
With these five you can cut, fold and assemble a four-panel tunnel book from scratch in an afternoon. Press the finished thing under a heavy book while the glue dries, because the workshop handouts all end on that instruction and skipping it leaves you with a gentle banana curve. Next come the pieces that are not required but genuinely change what you end up with.
Where the Depth Starts Looking Deliberate
A first tunnel book works. A second one is where you notice the layers are evenly spaced and a little flat, and start wanting things to float between the panels and light to rake across them. None of this is required and all of it is cheap, apart from the last item, which is the one real step up on this page. Make two or three books by hand before you buy any of it; you learn more from a crooked hinge than from a machine that never cuts one. If working at this scale appeals, scenes built inside a walnut shell ask for the same patience and even fewer materials.
06Pick 06 of 15
Bone Folder for Creasing and Gluing
A bone folder is a smooth blunt blade, traditionally of bone, used to press a fold flat and to rub glued paper down without leaving fingerprints. The accordion hinges either side of a tunnel book are a run of creases that all need to sit at the same angle, and a thumbnail cannot deliver that evenly. It also pushes trapped air out from under a freshly glued panel.
Why we picked this exact one: The VENCINK bone folder is real bone rather than moulded plastic, so it burnishes paper to a faint sheen instead of dragging across it. At 4.8 stars over several thousand reviews it is the default pick on bookbinding supply lists. Bone has a grain and the tip can splinter if you lever with it, so use it to press rather than to pry.
These are small pads of adhesive foam, sticky on both faces and a couple of millimetres thick. Stick one behind a cut-out bird or a tree and it stands proud of the panel it is mounted on, so the scene gains depth between the layers rather than only at the hinges. A mixed-size pack beats a single size, because a big shape wants two or three pads and a small one wants a sliver.
Why we picked this exact one: The Scrapbook Adhesives by 3L pre-cut squares arrive in mixed sizes, which saves slicing foam tape into fiddly pieces with a knife. They are white, so against a dark panel you will occasionally catch a pale edge from an angle; trimming the pad a little smaller than the shape hides it. The adhesive is permanent, so place each one deliberately.
A thin adhesive strip of LEDs, powered over USB, that tucks behind the back panel and turns the piece into something you look into rather than at. The dotless COB type matters here: an ordinary strip shows as a row of bright points through thin paper, while a COB strip gives one continuous band of light. A dimmer helps, because full brightness blows out the cut edges you worked hardest on.
Why we picked this exact one: The PAUTIX 5V USB strip is dotless and 3000K warm white, the combination that reads as lamplight rather than as a gadget sitting behind your artwork. It runs from any USB socket, so there is no battery box to hide inside the structure. At 4.2 stars it carries the lowest rating on this page, so treat it as the functional choice rather than the beloved one.
An electronic cutter holds a small blade on a motorised arm and cuts a shape you have drawn on screen, identically, as many times as you ask. For layered paper work it removes the part people find hardest: cutting four or six nested frames that align perfectly behind one another. Most of these machines will also hold a pen and draw guide lines, which is handy for marking where hinges fold.
Why we picked this exact one: The Cricut Joy Xtra is the entry point into machine cutting rather than the flagship, and the bundle includes the fine-point blade and a pen. Step up once you are cutting the same nested frame for the fifth time, or selling what you make; if you have built two books and enjoyed them, wait, because hand-cutting still teaches you where a frame wants to sit. At 4.4 stars it rates below the larger machines in the range, and a compact machine stays compact.
Added one at a time, these turn a paper object into something people pick up and tilt toward a lamp. If you take only one, take the foam squares; they cost almost nothing and they are the difference between a scene with four depths and a scene with ten. And if you like the idea of a lit, layered scene but would rather hang it on a wall than fold it flat, shadow box assemblage plays the same optical trick behind glass.
Build the Little Theatre Instead of the Box
There is a branch of this craft older than the tunnel book itself: the paper theatre, with a decorated arch across the front and flat cut-out scenery standing in the wings. The early perspective theatres copied real stages closely, arch and all, and the middle panels were literally called stage flats. Going this way needs sturdier material than the basic structure. A stage front that flexes when you pick it up kills the illusion on the spot, and card alone will not hold a wide arch rigid. The scenery instinct here is the same one behind building tiny furnished rooms, only flattened into layers.
10Pick 10 of 15
Rigid Chipboard Sheets
Chipboard is dense compressed board, far stiffer than card, and it is what bookbinders reach for when they need covers. In a paper theatre it sits behind the proscenium arch and under the base, so the structure stands by itself instead of leaning. At around fifty points thick it still cuts with a craft knife, though it takes several passes rather than one.
Why we picked this exact one: The LOTMER 50-point sheets come letter-sized, so they match the cardstock you are already cutting and need no trimming to fit. Fifty point is a deliberate middle: 80-point board is a fight to cut by hand, and anything lighter flexes. It is rated 4.5 stars, the lowest of the paper picks here, so store the pack flat rather than leaning, since board this size takes a set.
Black card at the same 65 lb weight as your main panels, for the layers you want read as shape rather than as picture. Silhouetted trees, rooftops and crowds standing black against a lit background are the oldest trick in this craft and still the most effective. It is also what the inward faces of a frame should be when you do not want the structure itself drawing the eye.
Why we picked this exact one: The Goefun 50-sheet pack is 65 lb black cardstock, matching the weight of the white sheets in the essentials, so the same blade and the same folding behaviour carry straight across. It is rated 4.8 stars, and the reason to buy black card rather than paint white sheets is simply that paint curls thin paper and dyed card does not. Fifty sheets is more than one project needs, which is right, because silhouette layers are the ones you recut most.
Vellum is a smooth translucent paper that light passes through but shapes do not. Set behind the back panel it spreads a light source into an even glow instead of a bright spot, which is the standard fix when a lit scene looks like it has a torch behind it. Used between layers it reads as mist, water or simple distance.
Why we picked this exact one: The Dowsabel vellum is 68 lb, heavy enough to hold its shape rather than curling the instant it is glued, which lighter tracing paper will do. It is rated 4.8 stars over several thousand reviews and it is printable, so a gradient or a line of text can go through an inkjet before you cut it. Ink sits on the surface rather than soaking in, so give it longer to dry than feels necessary.
Heavy metallic card, around 250 gsm, with a reflective finish on one face. In paper theatre work it does the job gilding did on real stages: the arch, the pillars, the scrollwork along the top edge. A little goes a long way, which is why a small pack of twenty sheets is the sensible buy rather than a ream.
Why we picked this exact one: The Erilano gold metallic cardstock is 92 lb, about 250 gsm, stiff enough that a cut arch stands on a small theatre without a board behind it. At 4.6 stars across a few hundred reviews it is the best-rated of the small packs. The coating is on one side only, so work out which way each piece faces before cutting, because a reversed scroll shows plain white and cannot be fixed.
Between the board, the black card and a single sheet of gold, a paper theatre starts to feel like a real object rather than a craft project. Work the arch out on plain paper first, full size, because a mock-up costs nothing and saves you cutting the same curve twice into board. If you would rather build scenes you can walk around than scenes you look into, scale diorama building runs on the same instincts in three dimensions.
Two Books Worth Owning Before You Get Ambitious
Paper engineering is one of those crafts where a single diagram saves an hour of guessing. Neither of these is bedtime reading. You will keep them open on the desk with a half-cut sheet beside them, which is exactly what they are for.
14Pick 14 of 15Book worth reading
Pop-Up and Paper Engineering Book
A working reference to the mechanisms behind movable paper: v-folds, parallel folds, boxes, pull-tabs and the layered tunnel structure among them. Every mechanism is built into the book itself, so you open the page, work the moving part with your fingers and see exactly how the tabs are cut and where they sit. It is a lookup book rather than a course.
Why we picked this exact one: The Elements of Pop-Up by David A. Carter and James Diaz is the reference paper engineers keep pointing newcomers at, and it earns that by building every mechanism it describes into its own pages. It is a hardback priced well above everything else on this list, which is the honest catch. It also assumes you want mechanisms rather than projects, so if you would rather be handed a finished design to copy, the other title here suits you better.
A project-led paperback covering dimensional and moving paper forms, with templates and step-by-step builds contributed by working paper artists. The structures run from simple folded shapes up to tunnel and carousel books. It is aimed squarely at someone who wants to make one specific thing this weekend.
Why we picked this exact one: Playing with Pop-ups by Helen Hiebert is the project counterpart to the Carter and Diaz reference, written by a paper artist who teaches these structures rather than a writer collecting them. It is a paperback with templates you can trace, which is the format that actually gets used at a cutting mat. Amazon lists it as print-to-order, so it arrives with a lead time rather than off a shelf.
Between them you get the mechanism and the recipe: one explains how a fold does its work, the other hands you a tested shape to copy. If the folding and binding side is what pulls you in, a proper beginner bookbinding setup goes much deeper into the structures these two only touch.
Why Your First One Comes Out Crooked, and Everyone Else's Did Too
Why did my panels dry with a ripple across them?
Too much glue, nearly always. PVA is water-based, and a wet layer swells the paper fibres on one face only, so the sheet curls as it dries and keeps the curve for good. Brush it thin enough that the card barely darkens, keep it on the half-inch side flaps rather than the panel face, and press the whole assembly under a heavy book until it is properly dry. Binders who have had enough of this sidestep it completely and attach panels with double-sided tape instead, which brings no water near the paper at all.
My layers do not line up behind each other. What did I do wrong?
The hinges, not the cutting. Each panel is held by a pair of accordion strips, one on each side, and those two strips have to be folded into identical segments; a four-panel book needs three pairs of them. Fold by eye and one side ends up a millimetre deeper than the other, which cants every panel behind it slightly off square. Fold both strips together as one stack, crease them against a straight edge with a bone folder, and check that the valleys fall at matching points before any glue goes near them.
How many layers should a first one have?
Four panels is the working minimum: a front frame carrying the opening, two inner frames, and a background that closes the scene. Beginners often start at eight because more layers sounds like more depth, then discover that every extra panel is another pair of hinges to fold accurately and another chance to throw everything behind it out of line. The size of the openings matters more than the panel count anyway, since a narrow front window crops the scene no matter how much sits behind it. Build the four-panel version twice before you go longer.
Why does my structure feel floppy even though I used thick card?
You almost certainly cut the frames too thin. The handouts tell you to leave at least a three-quarter-inch border all the way round each inner panel, and it feels wastefully wide while you are drawing it, so the temptation is to open the window right out toward the edges for a bigger view. Do that and the frame left behind is a thin ribbon of card that twists under the pull of the hinges. Mark the border first, then design the opening inside whatever is left.
Where should the light actually go?
Behind the back panel, not in front of the piece. Front lighting flattens everything, because it lights every layer equally and the shadows that signal distance simply vanish. A light set behind the final panel, with a sheet of translucent paper in front of it to spread the glow, throws each layer's cut edge into shadow against the one behind it. If all you have is a desk lamp, swing it round to one side instead, because raking light across the layers does much of the same work.
People Worth Following Into This Hobby
Real practitioners we found while researching this setup — people who do the work, show their process, and publish on sites they run themselves. No sponsorships, no affiliations; we just think they're worth your time.
Has taught accessible bookmaking since the 1980s and has published free paper-structure tutorials and printable templates on her blog since 2009.
Her work is almost entirely about folding paper accurately, which is the skill that decides whether a reader's accordion hinges line up or cant every panel off square.
An all-volunteer nonprofit running a biennial book arts conference in Oregon and, from 2027, a summer intensive in Fairbanks.
Their workshop pages publish the full materials list for each class, including the pop-up tunnel book one, so a reader can see what a taught version of this project actually requires.
Makes paper and book art in San Diego and documents each project on her blog, including the attempts that did not work.
Her tunnel book post is an honest account of panels that kept warping and the lighter hinge structure that fixed it, which is the first question in the FAQ above.
Love what you see here? Save individual picks with on any item, or copy everything to a list of your own in one click — great for coming back to later, or dropping as a not-so-subtle hint.