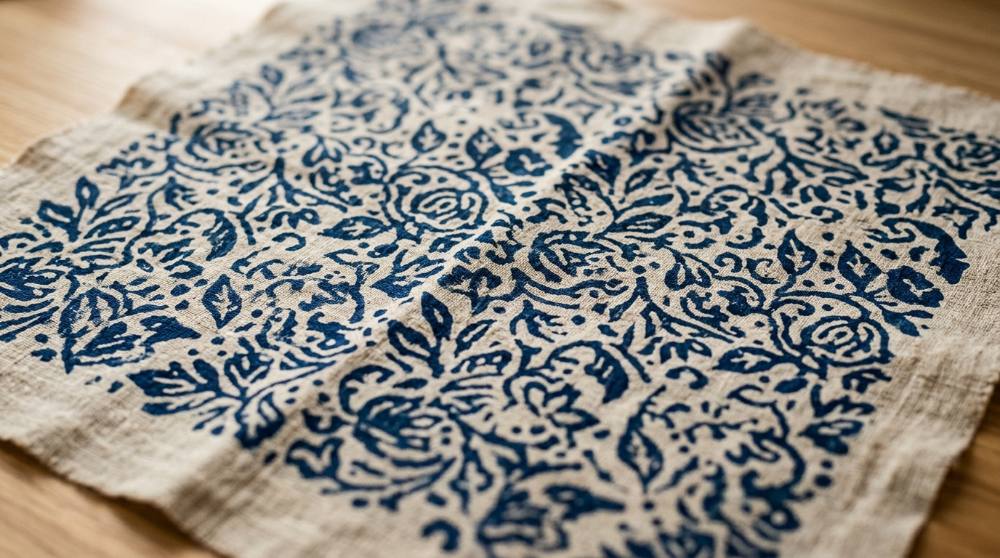
Shibori is the art of deciding which parts of a cloth the dye will never reach. You fold it, bind it, clamp it shut, then drop the whole bundle in a vat, and whatever you squeezed closed doesn't take any colour. Japanese dyers have worked this way since the Nara period, and the town of Arimatsu near Nagoya has lived off it since the early 1600s, when travellers on the old Tokaido road started buying shibori cloth as a souvenir. More than a hundred named tying methods exist. Traditionally an Arimatsu craftsperson masters one of them, and untying the threads afterwards is its own slow job, three or four days for a single bolt.
Here's the part nobody mentions first: the cloth doesn't come out blue. It comes out a murky yellow-green, and the blue arrives over the next ten or twenty minutes as air gets at it. Watching that happen to your own piece is the moment most people get hooked, and it's the same slightly unreasonable pleasure as watching a cyanotype print come up in a tray of water. The folding is the easy bit. Getting a vat that actually works is where a first weekend goes.
Start with less than you think. A vat, something cotton to dunk, and gloves that reach past your elbow will carry a whole first session. Rubber bands and two flat bits of wood will give you three or four distinct patterns before you need to buy anything else.
Nothing below costs enough to sting if the whole thing turns out not to be for you.
Where This Little Kit Can Take You
A few real moments and results from this hobby — made with tools no fancier than the ones below.
White starbursts on deep indigoEach pale ring marks a point of cloth that was bound tight before the dip.
Two dyed cloths drying outdoorsHow dark a piece ends up depends on how many times it went back in.
Binding the cloth before the dipEverything held shut at this stage will still be white at the end.
Shibori asks for a particular kind of patience. Not the careful, fussy sort, but the sort where you accept you can't fully predict the result and dunk it anyway. If you already enjoy working with a length of cord in your hands, the muscle memory from knotting a macrame wall hanging carries over further than you'd expect. The images below are roughly what one good afternoon looks like.
What Actually Goes In the Bucket
Four things stand between you and a finished piece, and only one of them is dye. The vat chemistry arrives as a packet of powder. The rest, meaning cloth and gloves and a bag of soda ash, looks optional on paper and isn't. One thing is deliberately missing from this list: the bucket. Any clean five-gallon pail with a lid that seals will do, and a hardware store sells one for pocket change. Indigo only asks for a deep, narrow container with as little surface meeting the air as possible, because air is what kills a vat.
Disclosure: This section may contain affiliate links to Amazon. We may earn a small commission from qualifying purchases at no extra cost to you.
01Pick 01 of 11
pre-reduced indigo vat kit for dyeing cotton
A pre-reduced indigo kit supplies the three things every indigo vat needs: the pigment itself, a reducing agent that dissolves it into a water-soluble form, and an alkaline base that lets the reaction happen. Mixed into roughly five gallons of warm water, a kit of this size dyes several pounds of cloth and stays usable for a few weeks. Look for one that states how much fabric it covers and includes written instructions rather than selling the powders loose.
Why we picked this exact one: The Jacquard Tie Dye Indigo Kit is the one most first-timers end up with, and it holds a 4.8-star average on Amazon. It carries enough pre-reduced indigo and reducing agent for around five pounds of fabric, and throws in rubber bands and two wooden blocks so you can start clamping without a second order. Its weak point is the gloves, which are thin and stop at the wrist, and that is why a longer pair is listed separately below.
Flour sack towels are large, thin, hemmed cotton squares, which makes them the cheapest finished object a dyer can practise on. Indigo bonds to cellulose, so cotton, linen, hemp and rayon all take it, while polyester and acrylic come out almost unchanged. A twelve-pack means you can afford to ruin several before one comes out the way you pictured.
Why we picked this exact one: Utopia Kitchen's 12-pack of 28-inch flour sack towels works here because each towel is already a finished square with a hem, so a first piece is usable the moment it dries. They are 100% cotton, which is the part that matters for indigo. The weave is loose and a little flimsy on its own, though that helps when you are trying to fold eight layers and still get a clamp around them.
elbow-length chemical-resistant gloves for dye work
Long waterproof gloves let you reach the bottom of a deep vat and squeeze fabric under the surface without putting your forearms in alkaline liquid. Cuff length matters more than thickness here, because most of the contact happens while your hand is submerged. Textured palms help, since wet bound cloth is slippery.
Why we picked this exact one: The Eiito Extra-Long 26-inch PVC gloves cover you past the elbow for under ten dollars, which is the whole problem solved. They sit at 4.6 stars, and buyers of indigo kits say again and again that the thin gloves packed with a kit stop at the wrist and are no use once an arm is in the bucket. They are stiff and not remotely precise, so take them off for the tying.
Soda ash is sodium carbonate, a mild alkali that does two separate jobs in dyeing. Simmered with the fabric beforehand, it strips the waxes, oils and factory finishes that stop dye penetrating evenly. Added to a working vat in small amounts, it lifts the pH when the liquid drifts back toward neutral.
Why we picked this exact one: Jacquard's 1-pound bag of Soda Ash Dye Fixer is the textile-grade version rather than the pool-chemical one, so there is nothing added to it that could interfere with a vat. A pound covers a lot of scouring loads. It is sold as a fixer for fibre-reactive dyes, which is a different job altogether, but the chemical is the same and scouring is what you want it for.
Mix the vat, leave it alone for an hour, and when you lift the lid you get the smell: earthy and faintly smoky, with something farmyard underneath. If there's a coppery film on the surface and the liquid below looks like weak lime cordial rather than blue, you've done it right. A blue vat is a vat that isn't working, because the pigment has to dissolve before it can dye anything. Most first-timers dip once, see a pale denim colour and assume they bought a dud, when the colour is meant to build in layers; six short dips land somewhere a single long one never will. And a dyed flour sack towel is a good surface in its own right, if you later fancy putting a carved stamp and a pad of ink on top of it.
The Blue Gets Everywhere, and That's the Least of It
Indigo dyeing isn't dangerous the way kiln work is dangerous. It's messy in a way that catches people out, and it involves powders you'd rather not breathe. Mix the dry ingredients outdoors or over a sink with a mask on, and always add the powder to the water rather than water to the powder. The vat is strongly alkaline, so gloves stay on for anything that goes below the surface, and a splash on skin gets rinsed rather than wiped.
The staining is the part nobody warns you about properly. Unoxidised indigo is nearly colourless as it drips, and then it turns blue twenty minutes later, on whatever it landed on. One dyer's account of trying to scrub a bathtub back to white is the standard cautionary tale. Work outside if you can, put down more covering than feels sensible, keep dye equipment permanently separate from kitchen equipment, label it, and keep the lidded vat away from children and pets.
None of this needs a studio. A sheltered corner of a garden, a balcony, or a garage floor with a tarp on it covers everything the process actually asks for. The one thing worth being strict about is the mask, because it costs almost nothing and the alternative is a lungful of alkaline powder.
Three Patterns You Can't Get With Rubber Bands
Every shibori technique is one idea applied with a different object, and the object decides the entire family of pattern. Clamp flat shapes onto folded cloth and you get itajime: hard-edged grids, windowpanes, rows of white circles. Wrap the cloth round a pole, shove it into a tight concertina and bind it, and you get arashi, the diagonal rain-streak pattern named after the Japanese word for storm. Bind small pinched points with thread and you get kumo, the spidery starbursts. Skill barely comes into it. What you need is the right object, which is why this section is mostly objects.
05Pick 05 of 11
flat wooden shapes for clamped itajime resists
Itajime works by sandwiching folded cloth between two rigid shapes and clamping them, so the covered area never meets the dye. Squares in a few sizes cover most of what a beginner wants, because the outline of the block becomes the outline of the white. Plain untreated wood is fine, and it goes on working once it has stained blue.
Why we picked this exact one: The Meetory 42-piece set of blank wood squares covers 2, 3 and 4 inches, which is the useful range for folded towels and scarves. Three sizes matter more than quantity, because changing the block changes the scale of the whole grid. They are unfinished pine, so they soak up colour and look thoroughly used by the third session, which makes no difference to how they work.
plastic spring clamps for holding resist blocks shut
Spring clamps squeeze two resist shapes together hard enough that dye cannot work its way between them and the cloth. Plastic bodies are easier to live with around a dye vat than bare steel, which is alkaline enough to be hard on springs. A jaw opening of about an inch handles most folded bundles.
Why we picked this exact one: The Romeda 12-pack of 3.5-inch plastic spring clamps is cheap enough to buy in quantity, which matters because every bundle has to come out and oxidise before it goes back in, so you want several running at once. Plastic bodies mean nothing rusts into the vat. The springs are fairly light, so a thick eight-layer fold may need two clamps where one looks like it should do.
Arashi shibori is made by wrapping cloth diagonally around a cylinder, binding it with thread, then pushing it down the pole into tight pleats. The diameter sets the spacing of the finished stripes, and around three inches suits towels and scarves. Any smooth, water-resistant tube does the job, which is why plumbing pipe is the standard answer.
Why we picked this exact one: This CKVIHAV 3-inch Schedule 40 pipe is 17 inches long, enough to work a flour sack towel on the diagonal and short enough to stand in a five-gallon bucket. It rates 4.8 stars, although a pipe is a pipe. Buying plumbing pipe from a craft listing is not the cheap route and a hardware store will cut you a length for less, so this one is about convenience rather than value.
Artificial sinew is a flat waxed polyester thread that splits down to whatever thickness you want. The wax makes it grip itself, so a binding holds under tension without a knot at every turn. It does not absorb dye or swell in water, which keeps a resist tight through repeated dips.
Why we picked this exact one: The Treasure Gurus spool of artificial deer sinew is the thread most tie-dyers reach for, and it holds a 4.7-star average on Amazon. One spool is an absurd amount of thread and will outlast the hobby for most people, but being able to split it to different weights is what makes it worth having over plain cotton string. It is slippery when new, so expect to lose a few wraps while you work out how to start a binding.
A natural indigo kit uses pigment extracted from indigo plants rather than synthesised from petrochemical feedstock, reduced with iron and lime instead of a sulphur compound. The resulting vat is cold, keeps for months under a sealed lid, and gives the slightly greyer, denim-like blue associated with traditional dyeing. It is the same process run slower, with more room to go wrong and more to learn from.
Why we picked this exact one: Graham Keegan's Indigo & Shibori Natural Dye Kit is the step up worth taking once you know you will keep dyeing, because its iron-and-lime vat stays alive for months rather than weeks. Wait until you have emptied a synthetic kit at least once: the natural vat asks you to judge its colour and pH yourself, and that is frustrating as a first experience rather than interesting. At 4.4 stars it is also a small-batch product, and the listing ships with a lead time rather than off the shelf.
Bind tighter than feels kind. A lot of disappointing first pieces come back to a resist that let dye creep underneath, and a properly clamped bundle feels stiff and oddly dry in the middle when you finally prise it open. Let yourself waste a towel working out how tight is tight enough. If it turns out the hard-edged, repeatable side of pattern is what pulls you in, carving a lino block and printing it scratches a very similar itch with none of the chemistry.
What the Blue Costs After the First Bucket
A kit the size of the one above dyes around five pounds of fabric, or about fifteen t-shirts, and the vat stays useful for a few weeks before it tires. That works out at a couple of dollars a towel for the first batch and then nothing at all until you reopen the chemistry. Refilling isn't quite as cheap as people assume: an eight-ounce tub of pre-reduced indigo costs a little more than the whole starter kit did, though it makes several vats' worth.
The real running cost is cloth. Once the vat is alive you want to put everything you own in it, and plain cotton adds up faster than dye ever does. It's the same economics you hit with screen printing onto blank shirts at home, where the ink lasts and the garments don't.
Vats die of neglect more often than of use. A sealed, undisturbed vat keeps far better than one that gets opened and stirred every couple of days, so it pays to save up a pile of things to dye and run them in one long afternoon rather than dipping a tea towel whenever you walk past.
Two Books Worth Owning Before You Buy More Gear
Shibori has an unusually good literature for a craft this niche, largely because one standard reference pulled the whole vocabulary into English and nearly everything since has been in conversation with it. Neither of these is a weekend-project book, and that's deliberate. What makes shibori go deep is pattern, and pattern is where books still beat videos. Naming things helps too: once you know a technique has a name, searching stops being guesswork, the same way it does the first time you learn what the classic marbling patterns are called.
10Pick 10 of 11Book worth reading
the standard reference on Japanese shaped-resist dyeing
A survey of shibori as a tradition rather than a list of projects: the technique families, their Japanese names, the regions that specialised in each, and photographs of historical and contemporary work. It explains why a particular binding produces a particular pattern, which lasts longer than step-by-step instructions for one afternoon. Expect a reference book, not a manual.
Why we picked this exact one: Wada, Rice and Barton's Shibori: The Inventive Art of Japanese Shaped Resist Dyeing is the book the other shibori books cite, and it holds a 4.8-star average. It is the reason English-speaking dyers use the Japanese technique names at all. The trade-off is real: it is a reference rather than a manual, so if you want a project to follow this weekend it will frustrate you.
Stitched shibori, or nui, uses running stitches drawn tight to gather cloth into a resist, which gives finer and far more controllable patterns than clamping or binding. A manual of this kind works through the stitch types, how motifs are placed, and how a pattern repeats across a piece. It assumes you can already dye and concentrates on everything that happens before the vat.
Why we picked this exact one: Jane Callender's Stitched Shibori is the practical companion to the reference above, written by a dyer who teaches nui shibori and illustrated with her own pattern work. It is the cheaper of the two and the one that will actually sit open next to the cloth. It covers almost nothing about vats or clamping, which makes it a second book rather than a first.
Buy one, not both, to start. The reference is the one to own if you want to understand what shibori is and how far it reaches. The stitched-shibori manual is the one to own once you've clamped a few towels and want a technique to work through properly.
Why Is My Blue So Disappointing?
I followed the instructions and my cloth came out pale and patchy. What went wrong?
Two things cause this and both are invisible from above. The first is a vat that never reduced: the surface stays dark blue-black whatever happens underneath, so judging it from the top tells you nothing. Dip a metal spoon and look at the liquid clinging to it, which should be a translucent yellow-green. The second is putting the bundle in dry, which traps air in the folds and keeps dye out of exactly the places you wanted it. Soak the bound piece in plain water and squeeze it out before the first dip.
How long do I actually wait between dips?
Longer than feels necessary, and a clock is the wrong instrument. Indigo only turns blue in air, and the cloth tucked deepest inside the folds goes last, so the piece can look finished on the outside while the creases are still green. Rinse it, prise the folds apart enough for air to get in, and hang it where nothing touches anything else. The rule is firm: no second dip until there's no green left anywhere, which usually means ten to twenty minutes.
Can I dye a poly-cotton shirt if I leave it in long enough?
No, and the length of the dip makes no difference at all. Indigo attaches to cellulose and protein fibres, and polyester and acrylic give it nothing to hold onto, so a blend comes out noticeably weaker and reads as washed-out rather than as a lighter blue. Rayon, viscose and modal are made from cellulose and do take it perfectly well. Check the care label before you spend an evening binding something, because the bundle looks identical right up until it dries.
My vat worked on Saturday and does nothing on Sunday. Is the dye used up?
Almost certainly not. Two separate failures look the same from the top: exhaustion, where the pigment really is gone, and oxidation, where the pigment is still there but has reverted to a form that won't dissolve. The second is far more common, especially after a session with a lot of lifting and splashing, and it shows as liquid that has gone dark and murky instead of yellow-green. The fix is more reducing agent and a little warmth. Reaching for more indigo is the classic beginner move, and the expensive one.
Do I really have to wash the finished piece on its own?
For the first couple of washes, yes. Indigo sits partly on the surface of the fibre as well as inside it, and that loose surface pigment rubs off onto whatever it meets while damp, which is the same reason new jeans mark a pale sofa. Rinse until the water runs clear, give it a short soak in weak vinegar or citric acid to neutralise the alkali left from the vat, then wash it cold and alone. After that it behaves like any other dyed cotton.
People Worth Following Into This Hobby
Real practitioners we found while researching this setup — people who do the work, show their process, and publish on sites they run themselves. No sponsorships, no affiliations; we just think they're worth your time.
Dyes and teaches nui (stitched) shibori with indigo, and keeps a visual dictionary of technique names with audio pronunciations on her own site.
This setup stops at clamping and binding; her technique pages are where a reader finds out what the other hundred-odd named resists are and how to say them, and she wrote the stitched-shibori manual recommended in the books section.
Runs numbered indigo vat experiments on her own blog, publishing the ratios, the side-by-side swatches and the vats that did not behave.
The commonest beginner complaint is pale, disappointing blue, and her posts compare weak and strong vats gram by gram so a reader can see what vat strength actually buys them.
Runs a batik and dye studio in Asheville, teaches hands-on dye classes there, and writes long illustrated tutorials on the studio blog.
Her shibori overview walks through the same pattern families this setup equips you for, and is blunt about plant fibres only, which is the mistake in our fabric question.
Grows and extracts his own indigo, dyes and block-prints from a shop in Silver Lake, Los Angeles, and publishes full vat recipes and troubleshooting notes for free.
Everything this setup says about oxidising between dips, keeping the lid on and reviving a tired vat is the territory his notes cover in far more depth than a product page can.
Love what you see here? Save individual picks with on any item, or copy everything to a list of your own in one click — great for coming back to later, or dropping as a not-so-subtle hint.