Somewhere in Your Spare Room, a Train Is About to Leave
The word "hacker" came out of a model railway club. MIT's Tech Model Railroad Club, founded in 1946, wired its HO layout with around 1,200 telephone relays, and the students who built that signalling system went on to shape early computer culture. That's the part nobody warns you about: a model railway is half landscape painting and half wiring diagram, and the two halves pull at each other the whole way. People build them on a board in a spare room, in a loft, or on a shelf running along one wall. The oldest one still working, a 1912 rig built to train signalmen on the Lancashire and Yorkshire Railway, stayed in use until 1995.
Most people stall before they start because they picture the end state, the basement empire with the mountain and the four-track main. You don't build that. You build an oval, you run two wires to it, and you watch a train go round for an evening while you work out what you actually want. Plenty of first loops live on a kitchen table for a week before they get a board. If you want the landscape without the electricity, building a static diorama gets you there faster; what's on this page is the version that moves, and moving is the part that has to work first.
So the philosophy here is blunt: buy the smallest thing that can run. An oval of track, a controller, one locomotive and one wagon is a complete railway. Scenery, buildings, a second train, a siding, all of that waits until the first loop has run for a few hours without a hiccup.
Nothing below is collector gear. This is the cheap end of a hobby that gets silly expensive very quickly, picked so that if you decide in March that trains aren't for you, nothing much was lost.
Where This Little Kit Can Take You
A few real moments and results from this hobby — made with tools no fancier than the ones below.
Pithead, trestle and ore trainLook for the figures working the rock face to the left of the headframe.
Headlight lit at track levelThe moss and the gravel are real; the locomotive is not.
Everything that follows assumes you want a train moving by the end of a weekend, not a museum piece by the end of the decade. Have a look at what a board like this can turn into, and then we'll talk about what honestly has to go in the basket.
The Five Things Between You and a Moving Train
Everything here is HO scale, 1:87, which is where most people land and which has by far the widest range of track and locomotives behind it. The other serious choice is N, at 1:160, and the trade is simple: N fits roughly twice the railway into the same space, HO is much easier to handle when your fingers are new at this. Modellers put it as the littler the hands, the bigger the trains. Be honest about your table first, though. An HO oval on 18-inch-radius curves wants something close to four feet by three; the neat 47-by-24-inch shelf people picture is an N-scale board, not an HO one. Half-inch plywood with a two-inch sheet of rigid foam on top is the standard base, and that's a hardware-store errand rather than a hobby-shop one.
Disclosure: This section may contain affiliate links to Amazon. We may earn a small commission from qualifying purchases at no extra cost to you.
01Pick 01 of 12
HO Scale Oval Train Track Set
Sectional track with the ballast shoulder moulded into the base, so every piece sits at the right height and clips to the next without pins or glue. A basic oval set holds the curves, the straights and a feeder piece that carries power up to the rails. Look for nickel-silver rail rather than steel, and measure the stated curve radius against your board before you buy anything.
Why we picked this exact one: The Kato HO Unitrack HV5 basic oval set is the one modellers keep pointing beginners at, and the praise is almost always about the Uni-joiner rather than the looks. Its 21 5/8-inch radius curves fit inside a four-by-eight-foot space, and the set includes the feeder track, so there's no soldering on day one. The moulded roadbed does read as plastic until you paint and re-ballast it, which is a fair trade for track that just works.
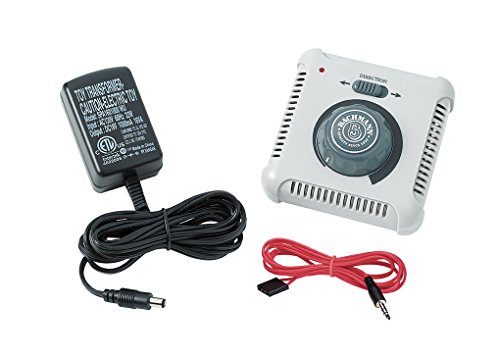
A mains transformer and a throttle knob in one box: it turns household power into the low-voltage DC an analog locomotive runs on, with the knob setting speed and a switch setting direction. One pack drives one train on one electrically connected stretch of track. Worth checking are a direction switch you can reach without looking and a built-in circuit breaker, because beginners short the rails often.
Why we picked this exact one: Bachmann's 44211 power pack with speed controller is the plain, cheap, plug-and-play option, and at 4.6 stars across more than four hundred ratings it's where most HO beginners land. Bachmann states plainly that it is not DCC compatible, which is the right call for this page: a command station you won't use for a year is money better spent on scenery. The knob is coarse at the slow end, so creeping a locomotive along at a scale walking pace takes practice.
A road-switcher diesel in 1:87 with all-wheel drive, so it keeps picking up current across patches of rail that aren't perfectly clean. A DCC-ready model carries an eight-pin socket inside: it runs on plain analog power now and accepts a decoder whenever you decide to go digital. Four-axle diesels are the forgiving choice on a first layout because they take tighter curves than six-axle units do.
Why we picked this exact one: The Bachmann EMD GP40 in CSX colours is the cheap end of a real HO locomotive rather than a toy, and Bachmann lists it as performing best on 18-inch radius curves or greater, which the oval above clears. It arrives DCC-ready with the eight-pin socket fitted, so going digital later costs a decoder and ten minutes rather than a rebuild. It sits at 4.2 stars, and the recurring complaint is a noisy drive at full throttle, which matters less when slow running is the point.
An assembled goods wagon in 1:87 that rolls straight out of the box. What matters is underneath: metal wheels run quieter and track better than plastic ones, and knuckle couplers let you add more wagons later without changing anything. One wagon turns a running locomotive into a train, and a train is what makes an oval worth watching.
Why we picked this exact one: The Walthers Trainline offset hopper in Rock Island livery comes assembled with RP-25 metal wheels and magnetic knuckle couplers, and at 4.8 stars over ninety-five ratings it's about as safe as a cheap wagon gets. Trainline is the budget range of a serious manufacturer, so the mouldings are plainer than the premium line while the running gear follows the same thinking. It is a single wagon, so plan on two or three more once you know what you're modelling.
A small sled with a replaceable abrasive pad that you push along the railheads to lift oxide and the oily film new track arrives with. It reaches between buildings and through turnouts where a folded cloth cannot. Pads are consumable and sold separately, and the abrasive wants to be mild enough not to score the rail.
Why we picked this exact one: Bachmann's hand-held track cleaner is a rebadged Proses Easy Cleaner, a five-inch sled that costs less than a single wagon and carries 4.4 stars over 178 ratings. Bachmann's own instructions tell you to wipe the rails about every eight hours of running and warn specifically against steel wool, so having the right tool on the bench from day one saves an improvised one doing damage. The pads wear out, so budget for replacements.
Four of these five do nothing until the fifth turns up, which is the thing that trips people: order them together or don't bother. Once the oval runs, resist buying a second locomotive for a month and put that money into the board instead. And if the patience this takes suits you better than the wiring does, building a plastic kit off a sprue uses the same tweezers and none of the electricity.
Or Just Buy the Box
There's a gap between what those five items cost and what a complete boxed set costs, and it's wide enough that pretending otherwise would be dishonest. A set hands you a locomotive, wagons, an oval and a controller for well under half the money, already matched to each other, in one delivery. What you give up for that saving is real, though, and the table below is the honest version of it. If the appeal was a lit little world rather than anything that moves, a book nook on a shelf is worth weighing up before you commit to rails at all.
The one-box alternative
HO Scale Electric Train Set
A boxed set holding everything needed to run a train the evening it arrives: a diesel locomotive, three goods wagons, a full oval of snap-together track with a terminal piece, and a power pack with a speed controller. The track has roadbed moulded in, so nothing needs nailing down. Check the oval's stated dimensions against your space, because the box rarely puts them on the front.
Why we picked this exact one: Bachmann's Thoroughbred is the best-reviewed HO set at this end of the market, 4.5 stars across 1,120 ratings, and it ships from Amazon rather than a marketplace seller. It holds an F7 diesel with a working headlight, a quad hopper, a gondola and a wide-vision caboose, plus a 47 by 38 inch oval of E-Z Track: twelve curves, one straight and a plug-in terminal rerailer. Reviewers agree the locomotive runs well and the wagons feel cheap, which is a fair description of the trade.
One oval and one three-wagon train, running the evening it arrives. The loop measures 47 by 38 inches and the box is complete as sold.
The same kind of oval and a single wagon, but the track is a system you can keep adding turnouts and sidings to for years. better here
Quality of the tools
Reviewers like the F7 locomotive and say the wagons and the small track clips are the weak points.
The locomotive is DCC-ready with the eight-pin socket fitted, the wagon rides on metal wheels, and the track joiners are the part modellers single out. better here
The first evening
Open the box, clip the oval together, plug in two wires, run a train. Twenty minutes and no decisions. better here
Four separate deliveries, and you still have to work out which wire goes where before anything moves.
Where it leads
The track expands within its own system and the power pack keeps working. Whether the included locomotive will take a decoder is not stated on the listing.
All of it carries forward: the controller runs any analog locomotive, the track takes turnouts, and the engine takes a decoder when you want one. better here
Our verdict: it depends. Buy the set if you want a train running tonight and aren't sure you'll still care in six months; build it from the picks if you already know you want to ballast track and plant trees.
Here's what surprises people: once the train runs, you'll be bored of watching it inside twenty minutes. What holds attention is the landscape it runs through, and that landscape is granules, glue and nylon fibre costing less between them than one locomotive. Work in order, because the order is unforgiving. Ballast and glue the track, then ground cover, then grass, then anything that stands up. If it turns out you enjoy the gluing more than the running, building miniature rooms scratches the same itch at a bench instead of on a board.
06Pick 06 of 12
HO Scale Track Ballast
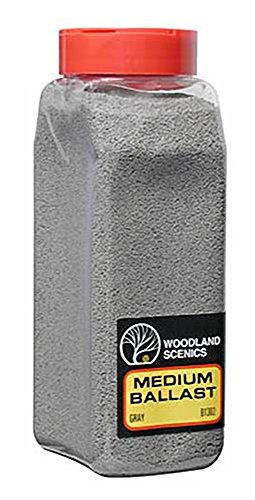
Graded stone-look granules that go between and beside the sleepers to lift the track off the board. Grade matters more than colour: fine reads right in N, medium in HO, coarse in the larger scales. A shaker top meters it far better than tipping from a bag.
Why we picked this exact one: Woodland Scenics' medium grey shaker is the grade matched to HO, and at 4.7 stars over sixty-three ratings it's the default on most first layouts. The shaker top is the real reason to take it over the bagged version, because you can lay a thin even bead along the sleepers instead of burying them. Grey is the safe choice, but real railways ballast with whatever rock is local, so if you are modelling a specific line its colour may be nothing like this.
A watery, water-based glue that soaks into loose scenic material and dries matte and almost invisible. It goes on by dropper or sprayer over material that has already been wetted, never brushed on dry. The same bottle fixes ballast, turf and static grass, which is why it tends to be the first scenery purchase after the ballast itself.
Why we picked this exact one: Woodland Scenics Scenic Cement is pre-mixed to roughly what modellers make themselves from white glue and water, which is why it carries 4.6 stars across more than thirteen hundred ratings. Buying it saves the mixing, not the money, since a bottle of white PVA and a jar does the same job for less. What it cannot do is let you skip the wetting step first, and that is precisely the step beginners drop.
Short nylon fibres cut to a single length, which stand upright when an electrostatic applicator charges them into wet glue. Four millimetres reads as rough pasture in HO. Mixing two or three lengths and shades is what stops a finished verge looking like a bowling green.
Why we picked this exact one: Woodland Scenics FS618 in 4 mm medium green is the length and shade most people start with, at 4.7 stars over 184 ratings. Worth knowing before you buy: these fibres only stand up under an electrostatic charge, and for a first small patch modellers press pinches of them into a line of full-strength white glue by hand instead. Buy a second shade at the same time, because one colour on its own looks manufactured.
Moulded trunk-and-branch skeletons, three to five inches tall, that you bend into shape and then cover with foliage material. They arrive unfinished, so painting the trunk and adding leaf foam is part of the job. Shape matters more than the leaves: branches all sweeping one way give the tree away instantly.
Why we picked this exact one: The Woodland Scenics deciduous armature pack covers the 3 to 5 inch range that suits HO lineside planting, and at 4.4 stars over 164 ratings it's the usual starting point. These are armatures only, so you also need foliage material and a dark grey or brown primer; modellers are consistent that priming the armature first is what separates a convincing tree from a green blob. Expect each one to take an evening rather than a minute.
A small plastic kit of the buildings that cluster along a railway: a handcar shed, a storage shed and a signal relay box. Parts are moulded in colour, so a usable result needs no paint, though a thinned wash lifts it a long way. Small lineside structures do more for a scene than one large building, because they sit close to the track where the eye already is.
Why we picked this exact one: The Walthers Trainline Trackside Tool Buildings set is sold as a first kit and says so on the box, with pre-coloured parts and illustrated instructions, and it carries 4.7 stars over fifty-seven ratings. Three structures come out of one box, the largest a handcar shed at three by eight inches, which is a lot of lineside from a single purchase. Moulded colour is also its limitation: straight off the sprue the walls look flat, and ten minutes with a thinned dark wash fixes that.
Do one stretch properly rather than a thin layer everywhere. A finished two feet beside the track teaches you more than a whole board under green flock, and it gives you something worth photographing while the rest is still bare plywood. The smell of the wet glue is half the fun, honestly. And if that degree of fiddliness appeals, people take it much further: whole scenes built inside a walnut shell make a four-by-three board look generous.
The Bills That Arrive After the First Loop
Model railways don't bill you once. They bill you in small, regular amounts, and the amounts are mostly your own doing. Scenery sits at the cheap end: a shaker of ballast, a bag of turf, a pack of fibres, each about the price of a takeaway and each lasting a long time. Track is the middle, and turnouts are the shock, because one point costs a meaningful slice of what the whole oval did. Locomotives are where the money actually goes, and a sound-fitted one can cost more than everything else on this page put together.
The trap most people fall into is buying a second locomotive before the first loop has any scenery, then a third, and ending up with a shelf of boxed engines beside a bare board. Finish one scene before you buy another train. Going digital later is its own line, and an entry-level command station is a step up from an analog pack rather than a different universe. If the running total puts you off, the same patience and the same tweezers go into painting a small force for solo tabletop wargaming, where the spending stops when the squad is finished.
Two Books That Save You a Year of Guessing
You can learn this hobby entirely from forums, and plenty of modellers will tell you to. The case for a book is different: a book gives you the order to do things in, which is exactly what a thread cannot. Scenery is where that bites, because every step taken out of sequence has to come off again. Both of these are scenery books, and that's deliberate, since the wiring on a single analog oval is two wires and the scenery is the next ten years. The comparison of the different miniature formats is worth a look as well if you're still weighing up whether a railway is the version of small worlds you want.
11Pick 11 of 12Book worth reading
Model Railroad Scenery Guide
A photo-led scenery manual that works through terrain, rock, ground cover, water and structures as recipes you follow rather than theory you absorb. It assumes no prior skill and names the material for every step. The approach it teaches, layering cheap materials instead of buying expensive ones, is still how most layouts get built.
Why we picked this exact one: Dave Frary's third edition is the scenery book modellers name when somebody asks on the forums, and it's usually the cheapest thing on this page. It carries 4.7 stars over 287 ratings, and the hundreds of in-progress photographs are the actual content rather than illustration. It's an older book, so some named products have been discontinued, but the sequence and the proportions have not changed.
A full overview of scenery built around what is sold now, from terrain shells and rock moulds through water effects, static grass and townscapes. Each technique appears as a project with photographs of every stage. It covers the newer products that an older manual simply cannot.
Why we picked this exact one: Kathy Millatt wrote this one, and she is a working modeller who has hosted scenery series for Model Railroader rather than someone compiling other people's methods. At 4.8 stars over 196 ratings it's the best-reviewed current scenery book, and it pairs well with the older classic because it handles static grass applicators and modern water products properly. It costs noticeably more than the Frary, which is the trade for being current.
Read one of them before you glue anything down. The most common regret on a first layout is ballast poured over track that still needed adjusting, and both books tell you to run trains over everything first.
Why Your Train Keeps Stopping in the Same Spot
Why does my locomotive stall at exactly the same place every lap?
Because it's a contact problem at one joint, and beginners almost always suspect the engine first. Rail joiners on sectional track can slip underneath the rail instead of gripping it, which looks fine and conducts nothing. Run a fingertip along the railheads in both directions: a joint you can feel is a joint that will stall a train. Reseat it, and if the spot survives that, clean the rail there before you take the locomotive apart.
I ballasted the track and now it crunches and lifts in lumps. What went wrong?
The wetting step got skipped, or it never reached the bottom. Dry ballast repels water, so modellers mist it first with water carrying a couple of drops of dish detergent, or a half-and-half mix of water and isopropyl, before flooding it with diluted glue from a dropper. If the wetting agent only soaks the top, the glue sets as a crust with loose grains underneath and the first derailment breaks it open. Soak it properly, leave it a day or two, then clean the railheads, because glue dries on the rail as happily as on the stone.
Should I skip the analog stage and start with DCC?
Only if you already know you want two trains moving independently, because that is the one thing it buys you. Analog varies the voltage in the rails, so everything standing on a connected stretch speeds up and slows down together, and a second train means cutting the loop into electrically isolated blocks with their own controllers. DCC instead holds a constant voltage on the rails and sends messages to a decoder inside each locomotive. On one oval with one train the difference is invisible, so buy locomotives that are DCC-ready and the upgrade later costs a decoder rather than a fleet.
How steep can a hill be before trains stop climbing it?
Shallower than you'd guess, and getting this wrong is what forces people to rebuild a board. HO locomotives struggle on anything above about three percent, and a short train on a long grade is not the same problem as a long train on a short one. The part everyone forgets is the transition: if the grade starts abruptly at the bottom and ends abruptly at the top, couplers pull apart and the front of the locomotive catches the rail. Ease into and out of every grade over a couple of feet.
Is a static grass applicator worth buying straight away?
No, and this is where a lot of first-layout money disappears. The fibres only stand up under an electrostatic charge, so without one you're pressing pinches into full-strength glue by hand, which is fine for small clumps and miserable across a field. Modellers who own one are clear that technique beats price: hold it a quarter to half an inch above a thin bed of glue, and mix two or three fibre lengths and shades so it doesn't read as a lawn. Fibres in the ten to twelve millimetre range need a powerful unit to stand up at all. Do the ballast and the ground cover first, then see whether you still want it.
People Worth Following Into This Hobby
Real practitioners we found while researching this setup — people who do the work, show their process, and publish on sites they run themselves. No sponsorships, no affiliations; we just think they're worth your time.
Builds small shelf layouts professionally and writes down the exact paint shades, ballast sources and backdrop heights he uses on them.
This page argues that a first railway should be a board you can actually finish, and his tips page is the shortest honest list anywhere of what makes a small layout look right, including the ballast and tree advice behind two of the picks above.
Builds small prototype-based layouts in S and 7mm scale and writes about why he keeps them small, having torn down a finished one to move house.
His Achievable Layouts writing is the clearest argument for the premise of this page, that a railway sized to your time and budget is the one that gets finished.
Love what you see here? Save individual picks with on any item, or copy everything to a list of your own in one click — great for coming back to later, or dropping as a not-so-subtle hint.