A model kit arrives as flat frames of grey plastic with everything still attached to them — wings, wheels, a pilot the size of a grain of rice. You clip the pieces off, weld them together with a solvent, paint them, and a few evenings later there's an aircraft or a tank on your shelf that didn't exist before. People build these at kitchen tables, in spare rooms, and at club nights where someone always brings a magnifier. Here's the part nobody expects: the whole industry started with a tractor. Airfix's first plastic model, back in 1949, was a Ferguson farm tractor made as a promotional giveaway, and assembling them cost so much that the company ended up selling the pieces unassembled through Woolworths instead.
The first decision isn't a tool, it's a subject. Planes, tanks, ships and cars all run on the same five or six tools, but they pull you in different directions — armour builders end up obsessed with mud and chipped paint, aircraft builders with panel lines and masking canopies. If you'd rather skip glue and paint entirely for a first go, snap-fit Gunpla kits click together straight from the box, and this page is about the older, messier kind. Whatever you pick, pick something with a low parts count. A single-engine fighter or a small tank teaches you everything a four-engine bomber does, in a quarter of the evenings.
Our line on this: buy the smallest pile of tools that can finish one kit and stop there. Nippers, a knife, liquid cement, a few sanding sticks and some acrylic paint will get a model built and painted. Everything else can wait until you know whether you like it.
Everything below is cheap enough that if the kit ends up half-built in a drawer, you've lost about the price of a takeaway.
Where This Little Kit Can Take You
A few real moments and results from this hobby — made with tools no fancier than the ones below.
Sabre finished on the shelfBare metal panels on a 1:48 jet, built and painted at a kitchen table.
A tank parked in winterThe same five tools build armour, and weathering is where it stops looking like plastic.
Claim a corner you don't have to clear every night. Half-built models and wet paint travel badly, and the single biggest reason first kits stall is that they get packed away mid-build. If small worlds appeal to you more than small machines, it's worth comparing the tiny-scale crafts side by side before you commit to one. Honestly, though, the smell of fresh styrene when you first lift the lid is half of why people keep doing this.
Five Tools and One Quiet Evening
Almost everyone starts by buying too much. You'll see thirty-piece tool kits and assume that's the entry fee. It isn't. Five things take a kit from sprue to shelf, and four of them cost less than lunch. The fifth is paint, and that's where people genuinely come unstuck — water-based acrylics are fussy about bare plastic and behave far better under a brush than through anything else, which is the opposite of what most beginners assume.
Disclosure: This section may contain affiliate links to Amazon. We may earn a small commission from qualifying purchases at no extra cost to you.
01Pick 01 of 13
Plastic Model Sprue Cutters
A small pair of single-bevel nippers made to cut soft styrene rather than wire. The flat face sits against the part so the cut lands flush with the surface instead of leaving a stub. Look for thin jaws that reach between parts on a crowded sprue, and keep them off anything metal, which rolls the edge over in one squeeze.
Why we picked this exact one: The Beaditive Precision Flush Cutter is the sensible middle of this category: thin enough to get in between parts, cheap enough that you won't baby it. It rates 4.6 stars across more than two hundred and fifty buyers. The spring is stiffer than on the boutique Japanese nippers, so your hand notices after an hour of clipping, but at under fifteen dollars that's a fair trade.
A thin metal handle that grips a replaceable scalpel-style blade, used for shaving the leftover nub after a part comes off the sprue and for slicing moulding seams along a fuselage or hull. The pointed number 11 blade is the one modellers reach for almost every time. Blades are consumables rather than tools, so a kit that includes a stack of spares saves you dragging a blunt edge across soft plastic.
Why we picked this exact one: The Stedi All Metal Craft Hobby Knife Kit wins on the twenty spare blades more than on the handle. It holds 4.7 stars, and the knurled metal body doesn't roll off a sloped desk the way the round aluminium ones do. The storage tin is flimsy, but you'll be swapping blades often enough that it barely matters.
A watery solvent, not a sticky glue. You hold two parts together and touch the brush to the join, and capillary action pulls the liquid along the seam, softening both faces so they fuse. It flashes off fast and leaves almost nothing on the surface, which is why modellers prefer it to the old squeeze-tube cement that strings everywhere. A bottle lasts years because each joint takes a brush-tip's worth.
Why we picked this exact one: Tamiya's Extra Thin Cement, the green-capped 87038 bottle, is what practitioners name first in almost every thread on the subject, and 4.7 stars from well over a thousand buyers backs that up. The brush in the cap is the right size for a 1:72 fuselage without flooding it. It will not touch a painted surface, so plan your build order around bare plastic joints.
Flexible abrasive sticks in a range of grits, coarse enough to take a glue ridge down and fine enough to polish the plastic back to a smooth sheen. The narrow shape reaches into wheel wells and along the spine of a fuselage where folded paper can't sit flat. Work down through the grits rather than jumping straight to fine, and finish around 400 grit or finer before paint goes near it.
Why we picked this exact one: The Honoson 20-piece sanding stick set covers the grit range a first build needs for the price of a coffee, with 4.6 stars from more than a thousand buyers. The teardrop shape is genuinely useful on wing roots. They wear out faster than a rigid file, which is exactly why twenty of them beats one good one at this stage.
A tray of small acrylic pots covering base colours, metallics and shading tones, plus fine brushes and a bottle of thinner. Water-based acrylics are the easy starting point because they wash out of a brush under the tap and don't fill the room with fumes. They behave noticeably better applied with a brush than pushed through an airbrush, and they want a clean, lightly sanded surface to grip.
Why we picked this exact one: The Smallbudi 20-colour set earns its slot mainly because the brushes and the thinner are in the box, which keeps the essentials list to five items instead of six. It holds 4.7 stars, though from under two hundred buyers so far. The dedicated hobby ranges such as Vallejo and Tamiya are better pigmented and cost roughly twice as much, which is the upgrade to make once you know you'll keep painting.
With these five on the table you can build, sand and paint a whole kit without borrowing anything. Expect the first one to look rough, and expect to find the seam you missed about ten seconds after the paint goes on. If a whole world in scale grabs you harder than a single aircraft does, a first model railway runs on very much the same patience.
Or Start With One Box That Has Everything
Add those five picks up and you're near seventy dollars before you own a single kit, which is a lot to spend on something you haven't tried yet. Revell sells boxes that put a model, a few paint pots, a brush and a tube of cement together for less than twenty. It's a genuinely different way in, so here's the honest comparison rather than a sales pitch.
The one-box alternative
Beginner Model Kit With Paints And Glue
A single box holding a small plastic aircraft kit alongside the few paint colours its scheme needs, a brush and a tube of cement. Nothing else has to be bought before you start. The parts count is deliberately low and the included paints are basic pots rather than a full range, so it is a complete first build rather than a stocked workbench.
Why we picked this exact one: Revell's F-15E Strike Eagle All-Included Set 73972 is the one box of this type actually in stock, and the listing spells out what's inside: 70 parts in 1:144, basic Revell paints, a brush and glue. It is a new listing with no accumulated ratings yet, which is the honest caveat here. The tube cement is the old thick kind rather than a thin liquid, so expect a visible seam you can't fully sand away.
One 1:144 jet of 70 parts, in the handful of colours that scheme needs. When the little pots run dry, that is the end of it.
Any kit you fancy, over and over. Twenty paint colours cover aircraft, armour and cars for a long run of builds. better here
Quality of the tools
A tube of thick cement and one brush. No nippers, no blade, no abrasives, so parts get twisted off the sprue and the seams stay where they are.
Flush nippers release parts cleanly, a fresh blade shaves the nub flat, and sanding sticks actually remove the join line. better here
The first evening
Open the box, clip, glue, paint, done. There is a finished aircraft on the desk the same night. better here
Slower. The first session goes on working out what each tool wants you to do with it.
Where it leads
Nothing carries forward except leftover paint, and you end up buying the tools anyway for kit two.
Every one of the five picks works on every kit after it, whatever the subject or scale. better here
Our verdict: it depends. Buy the box if you want to know tonight whether you enjoy this; build from the picks if you already suspect you'll still be at it in March.
These are what you buy after kit one, once you know what actually annoyed you. None of it decides whether a model gets finished. It decides how much swearing happens along the way. Tweezers are the usual first regret — a part the size of a comma flicks off a fingertip and the carpet wins, every time. If you already keep fine tweezers and a cutting mat on a soldering bench, you're halfway stocked already.
06Pick 06 of 13
Self-Healing Cutting Mat
A layered PVC mat that closes up behind a blade instead of collecting score marks, printed with a grid for measuring strip and tape. It gives a blade something to stop against and keeps solvent and paint off the furniture underneath. An A4-sized one is plenty for aircraft and armour up to about 1:35.
Why we picked this exact one: The Army Painter's A4 self-healing mat is sized for a model rather than for dressmaking, which most cheap mats are not, and it sits on 4.7 stars from over two thousand buyers. The non-slip backing stays put on a smooth desk. It will curl at the corners if you store it standing up against a radiator.
A set of stainless tweezers in straight, curved and angled tips, sized for parts measured in millimetres. The angled ones are the useful pair for modelling, because they let you look past your own hand at the spot you're placing a part into. Fine tips matter more than the number of pieces in the set.
Why we picked this exact one: The XOOL 9-piece precision tweezers set gives you several tip shapes to find out which you actually reach for, at 4.7 stars from close to four thousand buyers. The angled and curved pairs do nearly all the work on a model. The tips arrive slightly misaligned on some sets and need a gentle squeeze to close true.
Two small bottles that do opposite jobs. The setting solution goes under the decal to help it slide into place and grip; the softening solution goes on top afterwards and relaxes the film so it sinks into panel lines and curves. The strong one is not for positioning, and a heavy puddle of it will wrinkle a decal beyond saving.
Why we picked this exact one: The Microscale pairing of Micro Set 101 and Micro Sol 102 is the default answer in modelling threads, and this two-bottle package saves hunting them down separately, at 4.7 stars from three thousand buyers. Having both matters because they are not interchangeable. It is dearer than one bottle of a generic softener, and the strong one can cloud a gloss coat if you flood it.
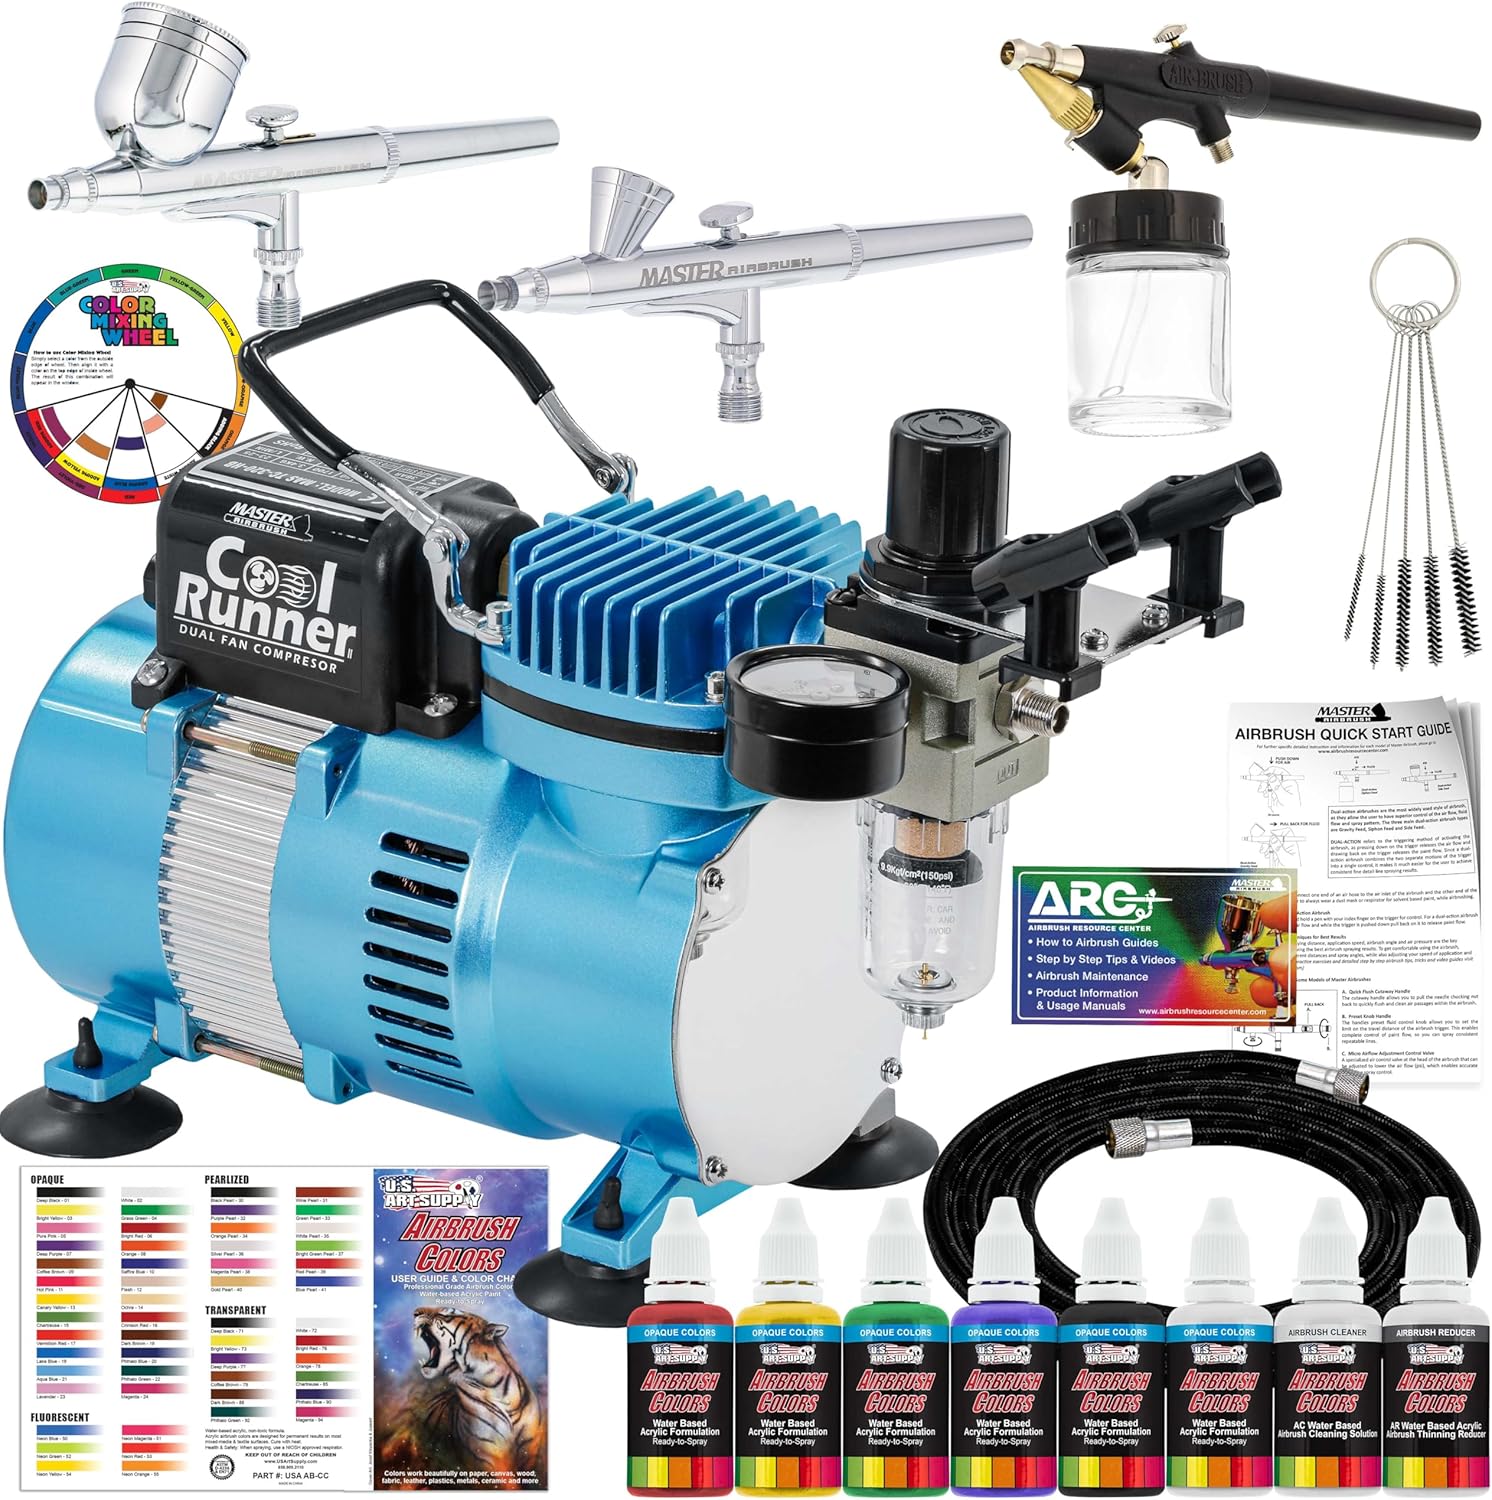
A compressor with a regulated air supply and one or more gravity-feed airbrushes, used to lay down even base coats, soft camouflage edges and faded panels that a brush can't reproduce. Dual-action means the trigger controls air and paint separately, which is what gives the fine control. It brings a whole second hobby with it: thinning ratios, needle cleaning and somewhere ventilated to spray.
Why we picked this exact one: The Master Airbrush Cool Runner II is the step up worth taking once brush marks, not building, are what's holding your models back, which for most people is somewhere around kit four or five. It carries 4.6 stars from over seven thousand buyers and includes the compressor, so there's no second purchase. Buy it on day one and you'll spend your first weekend learning to clean a needle instead of learning to build, which is why it sits here rather than in the essentials.
Of everything here, I'd move the decal solutions up the queue. They're the difference between markings that look painted on and markings that look stuck on. The airbrush can genuinely wait a year. And if what appeals is really just a quiet hour with a sharp blade and something taking shape in your hands, whittling a block of basswood scratches a very similar itch for the price of one kit.
Making It Look Like It Lived Outdoors
A clean model looks like a toy. That's the thing nobody warns you about — the paint goes on, the colour is right, and it still reads as plastic, because real machines are streaked and dusty and worn thin wherever boots and hands go. Weathering is the sub-skill that fixes it, and it's where armour builders spend most of their time. Push it a step further and you end up building the ground the vehicle stands on as well.
10Pick 10 of 13
Dry Weathering Pigments for Models
Jars of very fine coloured powder, essentially artist's pastel ground down, brushed onto a model to build up dust, dried mud and earth. They sit in corners and recesses the way real dirt does, and they can be moved around with a damp brush before being fixed in place. Earth and sand tones do the most work; the bright ones are for specific theatres.
Why we picked this exact one: Vallejo's Pigment FX Mud & Sand set covers the four earth tones that get used most, at 4.7 stars from over three thousand buyers, and the 35ml pots will outlast any reasonable number of builds. The powder is fine enough to drift, so work over paper. Pigments need sealing afterwards or they rub off on your fingers.
A bottle of very thin dark enamel with a brush in the cap. You touch it to a recessed line and it runs along the groove by capillary action. It settles in the groove and leaves the surrounding paint alone, and the overspill is wiped back with a cotton bud and a little thinner. Grey suits light schemes and aircraft; black is for dark or high-contrast subjects.
Why we picked this exact one: Tamiya's Panel Line Accent Color in grey comes pre-thinned to exactly the consistency this job needs, which removes the part beginners get wrong when mixing their own, and it holds 4.7 stars. Grey is the more forgiving of the two shades on a first attempt. It is enamel-based, so it needs its own thinner for clean-up and it can craze acrylic paint if you let it pool for too long.
A water-based clear coat that dries dead flat and locks everything underneath it in place. It goes on at the end, over decals and weathering, and pulls the whole model to one consistent sheen so the glossy patches under the markings disappear. It can also be brushed on earlier to seal a stage before you work over the top of it.
Why we picked this exact one: AK Interactive's Ultra Matte Varnish 183 is the cheapest honest way to finish a model without a spray setup, and at 4.8 stars it is the best-liked item in this section. Being water-based, it brushes on without stripping acrylics underneath. Shake it properly and go on thin, because a heavy coat of any matte varnish can frost over dark colours.
Go light the first few times. Pigments in particular are easy to overdo, and a tank buried in dust just reads as muddy rather than weathered, so step back and squint every few minutes. The same restraint applies if you drift toward tiny furnished rooms, where a little grime sells a scene and a lot of it wrecks one.
One Book Worth the Shelf Space
Most of what you need is free online, scattered through build threads and forum arguments. A book earns its place by putting the basics in order instead of in search results — seams, then paint, then decals, then weathering, in the sequence you actually do them. It's the same reason people keep a printed reference beside a solo wargaming table rather than scrolling for it mid-turn.
13Pick 13 of 13Book worth reading
Scale Modeling Beginner Reference Book
A paperback that walks the whole sequence of a build in the order it happens, with step photographs of each stage rather than finished models. It covers the dull, decisive parts most online guides skip, like how a filled seam should look before paint and how much sanding is enough. Written for someone with a first kit on the table, not for a contest builder.
Why we picked this exact one: FineScale Modeler's Essential Skills for Scale Modelers, written by Aaron Skinner, is the book modelling forums point newcomers to, and it holds 4.7 stars. The photography carries it: you can see what a correctly filled seam looks like, which is hard to describe in words. It leans toward aircraft and armour, so car and ship builders will find some sections thinner.
Read the first few chapters before your first kit, then leave it open on the desk while you work. The photographs of what a badly filled seam looks like under paint are worth more than any of the text around them.
The Things That Go Wrong on Kit One
Why does my glue melt a fingerprint into the model?
Liquid cement isn't glue in the usual sense. It's a solvent that dissolves the surface of both parts so they fuse into one piece of plastic, which is why the joint is strong and why a softened part keeps your fingerprint permanently. Beginners apply far too much and then hold the parts firmly while it works. Put the pieces together first, touch the brush to the seam and let it get drawn in along the join, then hold the model by edges nobody will ever see.
Why do my decals sit on a silvery patch instead of on the paint?
That's silvering: air trapped under the clear decal film against a matte surface that is, at that scale, slightly rough. It happens because most people decal straight onto flat paint. Lay a gloss coat over the area first so the film has nothing to trap air against, apply the decal, then knock the whole model back to matte at the end. Setting solutions help a lot, but modellers are clear that they reduce silvering rather than prevent it.
Should I just buy an airbrush now and skip brushes altogether?
No, and it's the most expensive wrong turn in the hobby. An airbrush brings a compressor, thinners, a cleaning routine and somewhere ventilated to spray, and none of that teaches you to build. Water-based acrylics are better behaved under a brush anyway, where they aren't drying on a needle tip between passes. Build three or four kits with a brush, and buy the compressor only when the finish is genuinely the thing holding you back.
Which kit should I actually start with?
Not the one with the best box art. Experienced builders steer newcomers away from four-engine bombers and multi-part ships toward a single-engine fighter or a small tank, because every extra part is another seam and another lost evening. Scale is a real trade-off rather than a rule: 1:72 kits have fewer parts, while 1:48 parts are bigger and easier to hold on to. Either is fine, and parts count matters far more than scale does.
Why won't the cement stick to the part I already painted?
Liquid cement only welds bare plastic. On a painted surface it attacks the paint and bonds nothing, which is why people hit this the moment they paint a cockpit and then try to cement the seat in. Scrape the two contact faces back to plastic, or switch to superglue for that joint. Keep superglue well away from clear parts, though, because the fumes fog the plastic white and that haze doesn't polish out.
People Worth Following Into This Hobby
Real practitioners we found while researching this setup — people who do the work, show their process, and publish on sites they run themselves. No sponsorships, no affiliations; we just think they're worth your time.
Paul Budzik documents scale modelling techniques in long illustrated articles and videos, from masking methods to surface texture.
Readers who get past a first kit and want to know why a seam reappears under paint will find the technique articles here go deeper than any beginner guide.
Love what you see here? Save individual picks with on any item, or copy everything to a list of your own in one click — great for coming back to later, or dropping as a not-so-subtle hint.