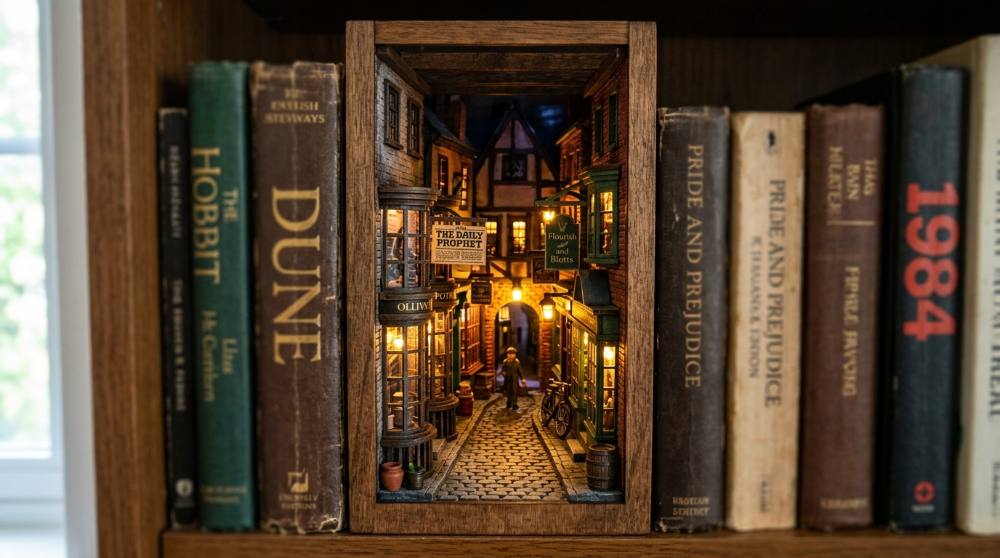
A book nook sits in the middle of a row of books rather than at the end like a bookend, and from the spine side it reads as one more hardback. Turn your head and there's a doorway. Behind it: a lit alley, a staircase, a shop window glowing at dusk. The format traces back to a Tokyo artist who goes by Monde, who built a back-alley insert sized to fit paperbacks and posted it around 2018, and it travelled far enough that by early 2020 it was being written up as a worldwide craze. Academics have since filed book nooks under pandemic bookshelf culture, which is a strange destiny for what is essentially a tiny street in a box.
If you've compared the different miniature formats side by side, the thing that makes a nook its own animal is the front. A diorama opens toward you and shows the whole scene at once. A nook gives you one doorway and hides the rest. Everything else can stay unbuilt. That constraint is why beginners get good-looking results fast - you only ever have to finish what the doorway can see.
My advice: buy one kit and almost nothing else. A craft knife, a bottle of tacky glue, tweezers and a dozen cheap acrylics will carry you through a first build and most of a second. The soldering iron can wait. So can the moss.
Nothing below costs enough to sting if you build one nook and decide you'd rather just read the books.
Where This Little Kit Can Take You
A few real moments and results from this hobby — made with tools no fancier than the ones below.
Tiny bookshop between the paperbacksFrom the spine side it gives nothing away until you turn your head.
Warm light through a tiny doorwayThe whole scene is about as deep as a paperback is wide.
Mid-build, parts still on the matMost of a nook is flat sheets and loose tabs until the last hour.
None of this needs a workshop. A kitchen table and a decent lamp will do, and the whole business smells faintly of scorched plywood for the first hour, which I've come to like. If you'd rather see a whole scene at once than glimpse one through a door, a full diorama built to scale goes the opposite way.
Five Buys and You're Building Tonight
Kits arrive with the plywood, the acrylic glazing, the printed paper and usually a small light. They almost never arrive with glue. That's the classic first-night disappointment - the box lands, you open everything out, and you can't start. The five things here close that gap and add the one tool every experienced miniature builder names first.
Disclosure: This section may contain affiliate links to Amazon. We may earn a small commission from qualifying purchases at no extra cost to you.
01Pick 01 of 14
DIY Miniature Book Nook Kit
A book nook kit supplies every structural piece pre-cut from thin plywood, plus printed paper panels, acrylic glazing and the small decorative parts that fill the scene. Most include a battery-powered light and an illustrated step-by-step booklet. Beginners should look for a kit with a modest part count and a single-storey layout rather than a multi-level build.
Why we picked this exact one: The CUTEBEE Owl Bookstore is the pick here because it is built around a short build rather than a showpiece - the maker quotes one to two hours with the illustrated manual, and the part count stays low enough that nothing stalls. It carries a 4.7 rating across more than fifteen hundred ratings, which is unusual steadiness in a category full of one-off listings. The scene is a warm interior rather than a street, so there is less fine lattice work to misalign on a first attempt.
A hobby knife with replaceable pointed blades handles the laser-cut tabs, paper panels and thin card that a miniature build is made of. The self-healing mat protects the table and keeps the blade from skating, and a metal ruler gives a straight edge that a blade cannot shave into. Replaceable blades matter more than handle comfort, because a dull blade tears plywood rather than cutting it.
Why we picked this exact one: The W.A. Portman set pairs the knife with the mat and ruler rather than selling the knife alone, which closes the gap most beginners fall into - buying a blade and cutting on the kitchen table. At 4.7 stars it sits among the better-regarded craft sets in this bracket. The mat is 9x12 inches, large enough for a nook's biggest sheet but not for much else, so a bigger project will eventually want a second one.
Tacky glue is a thickened PVA that grabs quickly and does not run off a vertical surface, which suits the thin plywood, printed card and paper layers in a miniature build. It dries clear and stays slightly flexible, so a join can absorb a knock without snapping. A beginner should look for a thick formula in a small bottle with a fine nozzle rather than a general-purpose school glue.
Why we picked this exact one: Aleene's Original Tacky Glue is the default in miniature circles because it holds a part in place within seconds rather than sliding while you reach for the next piece. More than five thousand ratings at 4.7 stars say the formula has not drifted. The 8 fl oz bottle is more than one nook needs and the wide nozzle is clumsy on tiny parts, so decanting a little into a finer applicator is worth the minute it takes.
Reverse tweezers hold closed at rest and open when squeezed, so they grip a part without any effort from your hand. In miniature work this turns a two-hand job into a one-hand job: the tweezers hold the piece against its join while the glue grabs. A set with a mix of straight and curved tips covers both flat gluing and reaching behind a wall.
Why we picked this exact one: The Honoson reverse-action set is chosen over ordinary precision tweezers because the self-clamping action doubles as a clamp - squeeze, place, let go, and the tool holds the part while the tacky glue sets. It rates 4.7 stars across roughly five hundred ratings. The tips are not as needle-fine as a watchmaker's pair, so very small paper details still want a standard sharp tweezer alongside them.
Craft acrylics cover bare plywood in thin coats and clean up with water, which makes them the standard choice for miniature scenery. A twelve-colour set gives enough range to mix greys, browns and warm interior tones without buying individual pots. Look for a multi-surface formula so the same bottle works on wood, card and the occasional plastic fitting.
Why we picked this exact one: Apple Barrel Essentials is the budget set worth owning here: twelve 2 oz bottles at a price where using paint freely does not feel wasteful, rated 4.8 stars over two thousand ratings. The colours are craft-grade rather than finely pigmented, so a dark shade can need two coats over bare wood - which is the right habit anyway, since one thick coat bows thin plywood.
With these you can finish a kit across two evenings and have something lit on the shelf by the weekend. Go easy on the paint. Thin coats dry fast and thick ones bow the plywood, and you'll only find out three steps later when a wall won't sit flush against its neighbour. If tiny furniture and room-by-room interiors pull at you more than a single lit view does, building tiny rooms at dollhouse scale scratches a close relative of this itch.
Where the Illusion Starts Paying Off
A finished kit looks like a finished kit. The distance between that and the photographs that made you want one is almost all small stuff: a figure standing in the doorway, a weed in a gutter, a wash that darkens every mortar line at once. None of it is structural. All of it is what people actually notice. I'd buy the second light before any of the rest, though - one warm point of light in a few centimetres of alley does more than an hour of detailing, and the single lamp a kit includes is usually pointed at nothing in particular. If you like this fiddly end of the hobby, you'll probably also like hiding a whole scene inside a walnut shell, where detail is the entire project.
06Pick 06 of 14
Miniature LED Lamp with Battery Holder
A miniature lighting kit pairs a small warm-white LED on a long lead with an AA battery holder and a built-in on/off switch. The lead is long enough to run from inside the scene to a battery box hidden behind or beneath the nook. Warm white around 2700K suits wood and paper interiors; cooler white reads as daylight or snow.
Why we picked this exact one: This enwant kit is the pick because the switch sits on the battery holder rather than inline on the wire, so you are not fishing a switch out from behind the books every evening. It rates 4.4 stars across 175 ratings, modest next to the big craft brands but consistent. It runs on two AA cells that are not included, and the lead is fixed length, so plan where the battery box will sit before you commit.
HO scale figures stand roughly 20 mm tall, which reads convincingly as a person inside a shelf-width scene. They come pre-painted in mixed standing and seated poses, so a single pack covers a street, a shop interior or a reading corner. A mixed-pose pack is more useful than a themed one, because most of the figures in any pack will not suit the scene you are building.
Why we picked this exact one: Evemodel's 1:87 passenger pack is the sensible starting point because it mixes standing and seated poses across thirty figures rather than selling a themed set you will mostly waste. It holds 4.3 stars over 129 ratings. The factory painting is rough at this size and the faces are barely more than a dot, so a figure placed in the brightest spot will show its limits - keep them toward the edges and the back.
Static grass tufts are small pads of upright fibre on an adhesive backing, peeled off and pressed into place. In a miniature scene they stand in for weeds pushing through paving, moss in a gutter or planting along a wall. A mixed-size assortment is more useful than a single height, because small tufts suit cracks and larger ones suit corners and planters.
Why we picked this exact one: The Warmtree assortment wins on sheer variety for the money - 126 tufts in a spread of sizes and greens, rated 4.6 over five hundred ratings, which means you can afford to be fussy about placement. The adhesive backing is weak on painted surfaces, so a dot of tacky glue underneath is worth adding if the nook will be handled.
A shade wash is paint thinned and flow-modified so it runs off raised surfaces and pools in the recesses on its own. Brushed over a painted surface it darkens every crack, panel line and mortar joint in one pass, creating shadow where a brush could not place it. Black-grey washes suit stone, timber and metal; brown ones suit earth and worn wood.
Why we picked this exact one: Citadel's Nuln Oil is the wash miniature painters reach for by name, and it earns the 4.8 rating across nine hundred ratings by flowing predictably instead of staining flat. One 18 ml pot will outlast several nooks. It is dark and fairly neutral, so on warm timber it can read slightly cold - a brown-toned shade is the better match if your scene is all wood.
Detail brushes in the 000 to 0 range carry just enough paint for a window frame, a book spine or a door handle. A multi-pack covers the three sizes most miniature work needs and gives you spares, which matters because fine tips splay with use. Synthetic bristles are the practical choice at this size and price.
Why we picked this exact one: The Anezus 30-piece set is the right buy here precisely because the brushes are cheap - dry brushing destroys fine tips, and a set at this price lets you ruin a few without flinching. It rates 4.7 across nearly two hundred ratings. These are not brushes that will hold their point for years; treat them as consumable and keep two unspoiled for the detail work.
Add one thing at a time and photograph the nook after each, or you'll never learn which change did the work. Figures are the fastest win and the easiest to overdo - two people in a tiny street read as a street, eight read as a crowd scene nobody asked for. Trapping a scene behind glass in a shadow box uses the same instincts with none of the wiring.
Wiring It Yourself, Once the Kit Light Annoys You
It happens to everyone. The included lamp stops being enough, usually when you want the shop window lit separately from the street, or when you've started cutting your own walls and there's nothing pre-wired to plug into. This is where book nooks quietly become electronics at the gentlest possible end - 3 volts, a pair of AA cells, nothing that can hurt you. The first time a 0603 LED lights up between your fingertips it is startlingly bright for something you can barely see. Experienced builders are blunt that an iron isn't required to build nooks; it's required to build nooks your own way, and plenty of people get there with lever connectors and never buy one.
11Pick 11 of 14
Pre-Soldered Micro SMD LEDs with Resistors
Micro LEDs on pre-soldered leads let you light a scene without any soldering of your own. At 0603 size the emitter is smaller than a grain of rice and the wire is fine enough to hide in a paper join. Running them at 3 volts avoids resistors entirely; higher supply voltages need the resistors fitted and spaced apart so they do not sit against each other.
Why we picked this exact one: Bowerful's pre-soldered 0603 pack is the usual entry point because the wires arrive attached, so nothing between you and a lit window needs a soldering iron. At 4.6 stars across more than two thousand ratings it is the best-established listing in a category of near-identical packs. The litz wire is very fine and snaps if tugged, so anchor it with a dab of glue near the LED before routing it anywhere.
These 2 do the same job. You only need one of them, so pick the one that suits you better.
12Pick 12 of 14Option A
Solderless Lever Wire Connectors
Lever-nut connectors clamp a stripped wire end when a small lever is pushed down, making a solid connection that can be undone and remade. For miniature lighting they let several LEDs share one pair of feed wires without twisting or soldering. The smallest two- and three-conductor sizes are the ones that fit inside a shelf-width build.
Why we picked this exact one: The WAGO 221 assortment is the solderless route worth taking, and at 4.8 stars over three and a half thousand ratings it is the reference product in its category. The 28-piece case covers the two- and three-wire sizes a nook actually uses. The bodies are bulky next to a 0603 LED, so they belong in the base or behind the back panel rather than anywhere the scene can see.
A 60 W adjustable iron with a fine conical tip covers everything miniature lighting asks of it: joining hair-fine LED leads to thicker hook-up wire, and tinning a switch terminal. Temperature control matters more than wattage, because fine wire insulation melts back quickly at high heat. Kits usually include solder, a stand and spare tips.
Why we picked this exact one: The Q-MING 60 W kit is the sensible first iron: adjustable temperature, five tips and a stand, at 4.5 stars across more than nine thousand ratings. It is a hobby iron rather than a station, so it takes a minute to settle and the temperature dial is approximate. Worth it if you intend to scratch-build or run several light zones; skip it entirely if you are assembling kits as they come.
An SPST toggle is a simple on/off switch small enough to mount through a base panel or hide behind a nook. Versions sold with leads already soldered to the terminals can be wired into a battery circuit with nothing but a connector. A latching toggle holds its position, so the scene stays lit without anything held down.
Why we picked this exact one: The VONVOFF pack is chosen because the wires come pre-soldered, which means a second light zone can be added without owning an iron at all. It rates 4.6 across roughly fourteen hundred ratings and ten switches is enough for years of builds. They are rated for mains voltages well beyond anything here, which makes them physically chunkier than a purpose-made miniature switch.
Wire the whole thing on the table first, batteries in and lights on, before a single LED goes near glue. A dead circuit inside a sealed nook means a scalpel and a repaint, and it is always the one you were sure about. If bending and shaping metal by hand turns out to be the part you enjoy, shaping sculpture out of bare wire is the same pleasure with nothing to solder.
Questions You'll Have at 11pm With Glue on Your Fingers
Why does my nook look deep in photos but shallow in person?
Because forced perspective is partly a camera trick, and nobody tells beginners that. Model railway builders have known it for decades: tapering walls and smaller-scale props toward the back read convincingly in a photograph, but looking with both eyes gives you real depth cues the illusion can't fake, and some of the effect collapses. The trap is chasing more detail to fix what isn't a detail problem. Design for the doorway instead - keep the opening narrow so there's only one sensible angle to look from, and put a mirror on the back wall, tilted a degree or two off square so you never catch your own reflection, with its edges hidden behind a wall or a column.
Everyone says test the lights first. What actually goes wrong if I don't?
The LED ends up glued where it looked tidy rather than where it lights something. Beginners place lights by eye in a bright room, then discover after dark that the beam falls on a blank panel or flares straight out through the doorway into the viewer's eye. Prying a glued LED off a painted surface takes the paint with it. Hold it with a blob of removable putty instead, switch it on, turn the room lights off, and shift it a few millimetres at a time until the scene looks right - then glue it.
Can I just use super glue? It's what I have in the drawer.
Not anywhere near the clear parts. Cyanoacrylate gives off a vapour as it cures that fogs acrylic, so the window you spent an evening framing goes permanently milky, and on bare wood it can bloom a white crust along the joint. It also gives you no time at all to nudge a piece into line, which thin plywood tabs usually need. Keep it for the occasional small metal fitting, use tacky glue or PVA for wood, card and paper, and reach for a clear flexible craft adhesive when something transparent has to stick to something else.
How much does half a degree out of square actually matter?
Much more than it sounds, and the bill always arrives late. Laser-cut tabs leave enough slack to glue a wall a fraction off true, and nothing feels wrong at the time. Four steps later a roof piece won't drop in, or a floor sits proud on one side, and by then the glue has cured and the fix involves a knife. Check each wall against a set square - or anything with a reliable right angle - while the glue is still wet, and slide the finished shell into the actual shelf gap before the last panels go on.
Why does my weathering look like dirt instead of age?
Usually too much wash, and too much paint left on the dry brush. A wash should be thin enough to run into the recesses by itself and leave raised surfaces alone; flooded on at full strength it just stains everything one flat dark colour. Dry brushing fails the other way - load the brush and you get the chalky crust modellers describe as looking like cake frosting. Wipe almost all the paint off onto a rag until the brush seems dry, drag it over edges only, and use a brush you don't mind ruining, because this is what ends brushes.
People Worth Following Into This Hobby
Real practitioners we found while researching this setup — people who do the work, show their process, and publish on sites they run themselves. No sponsorships, no affiliations; we just think they're worth your time.
Publishes free cut-file templates and step-by-step tutorials for making a book nook shell from scratch rather than from a kit.
Her build covers the mirror-on-the-back-wall depth trick this setup's FAQ warns about getting wrong, and it is the clearest route for a reader who finishes a kit and wants to design their own box.
Runs a long-standing miniatures blog with free beginner guides on dry-fitting, choosing adhesives and wiring tiny fixtures.
Her lighting walkthrough picks up exactly where this setup's specialty section stops, including the copper-tape route for anyone who would rather not solder.
Makes and sells small miniature kits and publishes a photographed walkthrough of wiring a 3V LED to a battery holder and switch.
It is the step-by-step version of the wiring this setup's specialty section only sketches, written for exactly the 3V battery-and-switch setup a book nook uses.
Teaches miniature making through written and video tutorials, including an expanded guide to wiring and hiding dollhouse lights.
A reader who hits the wiring section and wants it demonstrated rather than described will find the battery-versus-wired decision worked through here in detail.
Love what you see here? Save individual picks with on any item, or copy everything to a list of your own in one click — great for coming back to later, or dropping as a not-so-subtle hint.