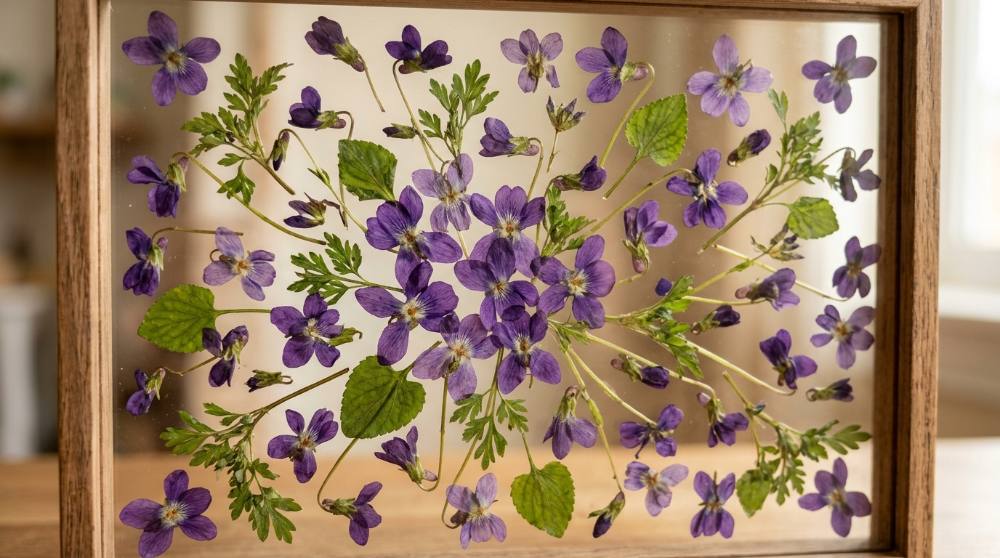
Pick a violet off the lawn, lay it flat under something heavy, and come back three weeks later: the flower is still there, paper-thin, with its colour mostly intact and no sign that it ever stopped being alive. Japan has had a word for making whole pictures this way since the sixteenth century - oshibana - and samurai are said to have taken it up as a discipline for patience and concentration, which tells you something about the pace. The press itself was not invented for art at all. An Italian botanist called Luca Ghini started flattening plants and binding them into books in the 1530s so that doctors could study specimens out of season, and every flower press sold today is a direct descendant of that filing system.
What nobody mentions is how little skill is involved. There's no drawing, no cutting, no technique to practise badly for a year - you choose a flower, you flatten it, and then you arrange the results on glass until they look right. The craft that most resembles it is keeping a nature journal of what's in season, in that both reward walking slowly and noticing things. The difference is that pressing hands you an object at the end, and people genuinely assume you bought it.
Our philosophy here: buy as little as possible before the first flower comes out. A heavy book, a few sheets of smooth plain paper and one sheet of glass will get you a finished piece, and most of what follows only makes that same result faster or steadier. Everything on this page is cheap enough that losing interest in March costs you less than a takeaway.
Where This Little Kit Can Take You
A few real moments and results from this hobby — made with tools no fancier than the ones below.
Nine small panes, one wallEach pane holds a single specimen, hand-labelled in pencil along the bottom edge.
Three cards on bare woodThe middle one is mounted over old handwriting, which pressed petals sit on better than plain white.
Holding the glass up to the lightNothing backs the flowers, so whatever is behind the frame becomes part of the piece.
One thing to set expectations on: the flower you put in is not quite the flower that comes out. Colours warm and shift, and that's chemistry rather than a mistake you made. If you like the idea of real objects sealed behind glass but want depth rather than flatness, building a shadow box scratches a similar itch from the other direction.
The Four Things Between a Fresh Flower and a Framed One
Almost everything that goes wrong in this craft goes wrong in the first forty-eight hours, and it goes wrong because of water. A petal that went into the press slightly damp will grow mould against the paper. Two flowers laid touching will fuse. The kit below is small because the job is small: squeeze evenly, soak up the water, handle the result without breaking it, and put it behind glass. Beginners tend to overbuy frames before they have any flowers worth framing, which is the wrong way round - press first, and buy the second frame once you know what size your compositions want to be. If you already hoard ticket stubs and dried leaves for a junk journal, you will find the first two items earn their keep well beyond flowers.
Disclosure: This section may contain affiliate links to Amazon. We may earn a small commission from qualifying purchases at no extra cost to you.
01Pick 01 of 11
wooden flower press for drying blooms flat
A flower press is two rigid boards squeezed together by corner bolts, with layers of absorbent paper and corrugated card stacked between them. Each layer holds a batch of blooms under even pressure while the card channels moisture away. Look for a press with enough layers that you can keep pressing while an earlier batch is still drying, and for wing nuts you can tighten by hand as the flowers flatten.
Why we picked this exact one: The Aboofx 11-inch wooden press runs ten layers deep, which is the detail that matters most in the first season: you can load a new batch on Saturday without disturbing last Saturday's. It ships with blotting sheets and card already cut to size, so nothing needs trimming before you start. The wing nuts are plain hardware and will feel a bit rough going on - that's normal, and you'll be loosening and retightening them every few days anyway as the flowers give up their water.
absorbent blotting paper sheets for flower pressing
Blotting paper is thick, smooth, unsized paper that pulls water out of petals without sticking to them. It sits directly against the flower on both sides, with corrugated card outside it to let the damp air escape. The surface has to be completely smooth, and sheets are reusable once they have dried out properly between batches.
Why we picked this exact one: These Aboofx A4 blotting sheets are the straightforward refill: twenty sheets, cut large enough to trim down to whatever press you own. A ten-layer press swallows its own included sheets in one full load, so a second pack is what lets you keep pressing through a good week in the garden instead of waiting. They are reusable, but give them a day flat on a radiator before they go back in - a damp sheet is how mould starts.
plastic tweezers for lifting dried petals without tearing
These are soft, blunt-tipped tweezers moulded from plastic rather than ground from steel. The wide tips spread the grip across more of the petal, and the slight flex in the arms stops you from crushing anything when your hand tenses. A pack of them means you can keep a pair in the press box and another wherever you assemble.
Why we picked this exact one: The ZIQON plastic tweezer pack is the cheap thing that saves the expensive-feeling moment, and the material is the point: pressed-flower makers reach for plastic over metal because sharp steel tips bite through a dried petal before you feel any resistance. Thirty pairs is more than anyone needs, which is fine - they go missing under paper constantly. The arms are springy enough that very small seed heads can still slip, so go slowly with those.
double-glass floating frame for displaying pressed botanicals
A floating frame is two panes of glass held in a soldered or welded metal surround, with the artwork sandwiched between them and nothing behind. Light passes straight through, so a pressed fern reads as a silhouette against whatever wall it hangs on. Most take material up to a couple of millimetres thick, which covers almost anything that has been properly pressed.
Why we picked this exact one: The NCYP octagon 8x10 is a glass-only frame, and that honesty is in its favour - you are buying two panes and a brass-coloured surround, nothing else. The octagon shape also does half the composition work for you, because the angled corners give a loose spray of stems somewhere to point. It takes material up to about 2mm in the middle and less than 1mm near the edge, so keep thicker buds toward the centre or the panes won't close flush.
With these four you can take a flower off a stem in the morning and hang it on a wall a fortnight later, which is a shorter route to a finished thing than most crafts offer. Pick more than you think you need - a good share of any first batch comes out creased, torn or simply the wrong shape, and your eye for a good candidate sharpens fast. The same armful of garden material also feeds a dried wreath if you keep the stems and seed heads rather than only the faces.
What You'd Add in Your Second Month
The slow press is still the one that produces the best colour across the widest range of flowers, and nothing below replaces it. What these three do is remove specific frustrations: waiting three weeks to find out whether a flower was worth pressing, staring at a fat rose you cannot flatten, and wondering whether the glue you grabbed will quietly yellow the whole thing in four years. The honest ranking is that the glue is the one to buy first and the cheapest to be wrong about.
05Pick 05 of 11Worth the upgrade
microwave flower press for same-day pressed blooms
A microwave press is a vented plastic clamp holding felt pads and fabric liners, designed to drive moisture out of a flower in bursts of microwave heat while it is held flat. The flowers go in fresh and come out papery in a few minutes rather than a few weeks. The technique is a series of short bursts with the press opened between each one, not a single long run.
Why we picked this exact one: The Microfleur 9-inch is the press teachers name when someone asks how to skip the wait, and the method is consistent: about 25 seconds on the first burst, then 10-second bursts with the press opened to air out between each. It earns its price once you know you're staying with this - before that, a book does the same job for nothing. Wait on it if you mostly grow pale blooms, because light pinks and creams brown in the microwave in a way they don't in a slow press.
silica gel crystals for drying thick blooms in three dimensions
Silica gel is a fine desiccant you bury a flower in, inside a sealed container, so it gives up its water while keeping its shape. Colour-indicating versions change shade when saturated and can be dried out in a low oven and used again. This is the opposite of pressing: the bloom stays round rather than going flat.
Why we picked this exact one: The wisedry colour-indicating crystals go pink when they are full of water and blue again after a spell in a low oven, which removes the guesswork about whether the batch is still working. Five pounds fills a decent lidded box with room for several blooms. One thing to be clear about: this will not speed up your flat pressing, whatever the craft blogs imply - it is a different method that produces a different, rounded result, and the two sit side by side rather than one replacing the other.
acid-free pH-neutral adhesive for mounting pressed flowers
A pH-neutral PVA is a white craft glue formulated without the acids that yellow paper and eat into plant material over years. It brushes on thin, stays flexible, dries clear and can be thinned with water. Conservators and bookbinders use the same stuff, which is why it turns up in archival supply lists rather than craft-aisle multipacks.
Why we picked this exact one: The Lineco pH Neutral PVA is the bottle working pressed-flower studios reach for most of the time, and it spreads thin enough to use with a small brush rather than squeezing blobs. A 16-ounce bottle is frankly a lifetime supply at the quantities this craft uses. Go lighter than feels right: it dries clear but it dries shiny, so a thick patch under a translucent petal shows as a glossy shadow in raking light.
None of this is urgent. A beginner who buys all three on day one usually ends up with an expensive microwave press and no flowers in season, which is a dispiriting corner to be in. Buy them when a specific annoyance makes you want them. Once you have a drawer of pressed material, it tends to spread into photo albums and scrapbook pages whether you planned that or not.
Glass on the Wall, or Something You Can Carry
This is where the craft forks, and the fork is real: the gear barely overlaps. One road ends in framed botanical panels, matted and hung, which is quiet and cheap and looks expensive. The other seals the same flowers in clear resin as coasters, pendants and bookmarks, which is louder, messier and the thing people ask you to make for them. Resin brings its own learning curve - gloves, ventilation, a warm room - and if you want the full picture of that side before committing, the beginner resin setup covers it properly. A warning worth having in advance: white flowers go strangely translucent in resin, almost vanishing, and the fix is to seal them with a thin skim of resin before the main pour.
Pick one
These 2 do the same job. You only need one of them, so pick the one that suits you better.
08Pick 08 of 11Option A
UV resin kit with lamp for small pressed-flower keepsakes
UV resin arrives ready to use in a single bottle and hardens under an ultraviolet lamp in minutes. It is poured in thin layers, so it suits pendants, bookmarks, hair clips and flat charms rather than anything deep. Kits that include the lamp save you matching a wavelength to a resin yourself.
Why we picked this exact one: The KISREL 200g kit includes its own UV lamp, which matters more than the resin itself - mismatched lamps are the usual reason a first pour stays tacky. It is hard-type resin, so finished pendants stay rigid instead of flexing. Two hundred grams sounds small and is not, because thin-layer work uses very little per piece - this is enough resin for a long run of pendants and bookmarks.
Pros
Cures in a couple of minutes under the lamp
No mixing and no ratio to get wrong
The lamp comes in the box
Cons
Only sets in thin layers, so coasters are out
The light cannot reach under a thick petal, which leaves a soft spot
two-part epoxy resin for pouring pressed-flower coasters
Two-part epoxy is a resin and a hardener measured together, usually one to one, that cures through a chemical reaction rather than light. It pours deep, self-levels and sets glass-clear over several hours. The mixing is the whole skill: off-ratio or under-stirred epoxy stays soft in patches forever.
Why we picked this exact one: The LET'S RESIN half-gallon kit is a 1:1 ratio by volume, which is the single most useful property for a first pour because it removes the arithmetic from a step you are already nervous about. The formulation releases its own bubbles over about an hour, so you are not chasing every one with a heat gun. Half a gallon is a lot of resin for a first project, but it is also the point at which the price per pour stops being painful.
Pros
Pours deep enough for coasters, trays and paperweights
One batch fills a whole set of moulds in an afternoon
Cons
Two parts to measure and stir, then hours of waiting
Wants a warm room - pour it somewhere cold and it goes cloudy
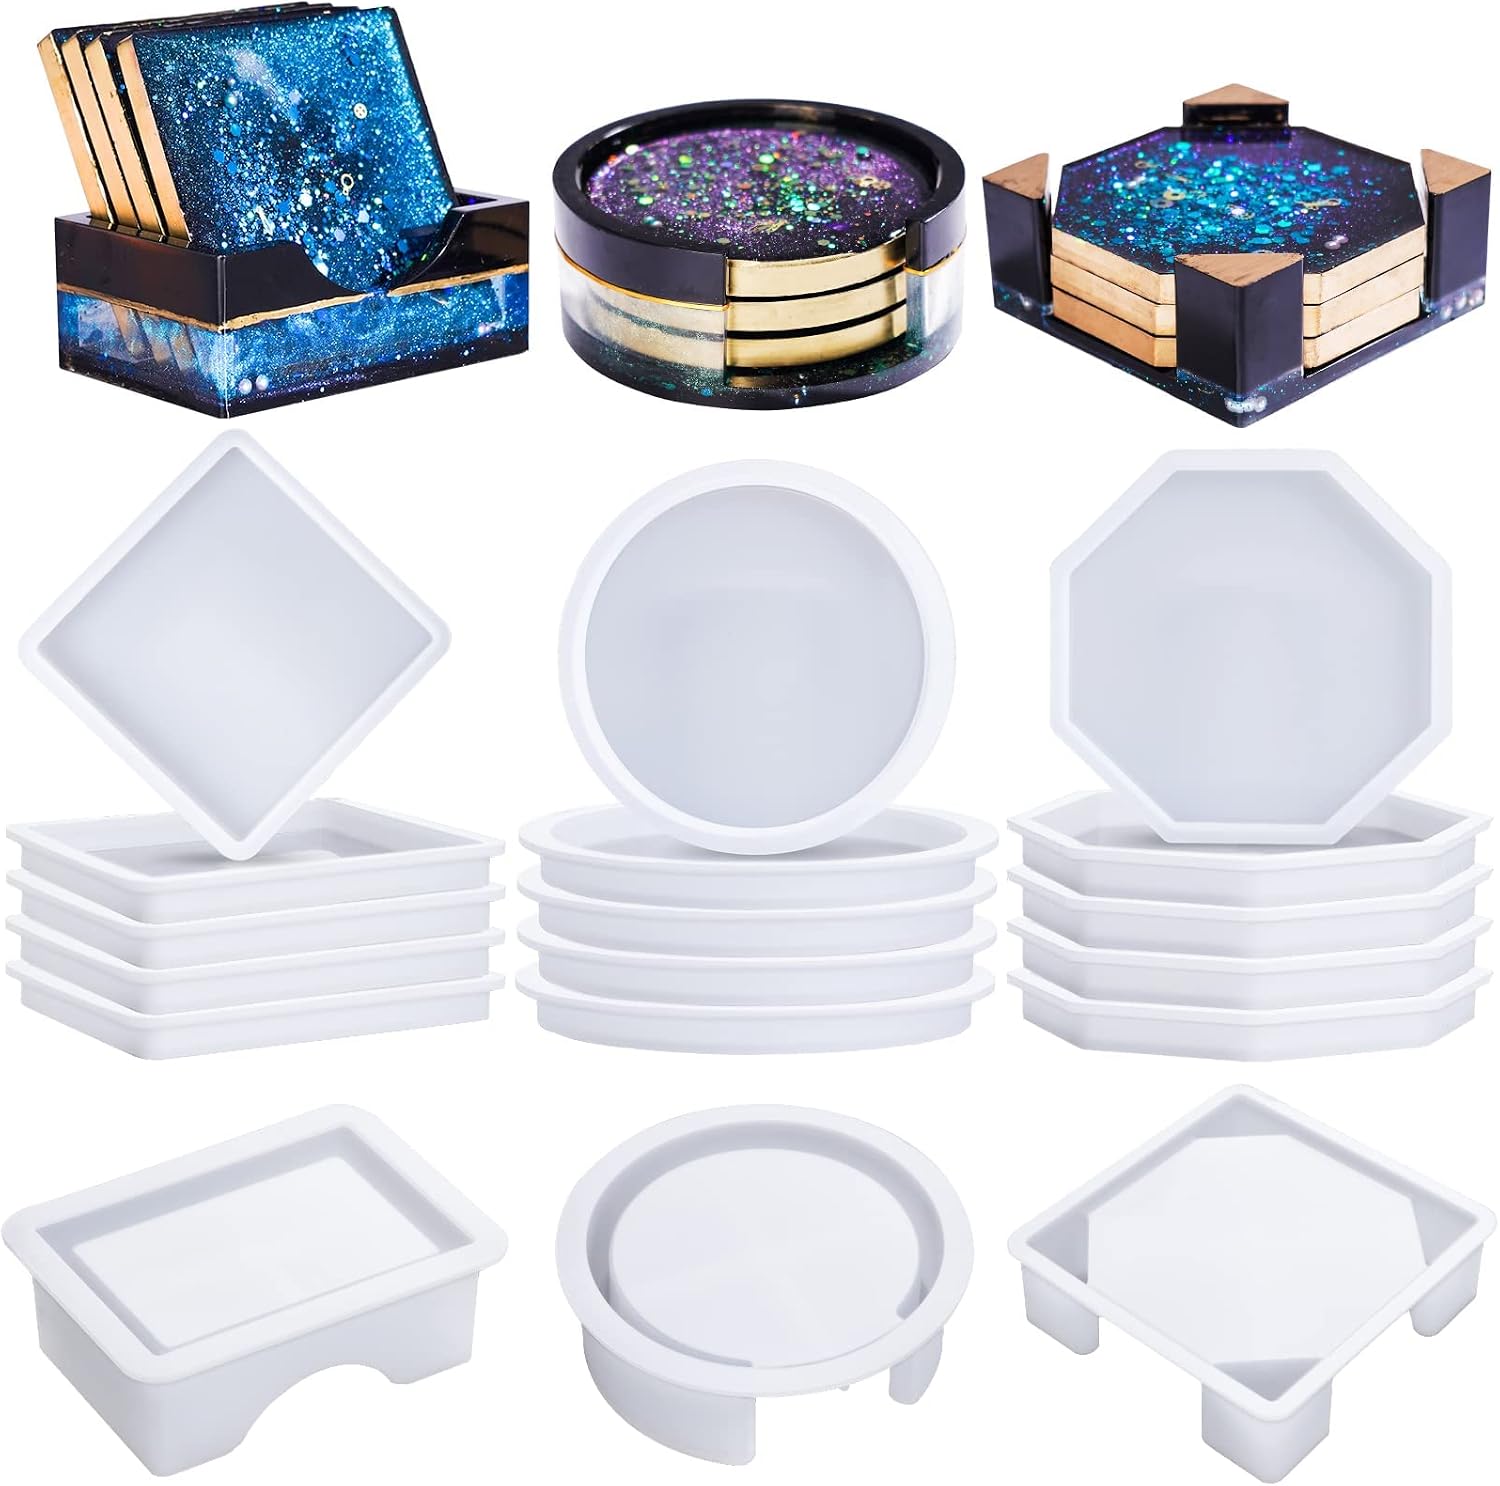
shallow silicone coaster moulds for flat botanical pours
Silicone moulds flex enough to pop a cured disc out without chipping the edge, and a glossy mould interior produces a finished surface that needs no sanding. Coaster sets usually mix round, square and octagonal cavities, often with a matching holder. Shallow cavities are the ones that suit flat material.
Why we picked this exact one: The LET'S RESIN 18-piece set gives you fifteen coasters across three shapes plus three holders, and its cavities are about 0.3 inches deep. The listing flags that shallowness as a limitation for bulky dried flowers, which is exactly why it suits this craft - a petal that has spent three weeks under boards is already paper-thin. The silicone is glossy rather than matte, so the finished face comes out shiny without polishing.
acid-free pre-cut mats and backing boards for framed botanical work
A mat is a window cut from thick card that sits between the artwork and the glass, holding the two apart and giving the composition a border. Pre-cut sets come with a backing board and a sleeve, so no mat cutter is needed. Acid-free stock matters here because the card touches the artwork along every edge.
Why we picked this exact one: The Somime ten-pack is acid-free and bevel cut, and it arrives with backing boards and sleeves, which is most of a framing kit for sixteen dollars. The bevel is the small thing that reads as professional: a white angled edge around the window catches light the way a flat cut doesn't. The opening is sized for 5x7 work in an 8x10 frame, so measure before you compose - it is an easy thing to discover after the glue has dried.
Pick one road for the first few months. Buying a resin kit and a mat set in the same order usually means both sit unopened while you decide, and deciding is easier once you've finished something. My own bias is toward the frames: they cost less, they fail less often, and a wall of small glass panels accumulates into something far better than any single piece.
What Nobody Tells You Until You Open the Press
Why did my white daisies come out the colour of old paper?
White petals contain almost no pigment - their brightness comes from light bouncing around inside water-filled cells, and pressing removes exactly that water. Beginners read the ivory result as a failure and start hunting for a technique that prevents it, but there isn't one, because nothing has gone wrong. Yellows and oranges hold up best, reds tend to deepen toward burgundy, blues drift toward lavender, and pinks warm into a dusty rose. Build your first compositions around yellows and oranges if a bright result matters to you, and treat the whites as the soft neutral they're going to become.
I opened the press after a week and there's mould. What went wrong?
Almost always the flowers went in carrying surface water - picked after rain, picked while the dew was still on them, or pulled straight out of a vase. Beginners assume the press will dry that off along with everything else, and instead it seals the damp in against the paper where it has nowhere to go. Pick in the morning once the dew has lifted, and if a flower is at all wet to the touch, stand it in front of a fan for a few hours first. Leaving at least half an inch of clear space between flowers matters for the same reason.
Everyone says two weeks, so why are mine still bendy?
Two to three weeks is the figure for thin, flat-faced flowers in a reasonably dry room, and people repeat it as though it covered everything. Thicker material routinely takes closer to four, and a humid house stretches every one of those numbers. The test is texture, not the calendar: a finished flower feels brittle and papery, and anything still slightly soft or cool to the touch is still wet inside and will brown later. Tighten the press a little every few days rather than cranking it down hard at the start, because the flowers only shrink into the space gradually.
Why do my petals lift off the paper a few days after I glue them?
Because the glue went on as a dot in the middle, which is the instinctive way to do it, and dried petal edges curl upward as they pick up moisture from the air. The curl gets noticeably worse in a humid room and it will keep happening to the same piece. If you want a flower to stay properly flat, run a thin line of adhesive out toward the petal tips rather than anchoring only the centre. In a double-glass frame you can skip glue altogether - the two panes hold the flower, and a few small pieces of tape on the inside edge stop anything sliding during hanging.
Can I just use kitchen roll instead of blotting paper?
You can, and the flower will come out with the kitchen roll's quilted pattern embossed into it. Any texture in the paper - weave, embossing, even a strong newsprint grain - transfers to the petal under pressure, and once it's there it's permanent. Smooth, unprinted, absorbent paper is the whole requirement: proper blotting stock, plain newsprint, parchment or a flattened coffee filter all work. Save the kitchen roll for blotting a wet stem before it goes in.
People Worth Following Into This Hobby
Real practitioners we found while researching this setup — people who do the work, show their process, and publish on sites they run themselves. No sponsorships, no affiliations; we just think they're worth your time.
Ashton presses flowers in the UK, wrote a guide to the craft, and teaches colour correction and the awkward thick blooms through step-by-step video courses.
Their seven-beginner-mistakes piece covers the same early failures this setup's FAQ names - damp flowers, impatience, flowers picked past their best - in far more detail than a gear page can.
Keith and Rachel press flowers grown in their Denver garden and on partner flower farms, and publish the specifics of how each piece is assembled.
Their write-up on adhesives is the practical answer to the curling-petal question in this setup's FAQ, and it names which glue they use for which weight of flower.
Ruth has run a dried-flower business in East Sussex since 2003 and writes up her own pressing, framing and potpourri projects, photographs and misfires included.
Her framing walkthrough makes the case this setup's essentials rest on: in a double-glass floating frame you can often skip glue entirely and hold stems with a sliver of tape.
Runs a studio teaching botanical art and built a self-paced pressing class that walks through making four different presses, from a pocket one to a large studio format.
Anyone who decides the bought press is the wrong size after a season can build the right one from her class instead of buying again.
Love what you see here? Save individual picks with on any item, or copy everything to a list of your own in one click — great for coming back to later, or dropping as a not-so-subtle hint.