A Gunpla kit shows up as a few flat plastic frames, every part already moulded in the colour it is meant to be. You clip the pieces off, push them together, and by the end of an evening a robot is standing on your desk that can kneel, point and hold its own rifle. No glue. That was not always true, because the earliest kits from 1980 did need cement and snap-fit only became standard in 1988, back when these were pitched at the teenagers and adults watching the show rather than at small kids. Somewhere past 800 million of them have shipped since.
The thing nobody warns you about is the sprue. Those plastic frames hold each part by little tabs called gates, and how you cut them decides whether your robot looks sharp or chewed. Squeeze a blunt cutter through one and you get a pale scar on a glossy red shoulder that you will spot from across the room. Most of a good first build is just cutting carefully, twice, in the right order.
Our take: buy three things and stop. A kit, a pair of proper hobby nippers, and something to darken the panel lines will get you a robot you are happy to leave on a shelf. The rest can wait until you have built two or three and know what annoys you.
Nothing below costs enough to sting if you build one kit and decide robots are not your thing.
Where This Little Kit Can Take You
A few real moments and results from this hobby — made with tools no fancier than the ones below.
White armour under a hard lightEvery panel on it arrived that colour; nothing here was painted.
Mid-kick on the build deskThe paint bottles behind it are optional, which is the point.
If you have been circling plastic modelling and kept bouncing off the glue and the paint, this is the version without either. The traditional route, a Spitfire or a Sherman built with cement and a brush, is a genuinely different evening: slower, messier, painted up from grey plastic. Gunpla hands you the colour in the box and asks you to cut well instead.
The Short List You Actually Build With
Beginners spend a startling amount of time choosing which kit and almost none choosing the cutter. It is backwards. People who have done this for years will tell you to grab whichever design you think looks coolest and stop agonising, because a High Grade is a High Grade: low part count, same engineering, whether you pick the white hero robot or a one-eyed green one. Spend the attention on the nippers instead, since that is the tool touching every single part.
Disclosure: This section may contain affiliate links to Amazon. We may earn a small commission from qualifying purchases at no extra cost to you.
01Pick 01 of 13
beginner-friendly 1/144 snap-fit robot model kit
A High Grade kit at 1/144 scale finishes around five inches tall and arrives moulded in its proper colours, so nothing has to be painted for it to look right. Part counts stay low enough that a first build runs a few hours, and the joints are engineered for posing rather than for play. Look for the High Grade label specifically, because that is the line built around simple assembly rather than maximum detail.
Why we picked this exact one: The Bandai Hobby HGUC RX-78-2 Gundam Revive is the kit most builders point newcomers at, and it holds a 4.8 average across more than three thousand ratings. It is the 2015 re-engineering of the original 1979 design, so the articulation is modern even though the robot is not. The trade-off is simpler colour separation than newer kits, and a few small areas lean on foil stickers instead of separate parts.
single-blade hobby nippers for cutting model parts off the runner
Hobby nippers differ from hardware-store cutters in one way that matters: the blade is flat on one side, so it shears the plastic instead of pinching it. A single-blade pair gets closer to the part without crushing it, which is the whole fight with model plastic. Check that the blade is thin and the handle has a return spring, because you will squeeze it a few hundred times per kit.
Why we picked this exact one: The RUITOOL Model Nippers for Beginners are the budget single-blade pair that actually holds up, with more than two thousand ratings behind a 4.6 average. They are thin enough for the second, flush cut, which is where the finish is won. They will chip if you force them through a thick runner, so cut the runner itself with something cheaper.
fine-tip panel line marker paired with a 0.3 mm mechanical pencil
Panel lining means running ink into the moulded grooves so flat plastic reads as separate armour plates. A fine liner handles dark panels, while thin pencil lead gives a soft grey that looks right on white, which is most of a classic robot. Excess wipes away with a plastic block eraser once it has dried.
Why we picked this exact one: The GSI Creos Gundam Marker Black Liner packages the black fine-tip pen with a 0.3 mm mechanical pencil, which covers both halves of the advice builders actually give: black on dark armour, pencil grey on white. Buying the two separately costs more for the same result. Its 4.4 average is the lowest on this page, and the recurring complaint is a tip that frays under pressure, so draw with it rather than press.
graduated sanding sponges for smoothing leftover nubs
After the second cut there is still a small bump of plastic where the gate used to be. Sponge-backed abrasive flexes over curved armour instead of flattening it, and three grades let you knock the nub down and then polish the dulled patch back towards its original sheen. Working coarse to fine is the whole method: 400 to take it off, then 600 and 800 to tidy up.
Why we picked this exact one: The stedi 30-piece set runs #400, #600 and #800, matching the grit sequence builders describe for nub cleanup exactly, which is rarer than it sounds in assorted packs. The sponges wash out, so a set lasts well past a first kit. They are 3 mm thick and clumsy inside tight recesses, where a folded scrap of sandpaper still wins.
With those four on the table you can take a sealed box to a finished, posed robot in an evening and a bit. Expect the first one to run slower than you planned, not because it is hard but because you keep stopping to look at it. If the cutting and tidying turns out to be the part you enjoy, that same patience carries straight into painting and fielding your own squad of tabletop miniatures.
What You Will Want By the Third Kit
Everything here is genuinely optional, and I would resist buying it all at once. The top coat changes the look most, because it kills the plastic shine that makes a bare kit read as a toy and it hides the dull patches sanding leaves behind. The rest just remove small irritations: a wedge for the part you snapped together backwards, a tweezer that does not drop a foil sticker onto the carpet, where it will stay until you stand on it.
Pick one
These 2 do the same job. You only need one of them, so pick the one that suits you better.
05Pick 05 of 13Option A
matte lacquer clear coat spray made for scale models
A flat clear coat sprayed over a finished kit removes the shine of raw plastic and evens out everything underneath, sanding marks and sticker edges included. Model-grade lacquer lays down thin, so detail stays crisp. It goes on in several light passes from five to ten inches away, outdoors, because the fumes are genuinely unpleasant in a closed room.
Why we picked this exact one: Testors Dullcote is the flat lacquer most English-speaking modellers name when you ask, and it sells here as four 3 oz cans at a 4.8 average. Four cans is far more than a first year of building gets through. Being lacquer-based it can make marker ink bleed, so spray a spare runner you have lined first and check before you commit the robot.
Pros
Model-grade lacquer that lays a thin coat and keeps detail sharp
The finish builders mean when they talk about top coating
Four cans, so you are not re-buying mid-project
Cons
Over forty dollars before you have sprayed anything
Lacquer thinner can drag panel-line marker ink out of the grooves
flat acrylic clear finish spray from the hardware aisle
A general-purpose acrylic matte spray does the same basic job as a hobby lacquer: it knocks the gloss off plastic and seals whatever sits under it. Cans like this are larger and the spray pattern is wider, so they go on heavier than a model-specific product. Light, distant passes matter more here than they do with a hobby can.
Why we picked this exact one: The Krylon COLORmaxx Flat Crystal Clear is the hardware-aisle option builders describe as working without being as good, and it carries a 4.6 average across more than two thousand ratings. Under ten dollars buys two large cans, so testing costs you nothing. The caveat they attach to it is real: it lays a thicker coat, so try it on a leftover runner before the robot.
Pros
Under ten dollars and on the shelf at any hardware store
Two large cans, so testing costs nothing
Acrylic rather than lacquer, so it is gentler on marker ink
Cons
Not formulated for scale models and lays a heavier coat
Wider spray pattern is harder to control on small parts
reverse-action curved tweezers for placing stickers and small parts
Reverse-action tweezers stay shut until you squeeze them open, so they hold a tiny sticker without your hand maintaining pressure. The curve lets you set a part down while still seeing what you are doing. Sturdiness is the thing to check, because thin craft tweezers splay out of alignment within a few uses and then never grip properly again.
Why we picked this exact one: Tamiya's 74102 HG Curved RevAction tweezers hold their grip without your hand doing the work, which matters when you are easing a 3 mm sticker into a recess. They are built heavily enough that the tips stay aligned, unlike the thin sets sold in multipacks. They cost more than a whole bag of generic tweezers, and the alignment is the entire argument for paying it.
wedge tool for separating snapped-together model parts
Snap-fit joints grip hard on purpose, which becomes a problem the moment you seat a part backwards. A separator is a thin tapered wedge that slides into the seam and levers the halves apart without marking them. It replaces the hobby knife people otherwise reach for, usually right before they cut themselves.
Why we picked this exact one: The Bandai Hobby Parts Separator is the manufacturer's own answer to a problem its own joints create, and it sits at 4.8 stars. Under eight dollars makes it the cheapest thing on this page by some margin. Being plastic it is deliberately blunt, so it works slower than the knife it replaces, which is the trade you want on a part you care about.
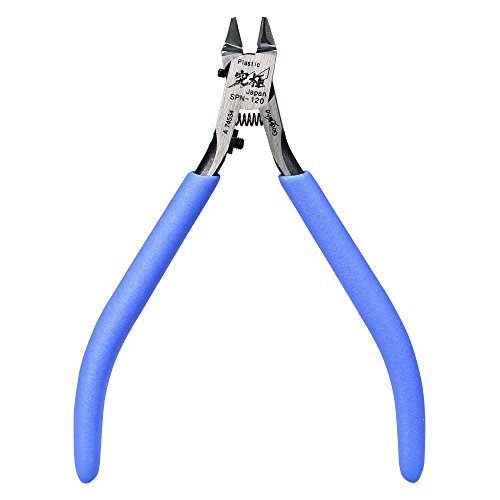
ultra-thin single-blade nippers for the final flush cut
A specialist flush nipper carries a blade ground so fine it shears the last sliver of plastic rather than compressing it, which can leave almost nothing behind to sand. It is used only for the second cut, on a nub that has already been trimmed down. The same thinness that makes it work makes it fragile, so it never touches runners or clear parts.
Why we picked this exact one: The GodHand Ultimate Nipper 5.0 GH-SPN-120 is the pair builders name once the conversation turns to spending real money on a cutter, and nearly three thousand ratings sit behind its 4.6 average. The step up is worth it after four or five kits, when nub cleanup is the part eating your evenings; before that a twenty-dollar nipper teaches the identical technique and you should wait. Use it for the flush cut only, because running it through a thick runner or clear plastic chips the edge.
Buy the top coat first and add the rest as the irritations turn up. One warning worth having: spray outdoors or at an open window, give each pass a minute, and never chase a run while it is still wet. If the tiny-parts-and-tweezers side turns out to be the appeal, the same dexterity goes a long way in building furnished rooms at 1:12 scale.
Branching Off: Washes, Markings and a Pose
Two roads open once you have a clean straight build behind you. One heads toward paint, starting with an enamel wash that flows into the grooves on its own instead of being drawn there. The other heads toward presentation: markings, a stand, eventually a scene. Neither needs an airbrush. A robot propped in a mid-air kick with real unit numbers on the shoulder is a different object from the same kit standing flat-footed, and it is roughly where building a whole scene around a model to scale starts looking tempting.
10Pick 10 of 13
pre-thinned enamel panel line wash in grey
A panel line accent wash is enamel paint thinned until it runs, with a brush built into the cap. You touch it to a groove and capillary action pulls it along the whole recess by itself, then you wipe the overflow off the flat surfaces. Grey is the shade that reads correctly on white and light armour, where black tends to look drawn on.
Why we picked this exact one: Tamiya's Panel Line Accent Color in Grey is the bottle to start with rather than the black most people reach for, because a classic robot is mostly white and black lines on white read as cartoon outlines. It is enamel, so cleanup wants mineral spirits or isopropyl rather than water. Use it sparingly around stressed joints, since enamel thinner can creep into a snap-fit seam and crack the plastic.
fine detail brush set for hand-painting small model areas
The smallest round brushes cover nearly everything a kit needs by hand: thruster interiors, camera lenses, the little vents moulded into armour. They also do the tidying work around an enamel wash. What to check is whether a tip keeps its point after cleaning, which comes down to how the bristles are set into the ferrule.
Why we picked this exact one: The Golden Maple 10-piece detail set holds a point well enough for the money, which is why it sits on a 4.7 average across seventeen thousand ratings. Ten sizes means you are not choosing a size before you know what you need. They are not sable, so expect to replace them after a few projects rather than keep them for years.
clear articulated display stand for 1/144 scale models
A display stand pegs underneath the model and holds it clear of the surface, so it can be posed leaping, flying or mid-kick rather than balanced on its own feet. Clear plastic keeps the support visually out of the way. Arm angle and peg size decide whether a given stand actually fits your kit.
Why we picked this exact one: Bandai Hobby's Action Base 5 is sized for 1/144 kits specifically, so the peg matches the socket moulded into the back or underfoot of most of them. Nine dollars and a 4.8 average make it hard to argue with. It arrives as a small kit you snap together yourself, which catches a few people out.
water-slide marking decals for 1/144 scale mobile suits
Water-slide decals print onto a thin film that floats off its backing paper in warm water and slides onto the model, where it settles almost into the surface. Sheets like this carry generic unit numbers, warning stencils and insignia rather than markings for one specific kit. They sit far flatter than the foil stickers packed in the box.
Why we picked this exact one: The Bandai Spirits GD-30 sheet is the multi-use Earth Federation set, so it suits almost any 1/144 kit from that faction instead of one box. A 4.5 average across 583 ratings is solid for a decal sheet. Water-slides are fiddly the first time, since they tear if you slide them dry and they need a reasonably flat surface to settle on.
None of this is a step up in difficulty so much as a step sideways into a different kind of patience. Do the wash first, the decals next and the top coat last, because that order saves re-doing work. Builders who get far enough down this road usually start wanting lights in the chest and the eyes, which is the point where putting a simple circuit together with an iron stops being somebody else's hobby.
The Two Things That Actually Hurt
This is a low-risk hobby right up until you add a spray can or decide to use a hobby knife. The aerosol is the real one. Lacquer and acrylic clear coats both carry solvents you do not want to breathe in a closed room, and the mist drifts further than you expect, so spray outdoors or at an open window with air moving away from you. Never do it in a kitchen. The smell clings to a jumper for a day, which is a decent reminder of what you just inhaled. The knife is the other one. The cuts happen when people shave a nub toward their own thumb, which is exactly why experienced builders use a flush nipper for that step instead.
Keep the empty runners in a box rather than the bin until the build is done, because the part you cannot find is usually still attached to one. And if you build where a small child or a cat has access, remember that the pieces that go missing at this scale are precisely the ones that are a choking hazard.
Why Does Mine Have Little White Scars on Every Corner?
Where do the white marks come from, and why do they show up after the cut rather than during it?
They are stress marks: plastic going pale where it was stretched instead of sliced. Beginners produce them by cutting flush against the part in one go, which forces the blade to compress a thick gate exactly where it meets the armour. The fix is two cuts, the first well away from the part so a stub is left behind, the second shaving that stub down now that barely any plastic resists the blade. Hold the runner rather than the piece while you cut, because the weight of the frame hanging off a part twists it and does the same damage.
Do I need glue or paint to make it look decent?
Neither, and that is the actual engineering rather than marketing. Kits have snapped together since the late eighties, and the parts arrive in their correct colours because the moulding process can shoot several colours into one frame. What beginners read as painted on other people's builds is almost always two things: ink in the panel lines and a flat clear coat over the top. Both take under an hour and neither involves a paintbrush.
Everyone says start with a High Grade, but Real Grade is the same scale and looks better. Why not that?
Because the scale is the only thing the two share. Real Grade packs a full inner skeleton and several times the part count into the same five inches, and some of those pre-assembled frame sections use a soft, rubbery plastic that deforms under weight. Builders consistently describe them as fragile and better suited to someone who already knows how much force a joint will take. Build two High Grades first, because the technique is identical and the parts forgive you.
Why did my panel lines go blotchy after I sprayed the top coat?
Because the common hobby flat sprays are lacquer-based, and the thinner in them can re-wet marker ink and drag it back out of the grooves. It is not a mistake in how you lined, it is a chemistry mismatch nobody mentions up front. Spray a lined-up spare runner first and look at it under strong light before you commit the model. If it bleeds, switch to an acrylic clear coat or do the lining after the coat instead of before.
Should I just line everything in black?
It is the default everyone reaches for and the one builders argue against most. Black in the grooves of white armour reads as a drawn outline rather than a shadow, because a real panel gap on a light surface sits grey. The working rule is to go one step darker than the plastic you are lining: light grey on white, mid grey on blues and reds, black only on dark or very saturated panels. Clean the overflow with a plastic block eraser rather than the pink stub on a pencil, which streaks and can transfer what it picks up straight back onto the part.
None of this needs solving before you start. Open the box, cut carefully, and let the first robot come out a bit rough. The second one will not.
People Worth Following Into This Hobby
Real practitioners we found while researching this setup — people who do the work, show their process, and publish on sites they run themselves. No sponsorships, no affiliations; we just think they're worth your time.
Builds 1/144 kits and documents every technique step by step, from nub removal to seam lines to weathering pastels, with his own photos of each stage.
His nub-removal walkthrough is the same two-cut method this setup's nippers and sanding sponges exist to perform, and he photographs the stress marks the FAQ warns about.
Keeps a small library of beginner Gunpla tutorials built around his own kits, covering nub marks, panel lining, decals, top coating and hand painting.
His topcoating guide and panel lining tutorial cover, with photos, the two steps this setup says turn a straight build into something that stops looking like a toy.
Writes and keeps updating the Layman's Gunpla Guide, a forty-odd tutorial reference on building, detailing, painting and weathering kits.
His equipment guide explains exactly why a hobby nipper is flat on one side and a hardware cutter is not, which is the single purchase decision this setup leans on hardest.
Love what you see here? Save individual picks with on any item, or copy everything to a list of your own in one click — great for coming back to later, or dropping as a not-so-subtle hint.