Soldering is the trick of joining two pieces of metal using a third one that melts at a lower temperature than either. You hold a hot tip against a component's leg and the copper pad it sits in, feed in a thread of tin alloy, and a second later the three are one piece. People do it at kitchen tables, in repair cafes, in school electronics clubs and in every factory that has ever built a phone. It is also very old: an Egyptian painting from around 1475 BC shows a goldsmith soldering with a blowpipe, doing with his breath roughly what an iron now does with a heating element.
Most people who want to learn turn up holding something broken they would like to fix. That is a terrible first project. The joints on a dead headphone cable are tiny, awkward and already damaged, so when the repair fails you will never know whether it was your soldering or the cable. A through-hole kit removes the doubt - big holes, generous pads, a silkscreened label telling you which leg goes where, and a circuit that blinks when you are finished.
Our view: buy the smallest pile of tools that can produce one good joint. A temperature-controlled iron, a reel of thin solder, something to clip the legs off with, eye protection, and a cheap board you are allowed to ruin. That is the whole list, and the rest can wait until something actually annoys you.
Nothing below costs enough to sting if the hobby doesn't stick - the one deliberately expensive pick is flagged as a step up, not a starting point.
Where This Little Kit Can Take You
A few real moments and results from this hobby — made with tools no fancier than the ones below.
Two clean rows of jointsEach silver dome is one component leg, held to the board by a few millimetres of tin.
A bead of solder, mid-airThe thread of smoke is flux burning off, not metal.
Iron, spool and pliersEverything one joint needs, within a single arm's reach.
A joint takes a few seconds. Heat, feed, pull the solder away, pull the iron away, and it is done before you have finished worrying about it. The second one is where people start fiddling, and fiddling is what produces the grey blobs. Here is the short list that gets you to both.
The Five Things on the Bench
The iron does not carry solder to the joint - it carries heat. That one misunderstanding is behind most of the ugly work beginners produce: they melt a bead onto the tip, dab it at the board like paint, and end up with a dull lump sitting on a pad it never bonded to. What actually works is heating the pad and the leg together for a second or so, then feeding the wire into the joint from the side and letting it flow. Everything on this list exists to make that easier, or to stop it from hurting you.
Disclosure: This section may contain affiliate links to Amazon. We may earn a small commission from qualifying purchases at no extra cost to you.
01Pick 01 of 10
temperature-controlled soldering station with a built-in iron holder
A soldering station is a base unit with a dial or display that holds the tip at a set temperature, plus a pencil-style iron on a cable and a cradle to park it in. Unlike a plug-in iron that simply gets as hot as it gets, a station keeps feeding power as the tip loses heat into the joint. Look for a readable temperature display, interchangeable tips, and a holder heavy enough that it doesn't skate across the desk when you drop the iron in.
Why we picked this exact one: The YIHUA 926 III is the entry point most people land on, and it earns it: a 194-896 F range covers lead-free work with room to spare, and the iron sits in an integrated cradle rather than a separate stand you have to find space for. It carries a 4.4-star average across more than seven thousand ratings. The bundled helping-hands arms are the weak part of the box - the alligator clips mark soft plastic and the joints go slack - but the station itself is the piece that matters.
thin lead-free rosin-core solder wire for through-hole work
Solder is a tin alloy wire with flux running through the middle of it like the lead in a pencil. The flux does the chemical work: it strips oxide off the copper so the molten metal can actually wet the surface instead of beading up on it. For circuit boards a 0.8 mm diameter is the usual choice, thin enough to feed a measured amount into a small joint without flooding the pad next to it.
Why we picked this exact one: This E ENERSYSTEC spool is the Sn99/Ag0.3/Cu0.7 alloy at 0.8 mm, which is the ordinary lead-free recipe rather than a cheap tin blend that drags on the tip. A 100 g reel is far more than a first kit needs and will outlast a year of weekends. It runs hotter and flows less eagerly than old leaded solder, so expect to work at the top of the temperature range.
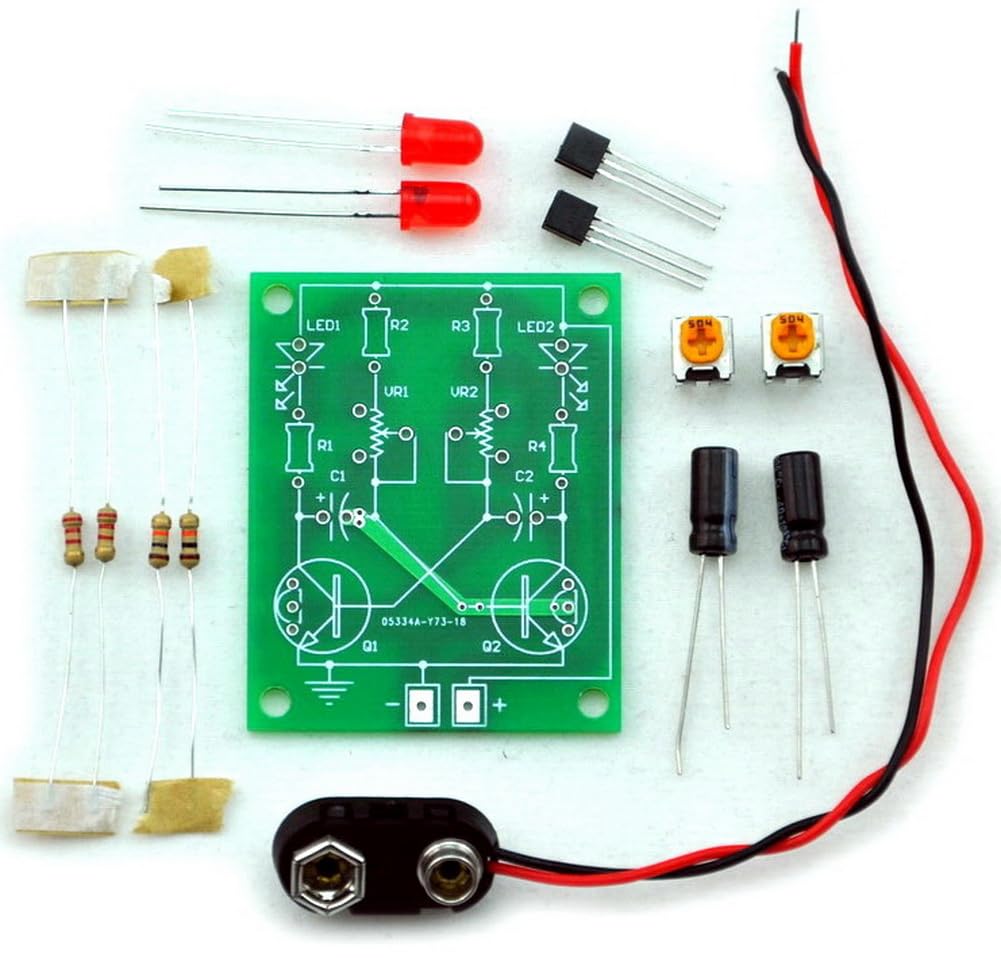
beginner through-hole kit that solders up into a flashing LED circuit
A learn-to-solder kit is a small printed circuit board with the component positions silkscreened onto it and a bag of parts whose legs push through from the top. Through-hole parts are the forgiving kind: the holes are large, the pads are generous, and a leg stays put while you heat it. The useful ones do something visible when finished, so a working circuit tells you your joints conduct and a dead one tells you to go back and look.
Why we picked this exact one: The Electronics-Salon astable multivibrator kit builds the classic two-transistor blinker, and two potentiometers let you drag the flash rate from roughly a tenth of a second out to five. The board is only 40 x 50 mm, so it is an evening rather than a project. It runs off a 9V battery through a snap connector that is included - the battery itself is not, so add one to the order.
impact-rated safety glasses for trimming leads and handling a hot iron
Safety glasses for bench work are polycarbonate lenses rated to take a small projectile without shattering, usually marked to the ANSI Z87.1 standard on the frame or lens edge. The wrap-around shape matters more than the lens tint here, because what you are guarding against arrives from the side and from below. Anti-fog coating is worth having if you lean in close over warm work.
Why we picked this exact one: The TICONN glasses are marked to ANSI Z87.1, which is the impact rating worth checking for rather than taking a seller's word on. They sit over prescription frames without pushing them into your face. The coating scuffs if you leave them lens-down on a bench, which is a good argument for the pack that includes a pouch.
flush cutters for trimming component legs close to the board
Flush cutters have a flat face on one side of the blade so they cut level with the surface instead of leaving a stub and a sharp diagonal point. On a circuit board you use them after soldering, to take the excess leg off above the joint. Small, sprung handles and a fine tip matter more than brute cutting capacity, since nothing you cut here is thicker than a paperclip.
Why we picked this exact one: Klein's D275-5 is a working tradesperson's cutter that happens to be the right size for board work, and its 4.6-star average sits on close to eight thousand ratings. The pinch-cutting face holds the offcut instead of flicking it across the room. It is a diagonal cutter rather than a true micro-flush model, so for very tight pad spacing you will eventually want something finer-nosed alongside it.
Those five get you through a first kit in an evening, plus a 9V battery from the corner shop. Expect your first two or three joints to come out lumpy and grey - everyone's first ones do, and reheating them until the solder goes shiny costs nothing. By the tenth you will have the rhythm, and that is the point at which the next shelf of tools starts to make sense.
What You'll Want by the Third Kit
Here is the thing almost everyone gets wrong about that curl of smoke: it is not lead. Lead does not vaporise anywhere near the temperatures an iron reaches. What you can smell is the rosin flux inside the solder burning off as it does its job, slightly sweet and a bit like pine, and it is the flux rather than the metal worth steering away from your face. Which is why a fan sits on this list and not in the emergency section, and why the lead question gets handled further down where it belongs.
06Pick 06 of 10
digital multimeter for testing joints and tracing a circuit that won't work
A multimeter measures voltage, resistance and current, but the setting that earns its place on a soldering bench is continuity: touch a probe either side of a joint and the meter beeps if current can cross it. That turns 'this board doesn't work' into 'this one joint doesn't conduct'. A basic manual-ranging meter does everything a through-hole hobbyist needs.
Why we picked this exact one: The AstroAI 2000-count meter is the one that turns up on more beginner benches than any other, carrying over fifty-six thousand ratings. For continuity, diode checks and battery voltage it is entirely sufficient. It is manual-ranging, so you pick the scale yourself before measuring - mildly annoying at first, and genuinely useful for understanding what the numbers mean.
desoldering braid for wicking excess solder off a pad
Desoldering braid is fine copper mesh impregnated with flux. You lay it over a joint, press the iron on top, and the molten solder climbs into the braid by capillary action and leaves with it. It is the tool for flat work - bridges between two pads, a pad flooded with too much solder - where a suction pump has nothing to grip.
Why we picked this exact one: This JoTownCand three-pack covers 0.08, 0.1 and 0.12 inch widths, which matters because braid wider than the pad pulls heat away faster than the iron can replace it. It is pre-fluxed, so it works straight off the reel. At under five dollars there is no argument for rationing it - cut off the used end and move on.
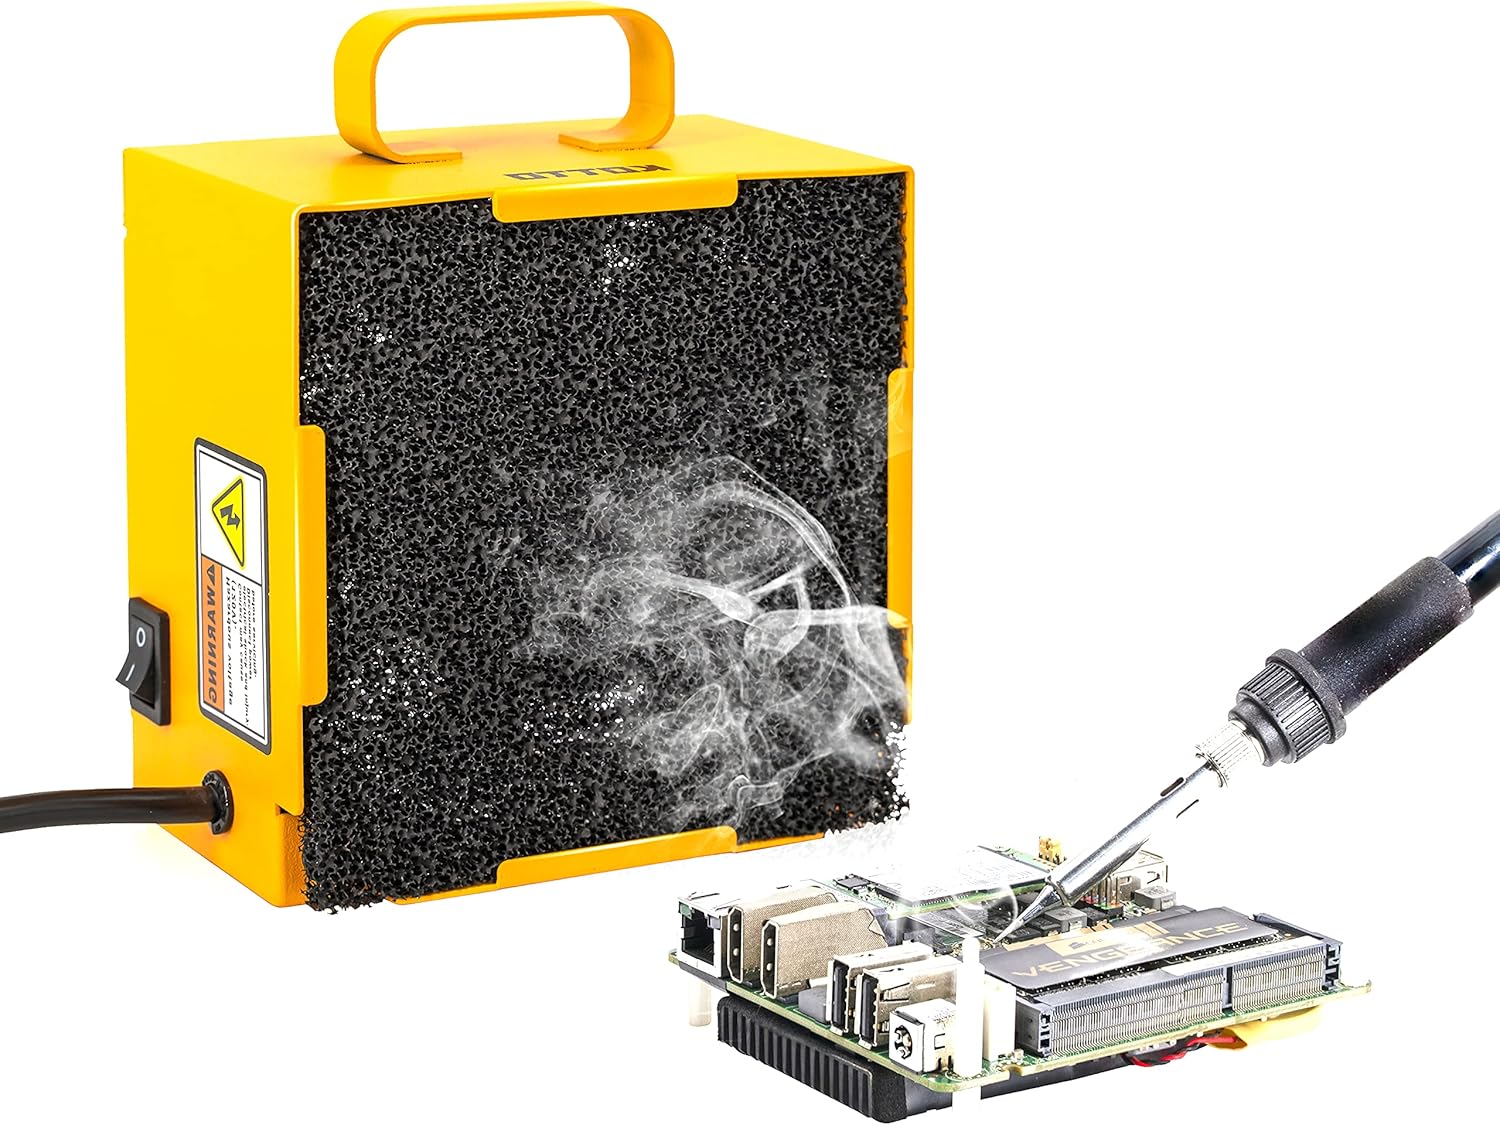
benchtop fan with a carbon filter that pulls flux smoke away from your face
A fume extractor is a fan behind a replaceable activated-carbon pad that sits beside the work and draws the rising smoke sideways before it reaches you. The carbon traps the organic compounds that give flux its smell. Placement does most of the work: a few inches from the joint pulls the plume, and a foot away mostly moves room air around.
Why we picked this exact one: The KOTTO absorber is the benchtop unit with a real review history behind it - a 4.7-star average over roughly two and a half thousand ratings - and its weighted feet keep it from creeping when the cable tugs. Replacement carbon pads are cheap and sold separately. It is a filter rather than an exhaust, so it belongs alongside an open window rather than instead of one.
low-profile vise that holds a circuit board flat at desk level
A board vise clamps a circuit board between two sprung jaws on a flat rail, holding it still and level while you work both hands above it. The low profile is the point: the board sits at desk height rather than waving about on articulated arms, so your wrists rest on the bench. Nylon jaws grip bare board edges without scoring the copper.
Why we picked this exact one: The Stickvise is the holder experienced builders keep recommending over the alligator-clip helping hands that come bundled with starter stations, and it holds a 4.7-star average. Because it keeps the board flat and low, it fits under a magnifier or a lamp without a fight. The standard jaws are nylon and will mark if you rest a hot iron against them, which is what the high-temperature jaws exist for.
professional temperature-controlled station with fast heat recovery
At the professional end, a soldering station is judged on recovery: how quickly the tip climbs back to its set temperature after the joint has pulled heat out of it. More power and a tighter feedback loop mean the second and third joints behave like the first. These stations also sit inside a long-running ecosystem of tip shapes, so a bevel or a chisel for a particular job is a few dollars away.
Why we picked this exact one: The Hakko FX-888DX is the step up that keeps being named by people who solder for a living, and it holds a 4.8-star average. Buy it when you know you will still be doing this next year - after a dozen kits, when you catch yourself waiting for the tip rather than the solder. Anyone still deciding whether they enjoy soldering should spend the difference on more kits instead, because it will not make a beginner's joints better.
None of this is urgent. Buy the multimeter the first time a finished board refuses to do anything and you have run out of guesses. Buy the braid the first time you solder a component in backwards, which will be soon. The one thing I would not put off is in the next section, and it costs nothing at all.
Burns, Fumes, and the Lead Question
Worth saying plainly before any of this: there is no regulator setting hobby soldering safety rules the way toy standards govern a child's paint set. What follows comes from the companies that make the irons and the solder - their datasheets, their own guidance - and from people who do this daily. Treat it as well-founded practice rather than law.
A soldering iron at working temperature looks exactly like a soldering iron that is cold. This is the entire problem. The tip is somewhere around 350 C, hot enough to brand a worktop instantly, and it gives off no glow and almost no warning. The rule that prevents nearly every burn is boring and absolute: the iron goes back in its cradle the moment it leaves the joint, every single time, including when you are only reaching for the solder. A cable that drags the stand around is worth taping down.
On fumes - the smoke is vaporised rosin flux, not metal. It is not acutely dangerous, but solder manufacturers' own datasheets note that prolonged exposure to flux fume can bring on asthma-type symptoms, and sensitisation is cumulative rather than dramatic. Open a window and put a fan somewhere that moves air past the bench rather than at it. The iron makers' advice is the same one you would reach anyway: work in a ventilated room, outdoors, or behind a filtered fan.
Lead is the question parents ask, and the honest answer is that lead-free solder makes it mostly moot - which is why it is the choice on this page. Even with leaded solder, the route into a body is not the smoke; it is hands, then food. Wash hands after a session, keep drinks off the bench, and the risk largely goes away. One more thing worth knowing if there are small children in the house: a lot of cheap LED soldering kits ship with a 3V coin cell, which is a genuine swallowing hazard. The kit above runs on a 9V battery instead, deliberately.
On age: manufacturers of beginner electronics kits generally put them at 12 and up, and that matches what the tool asks of someone. For a first few sessions an adult should be at the table rather than in the next room - not to hold anything, but because the habits set in the first hour are the ones that stick.
Set the bench up once and none of this needs thinking about again: iron at your dominant hand, cradle beside it, window open, glasses on, board clamped flat. The questions below are the ones that come up afterwards, once the equipment is sorted and the joints still aren't behaving.
Why Your First Joint Looks Like a Grey Blob
Why does the solder ball up on my iron instead of sticking to the board?
Because the board is cold and the tip is dirty, in that order. Solder flows toward heat, so if the pad and the leg have not been warmed, the molten metal has nowhere attractive to go and stays balled on the tip. Oxide on the tip - the dull black film that builds up as you work - makes it worse by blocking heat transfer entirely. Wipe the tip on brass wool rather than a wet sponge, since the thermal shock from a wet sponge shortens tip life, then melt a little fresh solder onto it before each joint so there is a wet bridge carrying heat into the work.
I bought solder at the hardware store and now my joints are going green. What happened?
You almost certainly bought acid-core solder or acid flux, which is sold for plumbing, stained glass and jewellery and sits on the same shelf as the stuff you wanted. The acid in it keeps working after the joint has cooled and will eat the connection and the surrounding copper over weeks. There is no rescuing it with cleaning. Electronics solder says rosin core on the reel, and anything labelled zinc chloride or sold near pipe fittings should go nowhere near a circuit board.
My iron says it is at temperature but the joint still won't melt. Is it broken?
Probably not - you have most likely hit a pad connected to a large copper area, which drains heat away faster than a small iron can replace it. Set temperature and delivered heat are different things, and a cheap iron reads the number it was told rather than the number at the joint. The fixes, in order: use a bigger tip so more metal touches the pad, add a dab of flux, and nudge the station up toward 380 C for that joint only. Leaning harder on the board does nothing except lift pads.
Do I actually need a separate flux pen?
For ordinary through-hole work, no - and this is the accessory most often sold to beginners who will never open it. Your solder already has flux running through the centre of the wire, which is released at exactly the moment and place it is needed. Extra flux earns its keep on surface-mount parts, on desoldering, and on those stubborn large-copper joints. Buying it on day one is money better spent on a second kit to practise on.
Everyone says leaded solder is easier. Should a beginner just use that?
Experienced solderers are being truthful when they say leaded flows better - it melts lower, wets more eagerly and is more forgiving of a slightly cool joint, which is why plenty of them still use it. The trade is that it brings a contamination problem onto a table that may also be used for homework and snacks. Lead-free is the sensible default at a kitchen table, and the price is simply working nearer the top of the temperature range and accepting joints that look slightly duller when cool. A dull lead-free joint is not automatically a cold one, which trips up people who learned on leaded.
People Worth Following Into This Hobby
Real practitioners we found while researching this setup — people who do the work, show their process, and publish on sites they run themselves. No sponsorships, no affiliations; we just think they're worth your time.
Builds Arduino, ESP32 and robotics projects and writes each one up as a long illustrated article with the wiring and the dead ends left in.
Once a beginner has soldered their first flashing-LED board, this is the most natural next shelf of projects - every build there needs the same through-hole joints and explains the circuit behind them.
Publishes hundreds of DIY build write-ups mixing microcontrollers, wearables and hand crafts, with the parts list and code for each one.
She teaches soldering as one skill among many rather than as an engineering specialism, which suits a reader who picked this up to make things rather than to study electronics.
Teaches electronics to complete beginners and has written a shelf of soldering guides covering temperature, desoldering, cold joints and the mistakes newcomers repeat.
His soldering library answers exactly the questions this page's FAQ opens up - what the right temperature is, why a joint went cold, how to get a component back out - and he wrote the beginner electronics books a parent would buy next.
Love what you see here? Save individual picks with on any item, or copy everything to a list of your own in one click — great for coming back to later, or dropping as a not-so-subtle hint.