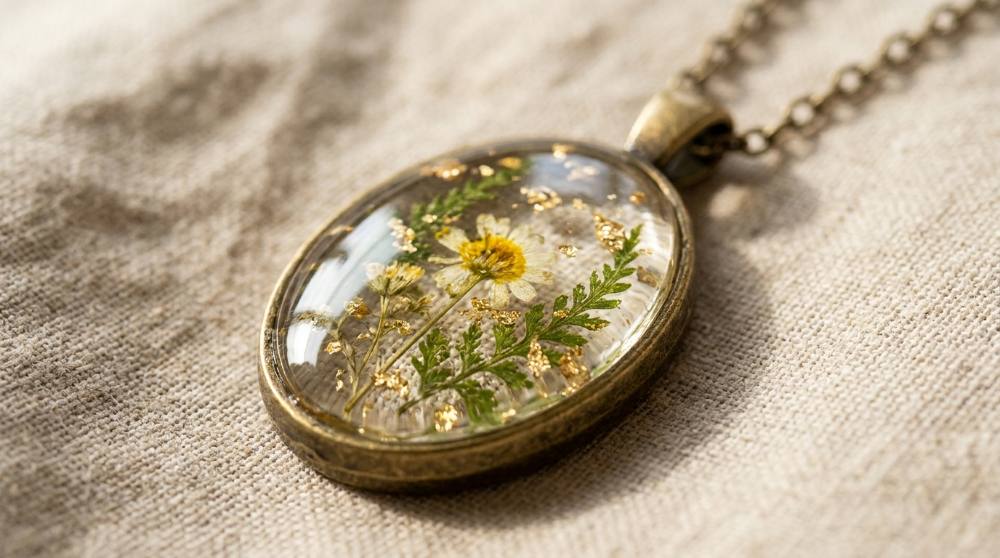
Nature got here first. Amber is just tree resin that oozed down a trunk, swallowed whatever happened to be sitting there and hardened, and more than nine tenths of the world's supply comes from one stretch of Baltic coast where Eocene forests did this on an industrial scale. Resin jewelry casting is the same trick on a kitchen table and a far shorter timeline: you mix a clear liquid, pour it into a thumbnail-sized silicone cavity with a dried petal or a curl of foil waiting inside, and the next morning you pop out a solid, glassy little object. The part that surprises people is that resin doesn't dry at all. It makes its own heat as it hardens, and a batch mixed too big can get warm enough to smoke.
If you've met resin before, it was probably spread flat across a coaster or a panel poured as resin art, where the surface is the whole point. Casting at jewelry scale flips that around. You're filling a cavity a couple of millimetres deep, the mold decides the shape, and a single bubble is suddenly a noticeable fraction of the thing you're making. The saving grace is how little is at stake per attempt: most casting resins won't let you mix less than about half an ounce, which is two or three pendants.
Our take: buy the five things standing between you and one finished pendant, and nothing else. Resin, a mold, something to measure and stir with, gloves, and a hook to hang the result from. Pigments, torches and clever little tools can wait until you've demolded something you actually want to wear.
Nothing below costs enough to sting if you pour one cloudy puck and decide this isn't for you.
Where This Little Kit Can Take You
A few real moments and results from this hobby — made with tools no fancier than the ones below.
Yellow bloom sealed in clear resinThe flower had to be bone dry before it went in, because fresh petals brown and rot inside the cure.
A slow pour into siliconePouring gently down the side of a cavity is most of what keeps air from getting trapped underneath.
One honest warning before the shopping starts: this is chemistry, not craft glue. Measure it carelessly and the piece stays tacky forever, and no amount of extra waiting rescues it. If you're still weighing up the glossy mediums against each other, the comparison of acrylic pouring and resin art for beginners is worth reading first, because pouring is more forgiving and far cheaper to abandon.
The Five Things Between You and a Pendant
Two words decide whether your first evening works: casting resin. Not coating resin, not tabletop resin. Those are built thick on purpose, to sit on a flat surface and level themselves, and they hang onto air like a sponge when you send them down into a deep little cavity. Casting resin mixes thin enough that bubbles can climb out unaided. You stir it the way you'd fold frosting, slowly, scraping the sides, never whisking.
The rest of this list is dull on purpose. A mold, a way to measure accurately, gloves, and the small metal bits that turn a lump of cured resin into something wearable. Beginners routinely spend their first fifty dollars on colour instead, then wonder why the pieces come out soft, and the honest answer is that nothing in a pigment bottle can rescue a batch that was measured by eye.
Disclosure: This section may contain affiliate links to Amazon. We may earn a small commission from qualifying purchases at no extra cost to you.
01Pick 01 of 10
two-part clear casting resin for small jewelry molds
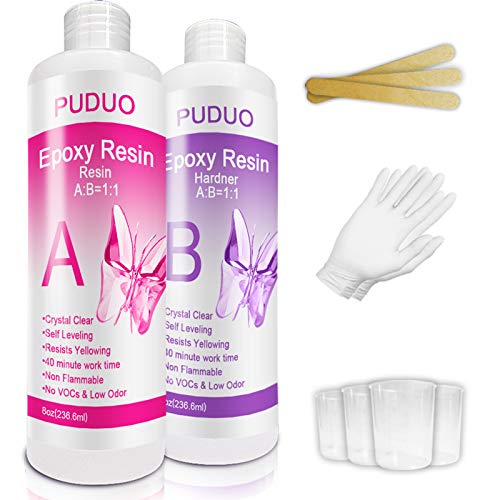
A two-part epoxy sold as resin and hardener in separate bottles, mixed in a fixed ratio right before pouring. Casting formulas mix thin, so air can climb out of a deep mold cavity instead of stalling halfway down. Look for a kit that prints its mixing ratio plainly and carries an ASTM D-4236 art-materials marking, and buy a size you will get through within about six months.
Why we picked this exact one: The Puduo Crystal Clear kit is sold as a casting resin and prints the two numbers that actually matter for mold work: demold at eight hours, full cure at twenty-four. It holds 4.5 stars across more than 28,000 ratings. The 1:1 mix ratio is the forgiving kind to measure, though the four small cups and single pair of gloves tucked into the box won't outlast your first evening.
silicone pendant and earring molds with cast-in hanging holes
Flexible silicone trays holding shallow round cavities in a few diameters, each with a small post that casts a ready-made hole into the finished piece. Silicone is the material of choice because it flexes enough to release a cured casting and shrugs off the heat the resin makes on its way to hardening. The cavity's own surface matters more than its shape: a glossy cavity casts a glossy piece, a frosted one casts a frosted piece.
Why we picked this exact one: The ResinWorld 25-cavity set is a shiny-surface mold with the hanging hole cast in, so a jump ring threads straight through instead of a bail being glued to a slick cured back. It rates 4.7 stars from close to 500 buyers. Every cavity is a flat circle in one of three sizes, so hexagons and teardrops mean a second tray later, though circles are the shape that makes the fewest demands on a first pour.
jewelry findings and pliers for mounting cast resin pieces
A box of the small metal parts that turn a finished casting into something wearable: hook wires, open jump rings, earring backs and two small pliers. Jump rings open sideways rather than by pulling the ends apart, which is why two pliers beat fingernails. Variety matters more than the headline count, so look for several ring sizes and a couple of ear-wire styles rather than a thousand of one thing.
Why we picked this exact one: The Paxcoo 1350-piece earring kit bundles hooks, jump rings and backs together with two small pliers, which saves ordering the tool separately a week later. It holds 4.7 stars across roughly 2,000 ratings. The metal is plated rather than solid, fine for pieces you make for yourself, though anyone whose ears react to plated findings will want to swap in surgical steel hooks.
graduated mixing cups and stir sticks for measuring small resin batches
Small clear cups printed with a volume scale, sold alongside flat wooden sticks for stirring. The scale is the whole point: craft epoxies are usually measured by volume in a fixed ratio, and a jewelry batch is small enough that a spoonful of error is a large share of it. Cups and sticks are both single-use, which is simply how this works, since cured resin is not worth scraping off anything.
Why we picked this exact one: The Coopay set pairs 2-ounce graduated cups with 100 wooden sticks, and the 2-ounce size is the useful one here because jewelry batches start at about half an ounce, a level that is hard to read on a cup scaled to ten. It rates 4.6 stars from several hundred buyers. Fifty cups sounds generous until you remember each one is used once and thrown away.
disposable nitrile gloves for handling uncured resin
Thin single-use gloves made of nitrile rather than latex or vinyl. Nitrile is the usual choice around epoxy because it is less likely to react with the chemicals, and the powder-free version is the one to buy, since loose powder has no business near a surface that is about to set solid. Thickness trades grip against durability, and lighter gloves keep more feel in the fingertips.
Why we picked this exact one: SwiftGrip's powder-free nitrile gloves are a 3-mil craft weight rather than a thick industrial one, which leaves enough feel in your fingertips to place a petal with a toothpick. They hold 4.7 stars across more than 7,000 ratings. At 3 mil they tear more easily than a heavy shop glove, so plan on a fresh pair each session.
Those five get you a demolded, wearable piece by about this time tomorrow. Leave it on a shelf for another day before you wear it, because resin keeps hardening well after it looks finished. If the findings end of it feels too fiddly, turning a spool of wire into settings and earring frames is the other route makers take to mount a cast piece, and the pliers you just bought carry straight over.
What to Buy Once the First One Comes Out Clear
Everything here solves a problem you won't recognise until after your first pour. Colour is the obvious temptation, and a drop or two of the same alcohol inks people use for alcohol ink art will tint a whole cavity or feather across the surface of one. Restraint is the actual skill here. The ink is a solvent, and a generous squeeze changes the chemistry enough that the piece never properly sets.
The finishing kit is less glamorous and gets used more. Wet-sanding a cured pendant throws up a grey milky slurry and leaves the piece looking chalky right until the last grit, which panics everyone the first time. I'd leave the vacuum chamber at the bottom of this list alone for a good long while; it costs more than everything else here combined, and warm bottles plus a slow stir get a beginner most of the way to clear.
06Pick 06 of 10
alcohol-based inks for tinting and swirling cast resin
Highly concentrated dye carried in alcohol, sold in small dropper bottles. One drop stirred through a cup tints the whole batch; dropped onto the surface of a filled cavity it spreads into feathered veins instead of blending evenly. Because the carrier is a solvent, the dose you can use is set by chemistry rather than by taste.
Why we picked this exact one: This 26-colour set from GR DZPLUS is sold for resin work rather than for paper, and the dropper bottles make a single-drop dose easy to control. It rates 4.6 stars from roughly 700 buyers. Twenty-six colours is far more than anyone needs; you will reach for four of them and the rest will sit in the box for a year.
A thin silicone oil misted into a mold cavity before pouring. Silicone molds let go of resin on their own, so this is not about getting a piece out at all, it is about getting it out without wrenching the mold. A light mist is the entire technique, and a puddle of it leaves a dull patch on the casting.
Why we picked this exact one: The Pachsi 4-ounce spray is a plain silicone-oil releaser sold for candle and resin molds alike, which is the simple version of this product rather than a branded mold conditioner. It rates 4.6 stars across more than 500 ratings. It is genuinely optional, and the case for buying it is mold lifespan rather than a better casting.
wet/dry sandpaper in graded grits for smoothing and polishing cast resin
Waterproof abrasive sheets in a ladder of grits from coarse to very fine. Resin gets sanded wet, with the piece dipped and worked against a sheet lying flat, because water carries the dust away and stops friction from heating and distorting the plastic. The assortment matters more than the brand, since the work only succeeds if you can step through the grits without leaving a gap.
Why we picked this exact one: The VERONES 90-sheet assortment runs 400 to 3000 grit, which brackets the 400-to-1000 range resin casters actually work through and leaves headroom for a final polish. It holds 4.7 stars from more than 5,000 buyers. The sheets come in full automotive size, so you will be cutting them down to pendant-sized pieces with scissors you do not mind blunting.
two-part silicone putty for making your own jewelry molds
Two tubs of coloured silicone paste that cure into a flexible mold once equal amounts are kneaded together by hand. You press the blended putty around an object, and a few minutes later you have a cavity that copies it. Mixing is by eye rather than by scale, which makes it one of the few forgiving materials in this hobby.
Why we picked this exact one: The DecorRom putty mixes 1:1 by eye rather than by weight, which is the forgiving version of this product and the reason it suits a first attempt. It rates 4.6 stars from close to 400 buyers. Worth knowing before you start: a homemade mold copies the finish of whatever you pressed it around, so a matte original hands you matte castings and a sanding job.
benchtop vacuum chamber that pulls air out of mixed resin before pouring
A sealed chamber and pump that drop the pressure around a cup of freshly mixed resin, so dissolved air expands, rises and breaks at the surface before anything goes into a mold. It treats the batch rather than the poured piece, which is the approach that reaches air sitting deep in a cavity. Chamber size decides what fits, and at jewelry scale you are degassing cups rather than castings.
Why we picked this exact one: The Resiners Airless Pro3 is a purpose-built resin chamber rather than a repurposed paint pressure pot, and it holds 4.5 stars across roughly 400 ratings. The step up is worth making once clarity is genuinely your limiting factor and you know you are staying with this; for a first year of flower pendants, warming the bottles and stirring slowly get you most of the way there. Wait if you are still deciding, because it costs more than every other item on the page put together.
None of this is needed to make a pendant, which is exactly why it sits in its own list. Add things one at a time, and give each one a few pours before deciding whether it earned its shelf space.
The Part That Deserves an Open Window
Epoxy isn't dramatic, and that's precisely the problem. It doesn't fume much, and small occasional pours in a ventilated room don't call for a respirator, so people get casual with it fast. The harm here is slow and cumulative: handling the uncured liquid bare-handed, often enough, is how makers sensitise themselves and end up allergic to a material they'd used happily for years. Gloves every single time, plus a window open or a fan running, covers nearly all of it.
Two other things catch beginners out. Sanding is the step that genuinely needs a mask, because fresh resin dust is fine enough to breathe in and may not be fully reacted yet. And don't reach for acetone or alcohol to clean resin off your skin; the solvent is harder on you than the epoxy is, so soap and a barrier cream before you start beat a scrub afterwards.
The last rule is the easiest to keep. Anything that touches resin is now a resin tool. The silicone mold, the stir stick, the measuring cup, none of them go back to the kitchen.
None of this should put you off. It's a tabletop craft with a short rule list, and the rules are cheap to follow, since a box of gloves and an open window cost less than the resin does.
Why Does the First One Never Come Out Like the Picture?
My resin was crystal clear in the cup, so why is the finished pendant cloudy?
Look at the inside of the mold rather than at the resin. A silicone cavity hands its own surface straight to the casting, so a glossy cavity gives you gloss, and the frosted matte cavities common on cheap molds and on repurposed baking trays give you a piece that looks sanded before you've touched it. Nothing you change about mixing will fix that. Buy molds with a shiny cavity, or plan on wet-sanding and polishing afterwards, or flood the face with a thin second coat of resin and let it level itself glossy.
How long do I actually have to wait before taking it out of the mold?
Demold time and cure time are two different numbers, and the bottle usually prints both. Small casting pours typically release after eight to twelve hours, while a dangle-sized piece is normally left overnight, around twenty-four hours. The trap is that a piece feels solid long before it has finished hardening, so an early demold leaves a thumbprint in the face or a pendant that bows slightly and never quite comes back. Pull it at the stated demold time at the earliest, then leave it alone another day before drilling, sanding or wearing it.
There's one fat bubble sitting right under my flower. Where did that come from?
The flower brought it. Dried petals are full of tiny air pockets, and when resin washes over them that air lifts out and parks against the underside of the petal, which is the one place a toothpick can't reach. The fix is to stop pouring in one go: lay a thin base layer, let it thicken to the consistency of half-set jelly, press the flower onto that, then pour the rest over the top. Warming the unopened bottles in a hot water bath for five to ten minutes helps as well, and so does working in a room in the low seventies Fahrenheit, because cold resin is thicker and holds onto everything.
What's the sturdiest way to hang a cast piece once it's hard?
Gluing a flat bail to a cured back is the obvious route, and it's also the joint that has to survive being worn every day. Two alternatives skip the glue entirely. Buy molds that cast the hanging hole in for you, where a small post in the cavity leaves a clean opening for a jump ring, or drop a closed soldered ring into the top of the cavity while the resin is still liquid so it cures locked into the piece. Use closed rings rather than the open ones in a findings kit for anything embedded, because an open ring has a seam, and a seam buried in cured resin isn't something you can go back and close.
People Worth Following Into This Hobby
Real practitioners we found while researching this setup — people who do the work, show their process, and publish on sites they run themselves. No sponsorships, no affiliations; we just think they're worth your time.
Writes a long-running handmade jewellery blog and documents her own resin experiments, including the pressed flowers that went opaque and the ones that floated mid-pour.
Her pressed-flower resin series walks through exactly the embedding problem this setup's FAQ covers, with her own failed attempts photographed next to the method that worked.
Runs a small jewellery studio that publishes step-by-step tutorials for setting resin and epoxy clay into bezels, photographing each stage.
Mixing resin accurately is the one failure this setup's measuring cups exist to prevent, and their mixing tutorial shows the scraping and folding technique on video.
Two sisters who make and photograph nature-based craft projects, including resin pendants cast around flowers they dried themselves.
Their flower pendant walkthrough covers the drying stage that decides whether an embedded bloom keeps its colour, which this setup flags but has no room to teach.
Love what you see here? Save individual picks with on any item, or copy everything to a list of your own in one click — great for coming back to later, or dropping as a not-so-subtle hint.