Zentangle for Beginners: No Skill, No Mistakes, No Erasing
One Pen, One Tiny Square, and No Eraser in Sight
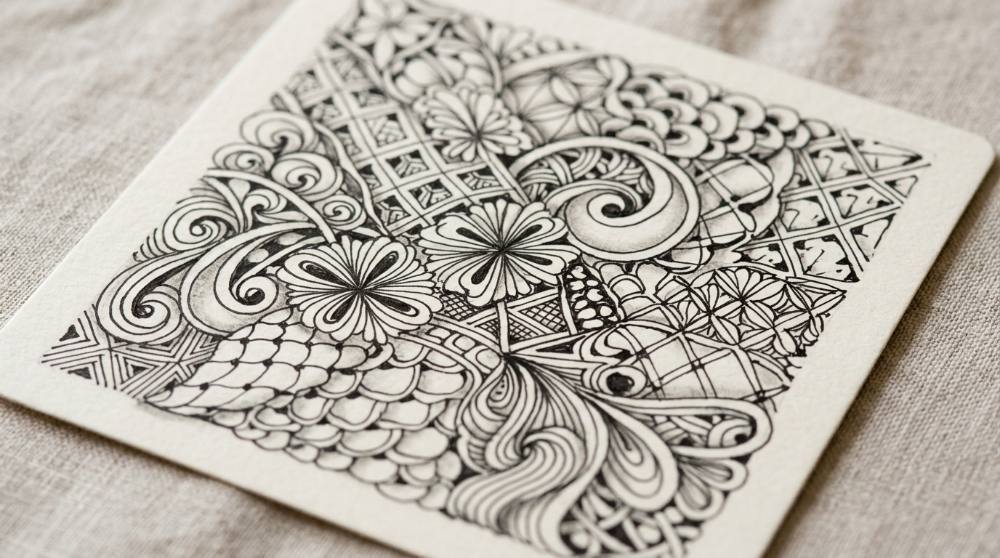
Zentangle began on a quiet Saturday in the fall of 2003, when Rick Roberts interrupted the calligrapher Maria Thomas as she drew patterns behind a gilded letter — and she realized she'd slipped into something like a meditative trance. The method they built from that moment is simple: you fill a 3.5-inch square of paper with structured patterns called tangles, one deliberate stroke at a time, with no plan and no fixed up or down. The finished tile is abstract on purpose. It isn't supposed to look like anything, which is exactly why people who insist they can't draw do fine. And a detail I love: although Rick spent seventeen years as a monk, he never actually practiced Zen — the name won out simply because it rhymed well with tangle.
The supply list is refreshingly short, and the whole kit fits in a pencil case. What matters is ink that won't smudge under your hand and paper thick enough to take pencil shading; the faint drag of a fine nib over toothy paper is half the pleasure. If you're still deciding whether structured doodling is your thing at all, a short guide to picking your first hobby is a sensible detour before you buy a single pen.
Start tiny: one black fineliner, a soft pencil, a paper blending stump, and a stack of small tiles. That's the entire method as taught — nothing else is required to begin.
Every pick below costs less than a takeaway lunch, so if tangling doesn't take, your wallet will barely notice.
black archival fineliner pens for drawing tangle patterns


Pigment-ink fineliners put down a crisp, permanent black line that dries almost instantly and won't smear when you shade over it with pencil. An assortment of nib sizes lets you draw delicate grid lines with a fine tip and fill dark sections with a broader one. Look for archival, waterproof ink and a nib around 0.25mm as your everyday size.
soft 2B graphite pencil for strings and shading


A soft 2B pencil does two jobs on a tile: it draws the faint border and the loose guideline (the string) that divides the square into sections, and afterwards it adds the shading that gives flat patterns depth. Soft graphite leaves a dark mark with almost no pressure, which matters on small paper. Look for smooth, break-resistant lead that sharpens cleanly.
paper blending stumps for smoothing graphite shading on tiles


Blending stumps and tortillons are tightly rolled paper sticks used to soften pencil marks into smooth gradients. On a small tile they reach the tight corners inside patterns where a fingertip would flatten everything at once. A set with several diameters covers both broad outer shadows and the thin channels between lines, and a sandpaper pad keeps the points clean.
3.5-inch square white paper tiles for tangle drawing


These are small, heavyweight square cards sized so a complete drawing fits into one short sitting. Good tiles are thick enough to take both ink and pencil shading without buckling, with a slight surface texture that gives the pen a satisfying drag. Ordinary printer paper is too thin for the job; look for stiff, acid-free stock in the traditional 3.5-inch square.
With these four things you can run the full traditional sequence: pencil border, a light guideline string, tangles in ink, then shading. You'll reach for an eraser out of habit the first evening — leave it in the drawer, because working around a stray line instead of removing it is the actual skill being practiced. Don't skip the shading either; it's the step that makes a flat pattern suddenly look carved, and the same graphite-and-stump technique transfers directly if you ever drift toward a beginner pencil sketching setup, where shading is the whole game.
When White Tiles Start Feeling Small
Nothing here is required, and I'd wait until you've filled at least a dozen white tiles before adding any of it. The classic first upgrade is flipping the contrast: white ink on black tiles feels like drawing with light, and patterns you already know suddenly look brand new. A sturdier plastic-nib pen is the other quiet fix, because beginners concentrate so hard they crush delicate fine tips — the nib is a whisker of felt, not a nail. These fineliners also happen to be the standard inking tool in beginner comic and manga drawing, so none of these pens will sit idle if your doodles wander toward characters.
durable plastic-nib archival pen for bolder lines and tangling on the go


A plastic-nib archival pen writes a slightly bolder, more forgiving line than a delicate fine-tip fineliner and shrugs off the heavy hand most people start with. The sturdier point suits filling in dark areas, drawing thicker accent lines, and working outside the house, where fine nibs tend to get crushed in bags. The ink is the same permanent pigment type as a standard fineliner.
opaque white gel pens for drawing tangles on black paper


White gel pens carry a dense, opaque ink that sits on top of dark paper instead of soaking in, so lines stay bright instead of fading to grey. A bold point lays down enough ink in a single pass, which matters because white ink rewards slow, unrepeated strokes. Look for genuinely opaque ink and a rollerball tip that doesn't skip on smooth card.
3.5-inch black paper tiles for white-ink tangle art


Black tiles are the same small square format as white ones, cut from heavyweight dark stock that takes gel ink and coloured pencil without warping. Drawing familiar patterns in white on black reverses every habit — shadows become highlights — and finished dark tiles read as dramatic little art objects. Look for genuinely black core paper rather than coated card, which gel ink can flake off.
day-by-day beginner course book of tangle patterns and techniques


A structured course book breaks the method into short daily exercises: each session teaches a few new patterns, a technique like shading or building depth, and a small finished tile to complete. Printed step-by-step stroke diagrams are easier to follow mid-drawing than videos, since the book lies open next to your tile. Look for clear stroke-order diagrams and daily lessons that build on each other.
Add this layer slowly — one purchase a month is plenty, and the course book alone will keep you busy for six weeks. The white gel pen moonlights nicely for headers and accents if you also keep a beginner bullet journal. Black tiles, meanwhile, are the cheapest way to make a finished piece look shelf-worthy. And if the quiet, hands-busy side of tangling is what hooks you, beginner origami delivers a very similar calm from a single square of paper.
Why Your First Tiles Won't Look Like the Ones Online
What am I supposed to do when I draw a line in the wrong place?
Beginners treat a stray ink line as a ruined tile because every other art habit says to erase and redo. In Zentangle there's nothing to erase with — official kits deliberately ship without an eraser — and hunting for mistakes breaks the slow, absorbed state that's the whole point. The fix is to build the line in: thicken it, echo it with parallel strokes, or let it become the border of a new section. A week in, you'll stop noticing which lines were intentional.
Why do my patterns look wobbly next to the samples?
New tanglers draw fast, trying to sketch the whole pattern the way they'd doodle in a margin, and speed is precisely what makes lines shaky. The method asks for one deliberate stroke at a time, rotating the tile to whatever angle is comfortable, since a tile has no up or down. Slow strokes come out steadier, and once pencil shading goes on, small wobbles read as hand-drawn texture rather than error. If a pattern still fights you, it's almost always being drawn in fewer, longer strokes than intended.
Can I just practice on printer paper instead of buying tiles?
You can sketch patterns on anything, but thin paper buckles under graphite shading, feathers fine ink lines, and robs you of the pen-on-card drag that makes the practice feel good. The usual result is flat, scratchy-looking tiles and a beginner who wrongly blames their own hands. If you want a cheaper route than bought tiles, cut heavyweight cardstock of at least 250gsm into 3.5-inch squares — the weight matters far more than the brand.
Why does my shading look dirty instead of soft?
The culprit is almost always a fingertip: skin oil grinds graphite into the paper's texture and leaves a grey smear that no amount of careful pencil work fixes afterwards. The consequence is tiles that look smudged rather than dimensional, which discourages people from shading at all. Use a paper stump with a light touch, rest your drawing hand on a scrap sheet, and add graphite gradually — you can always deepen a shadow, but you can't cleanly lift one.
Do I need to memorize dozens of patterns before I start?
Collecting patterns is the most seductive way to avoid drawing them, and beginners routinely stockpile dozens of tutorials while their tiles stay blank. One or two tangles are enough for a complete, satisfying first tile, since repetition — not variety — is what produces both the meditative effect and the visual richness. Learn a new pattern only when the current ones start feeling automatic. A single well-worn tangle drawn thirty times will teach you more than thirty tangles drawn once.
Love what you see here? Save individual picks with on any item, or copy the whole list to your own wishlist in one click — great for coming back to later, or dropping as a not-so-subtle hint.