Beginner Soap Making Setup: Melt-and-Pour Method Essentials
What You Actually Need for Your First Batch
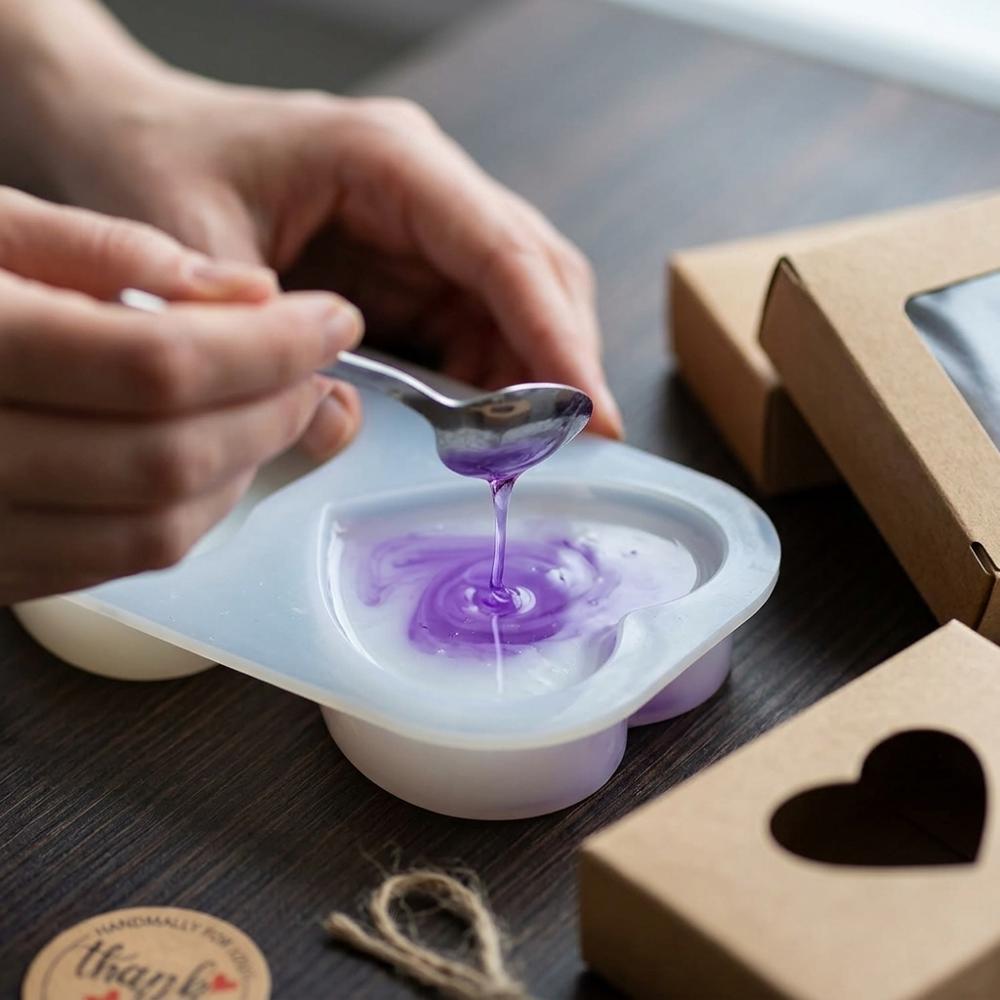
Melt-and-pour soap making starts with a solid block of ready-made soap base that you chop into cubes, melt into a clear or milky liquid, stir full of color and scent, and pour into a mold to set — a finished bar cools on your counter in a couple of hours rather than curing for weeks. It lives somewhere between cooking and craft, which is why you will find it taught at community centers, kids' birthday parties, and kitchen tables as often as in dedicated studios. Soap itself is ancient: people were simmering fats with wood ash in Mesopotamia around 2800 BCE, but the transparent, glycerin-rich bases that make this method so forgiving trace back to the clear soaps London perfumer Andrew Pears began selling in 1789. The part that surprises most newcomers is that there is no chemistry to fear — the base has already been saponified, so the lye is long gone and you are simply melting and decorating. That single fact is what turns a centuries-old craft into an afternoon anyone can try.
The supply list here is short, but each item carries a small quality threshold that separates a bar looking handmade from one looking homemade in the unflattering sense. You need a base to melt, a mold to shape it, something skin-safe to color and scent it, and a heat-proof container to pour from. Get these five right and the materials stay out of your way; skimp on them and you will spend the first session fighting seized fragrance, chalky color, or a bar that refuses to leave the mold.
My advice is to resist the urge to buy a sprawling kit. One block of soap base, a single flexible mold, a skin-safe colorant, a soap-grade fragrance, and a microwave-safe pouring cup will carry you through a dozen batches before you need anything else.
I worked through the supplies that beginners get pointed toward again and again, then narrowed the list to the pieces that are genuinely skin-safe, easy to find, and priced for someone still deciding whether soap-making will stick.
Clear glycerin melt-and-pour soap base for crafting bars
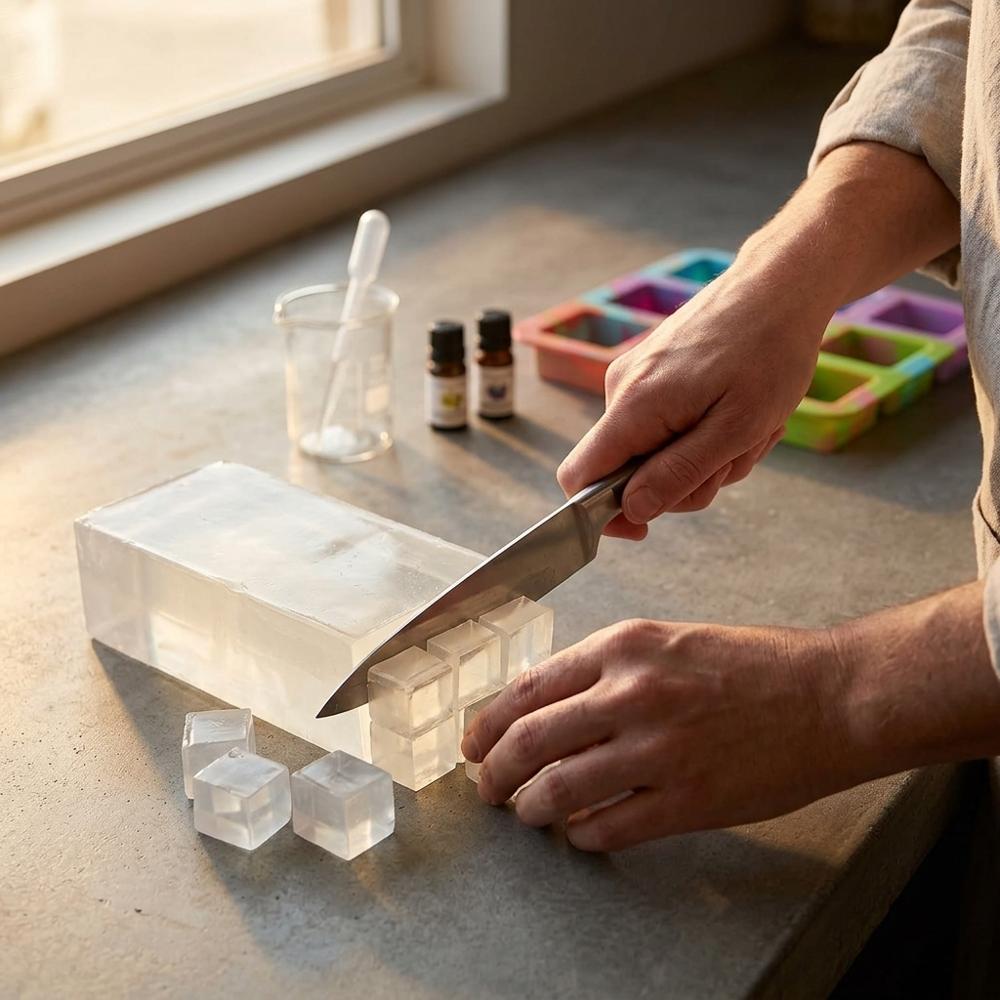
A melt-and-pour soap base is a pre-made, pre-saponified block that you cut, melt, and pour, and it is the foundation every bar is built on. Clear glycerin bases set transparent, which shows off color, swirls, and anything you suspend inside, and they lather gently on most skin types. Beginners should look for an unscented, easy-to-cut base labeled skin-safe, in a one- to five-pound size that leaves room for practice batches.
Flexible silicone mold with rectangular bar cavities
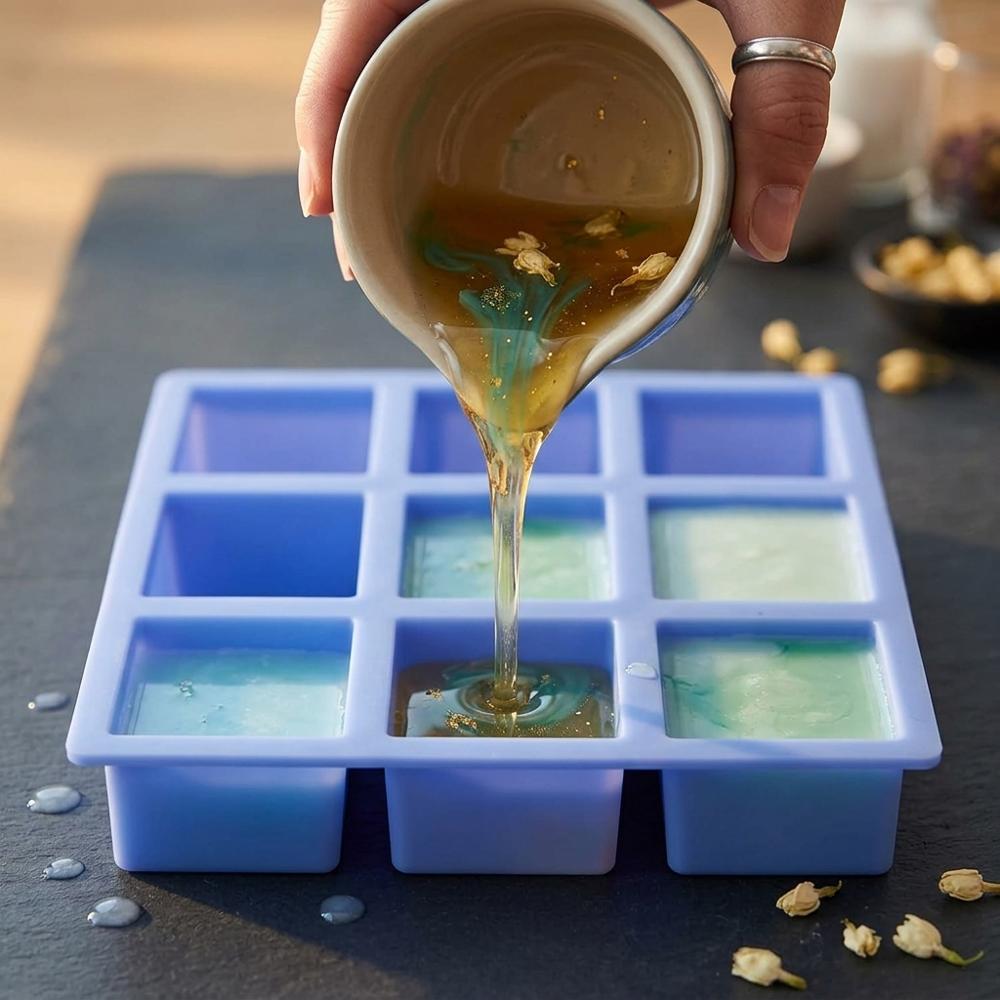
A silicone mold shapes the melted base into finished bars and flexes so each one pops out cleanly without cracking. Multi-cavity rectangular molds give you uniform, stackable bars and let you pour a whole batch at once. Look for thick, food-grade silicone with deep cavities, since thin molds sag when filled and leave wavy edges.
Skin-safe fragrance oil variety set for scenting soap

Fragrance oils are concentrated scents formulated to hold up in soap and stay skin-safe once diluted into the base. A variety set lets you test several directions, warm, sweet, and fresh, before committing to full-size bottles. Beginners should confirm the oils are rated for bath-and-body use and start with a small amount per pound of base, since a little goes a long way.
Cosmetic-grade mica powder color set for soap
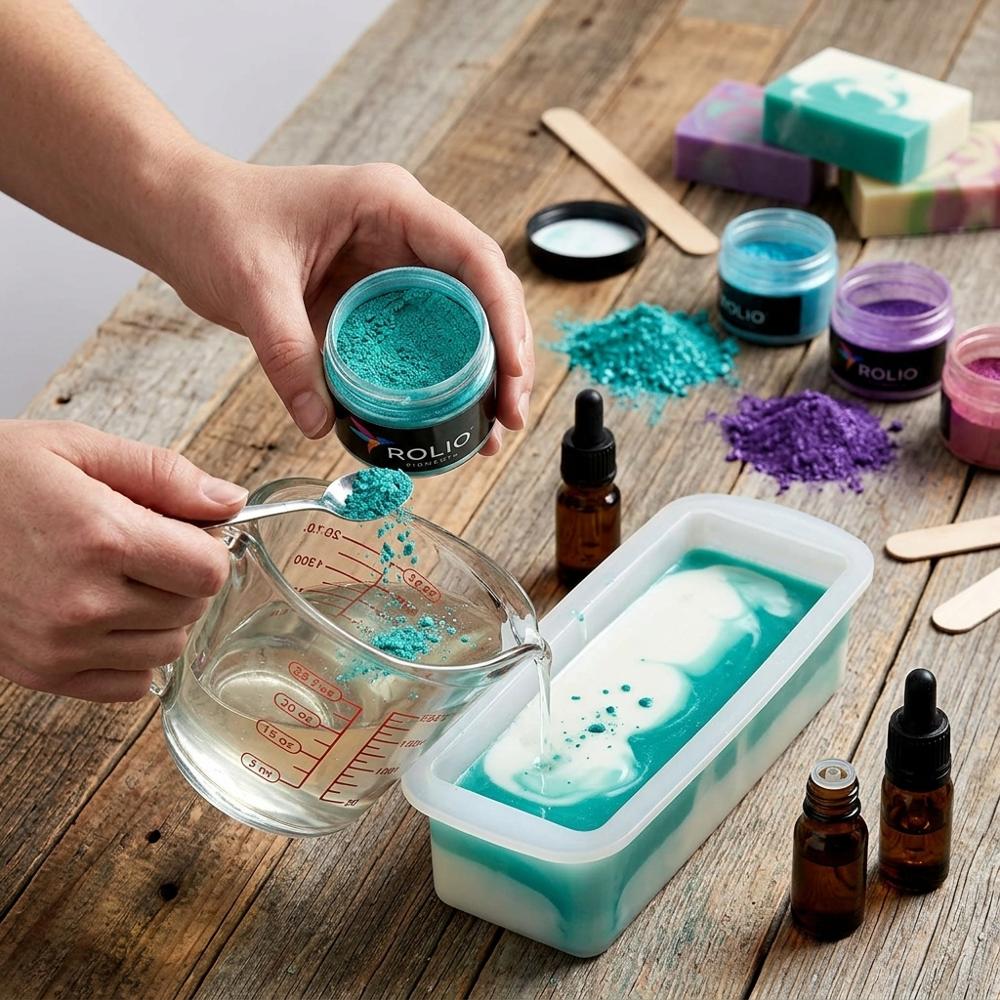
Mica powders are fine, skin-safe pigments that tint melt-and-pour base and add a soft pearl shimmer. A multi-color set covers the full range so you can mix custom shades instead of buying one jar at a time. Choose micas labeled cosmetic-grade and skin-safe, and disperse them in a little base or glycerin first so they do not clump into speckles.
Microwave-safe pouring pitcher with long spout
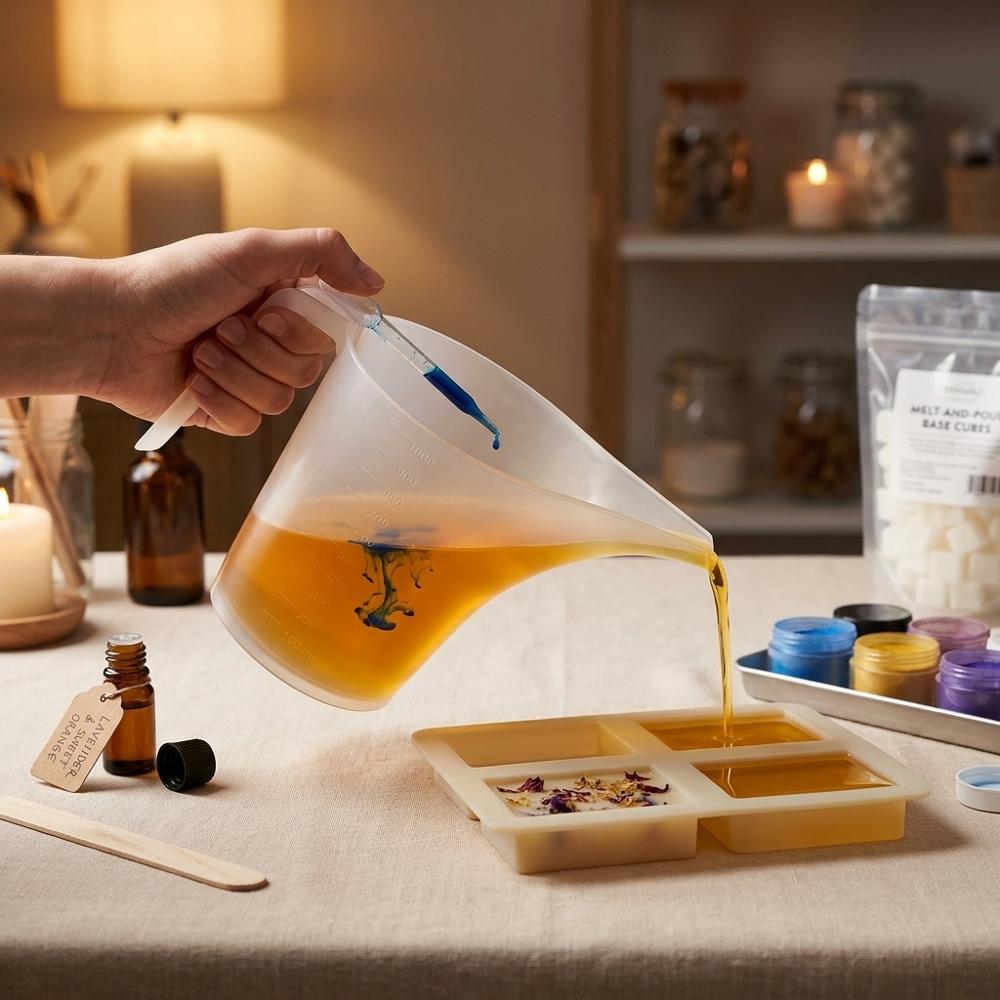
A heat-safe pouring pitcher is where you melt the base and pour it into molds, and a long spout keeps the stream controlled so you do not flood the cavities. Microwave-safe plastic with a comfortable handle lets you melt, stir, and pour from one container. Look for a spout and a capacity around a quart so a single melt fills several bars.
With these five things on the table, you can make a complete, usable bar today: melt, color, scent, pour, and wait. If you are still deciding whether this is your craft, it pairs well with the questions in our guide to how to choose your first hobby, since soap-making asks for very little commitment up front. The extras in the next section are not about making soap possible — they are about making it easier and more repeatable.
Small Upgrades That Make Pouring Easier
None of these are required to make soap, and I would gently steer you away from buying them all at once, because over-equipping early is precisely the pattern described in the art supplies beginners waste money on. What this group does is remove the small frustrations that show up around your third or fourth batch: air bubbles freezing into the surface, guessing at fragrance amounts, and pouring one bar at a time. Add them once you know you will keep going.
Fine-mist spray bottle for rubbing alcohol
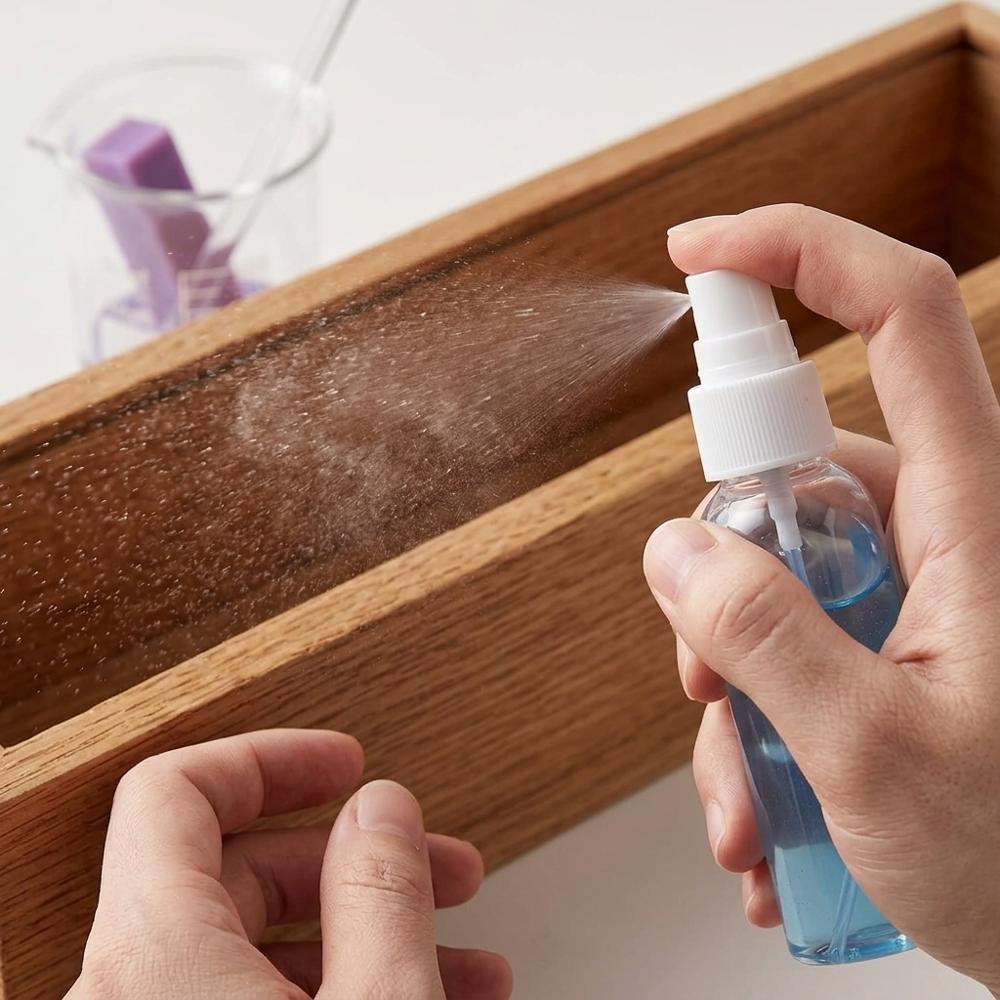
A fine-mist spray bottle filled with high-strength rubbing alcohol is how soap-makers pop the bubbles that form on a freshly poured surface. A light spritz right after pouring clears the foam and helps layers bond when you pour in stages. Small refillable bottles that produce a true fine mist rather than a squirt work best; fill with 91 percent or higher isopropyl alcohol.
Digital scale with 0.1-gram precision for soap and scent
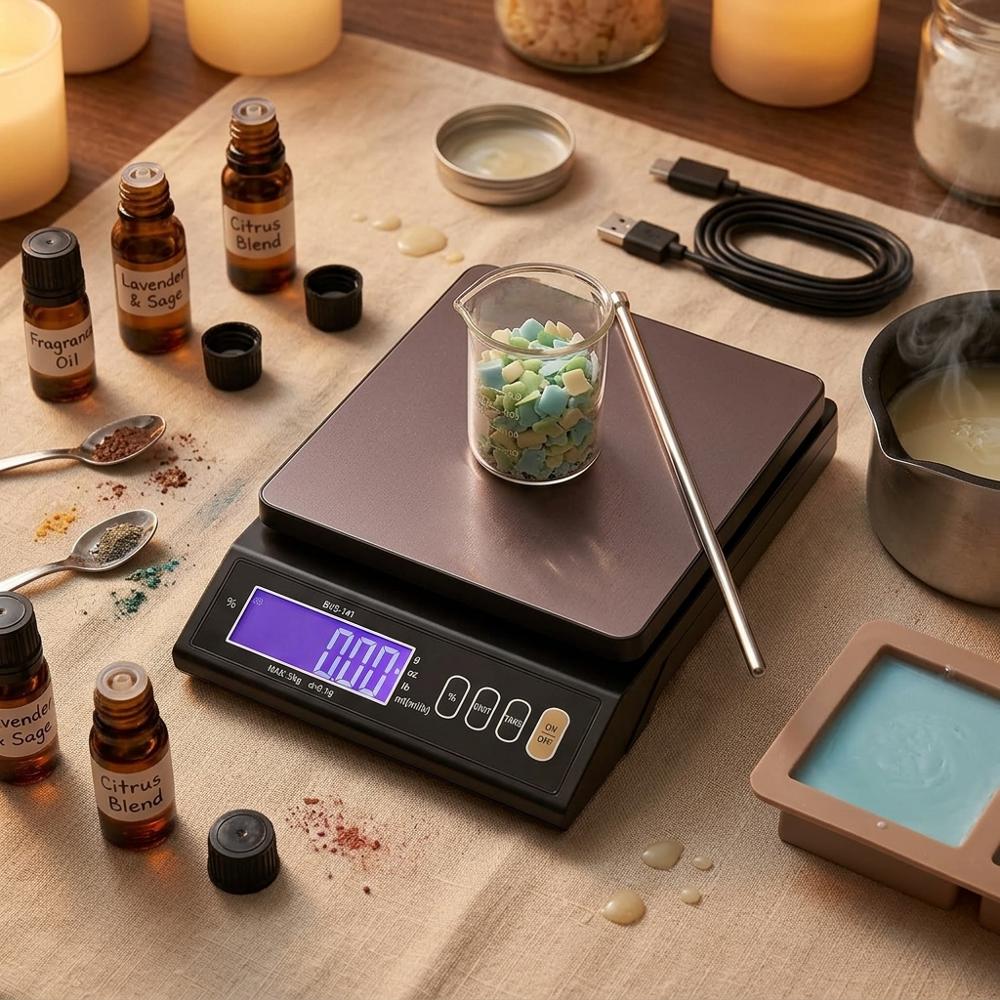
A digital scale that reads to a tenth of a gram lets you weigh both the base and the small amounts of fragrance a recipe calls for. Measuring by weight instead of counting drops makes each batch repeatable and keeps scent from turning out faint or overpowering. Look for fine resolution, a tare button, and a capacity of several kilograms so it handles a full block of base.
Silicone loaf mold with wooden box and bar cutter
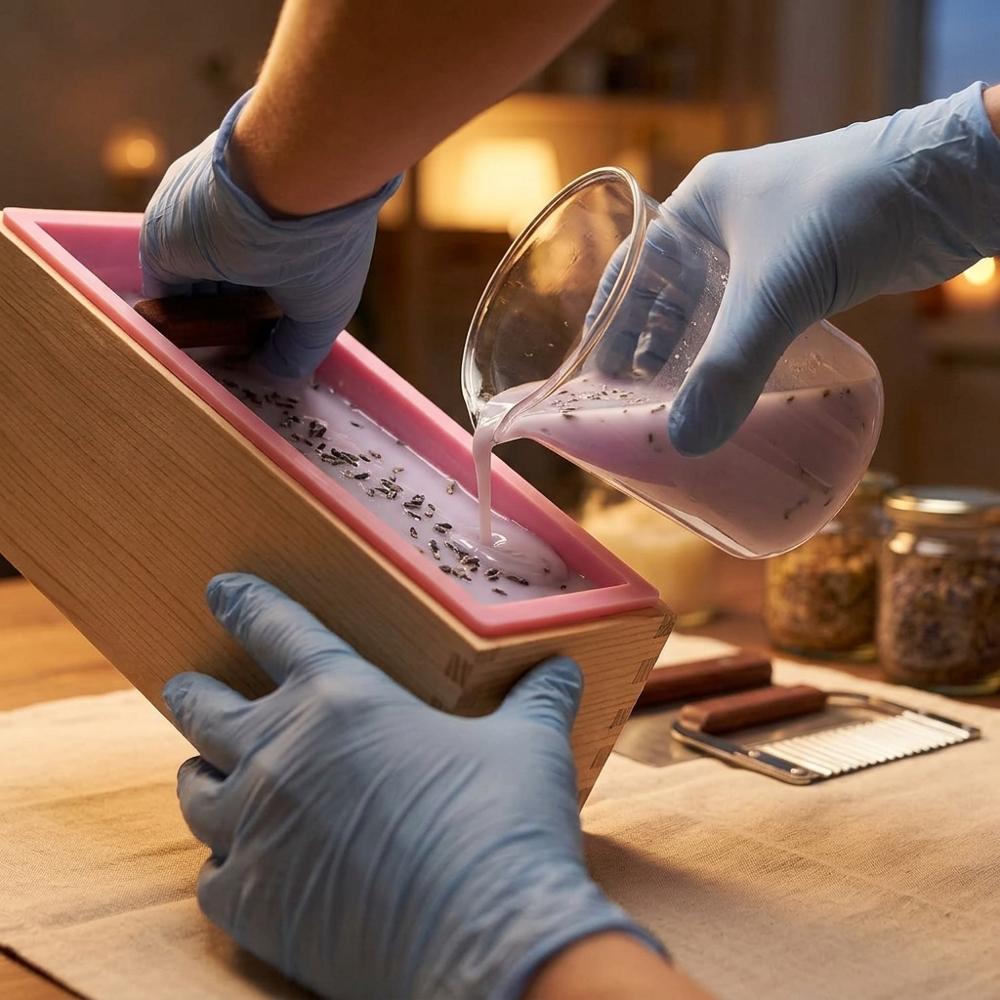
A loaf mold sets soap in one long block that you slice into bars, giving you control over thickness and a rustic cut edge. The wooden box supports the flexible silicone so the loaf keeps its shape, and an included cutter makes even slices. This is a natural next step once single-cavity molds start to feel limiting.
Pure essential oil set for naturally scenting soap
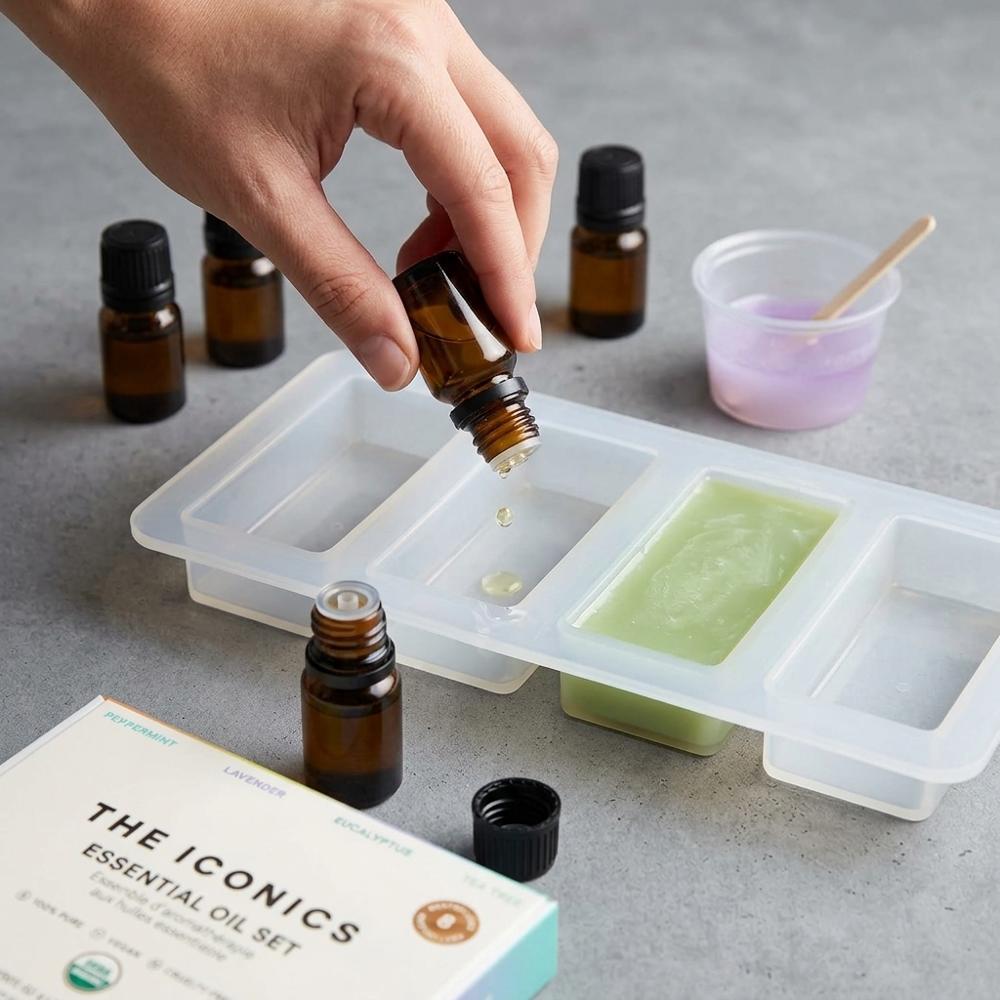
Essential oils are plant-derived scents for anyone who prefers a natural alternative to synthetic fragrance oils. A starter set of common oils such as lavender, peppermint, and eucalyptus covers most beginner recipes and doubles for other projects. Essential oils are usually subtler and can fade faster in soap than fragrance oils, so they suit makers who want a lighter, botanical scent.
Think of this group as comfort, not capability. A scale ends the guesswork that leaves fragrance either faint or overpowering, and a loaf mold lets you pour a batch and cut bars to whatever thickness you like. If you want soap-making to become a habit rather than a one-off, it slots neatly into a simple beginner creative routine you can return to on a slow weekend.
Turning a Plain Bar Into Something Giftable
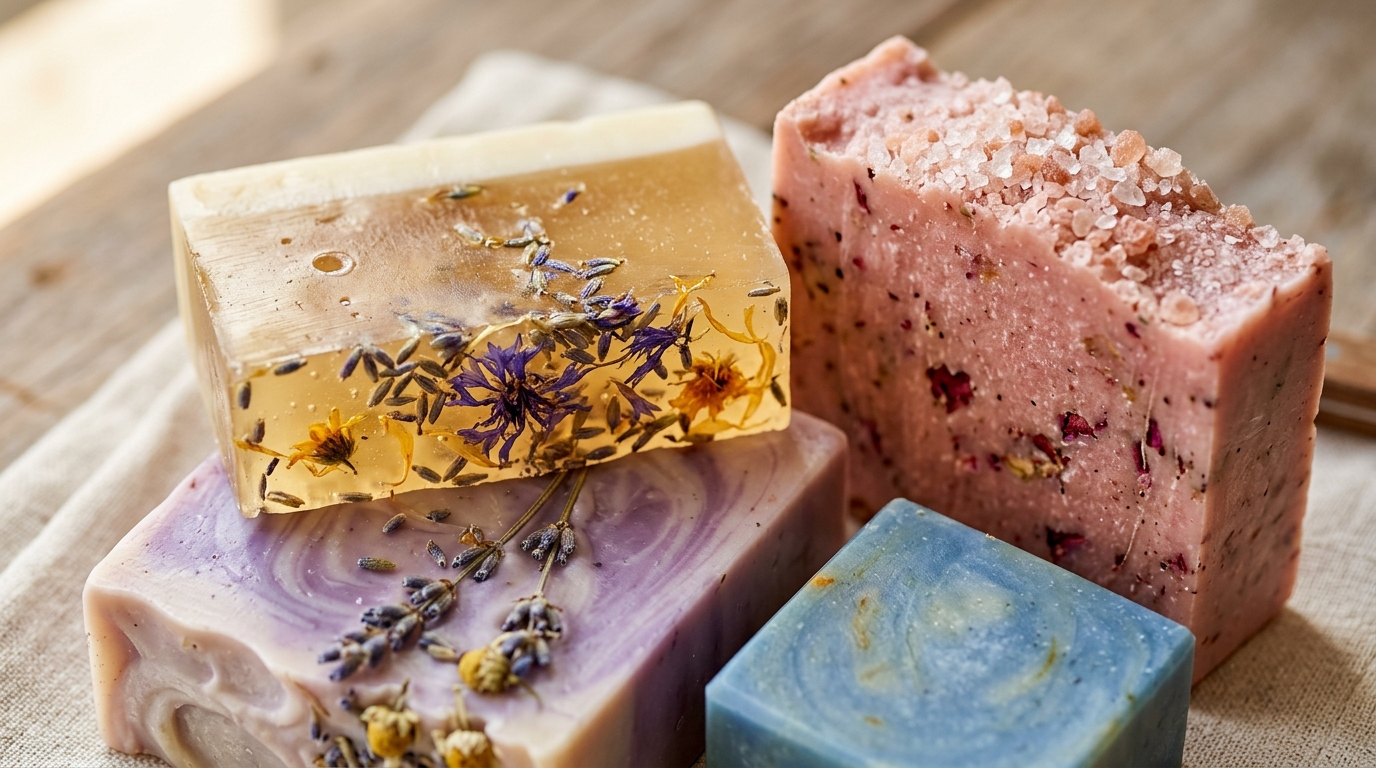
This is the fun part, and also where restraint pays off. A clear glycerin bar with a single dried flower suspended inside or a light dusting of oatmeal for texture reads as far more considered than a bar crammed with everything at once — the same less-is-more instinct that makes beginner origami paper folding so satisfying with nothing but paper. These three additions handle decoration, texture, and presentation, which is most of what separates a gift from a leftover.
Dried flowers and botanicals for decorating soap
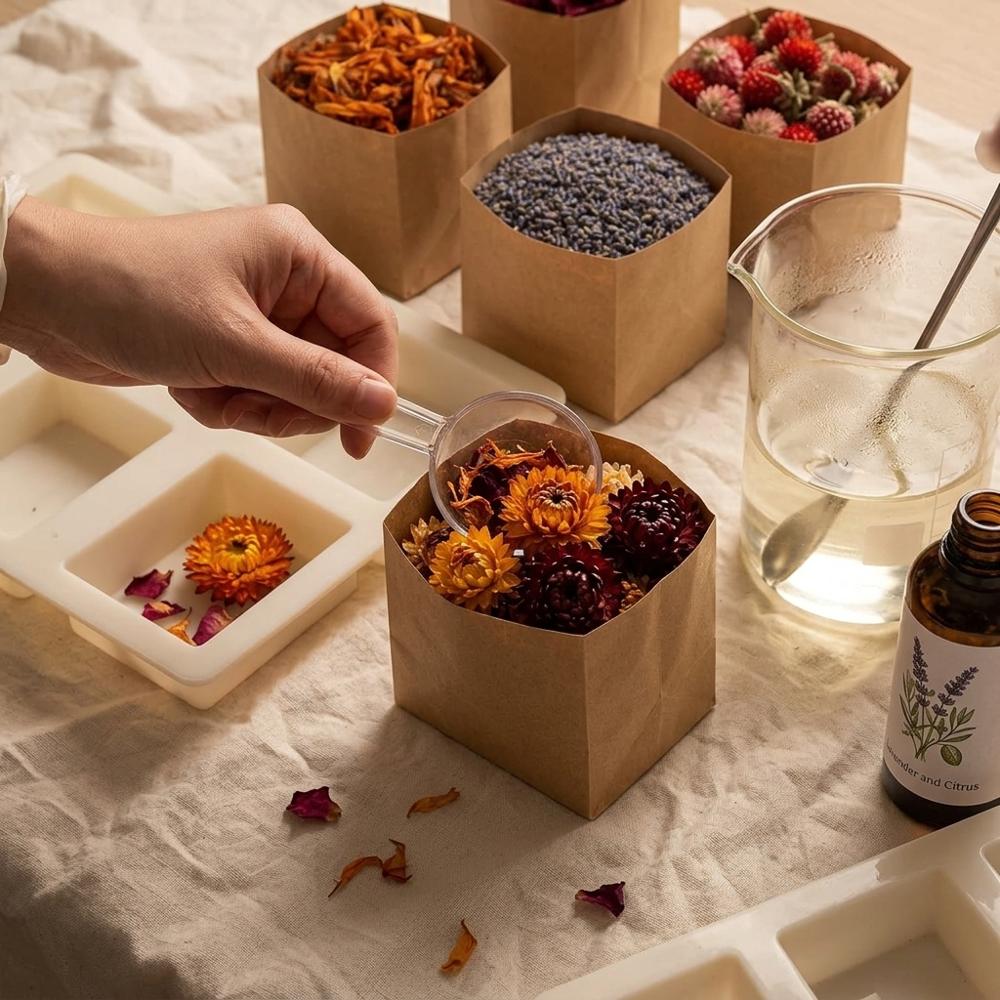
Dried botanicals are petals, buds, and herbs you press into or suspend inside a bar for a natural, handmade look. A multi-bag assortment lets you experiment with color and texture without committing to bulk quantities. Use fully dried material, since anything holding moisture can brown or rot once sealed in soap.
Colloidal oatmeal for gentle exfoliation and texture
Colloidal oatmeal is finely milled oats stirred into the melted base to add soft exfoliation and a soothing, skin-friendly feel. It gives clear bars a speckled, oatmeal-and-honey look that reads as wholesome and handmade. A little goes a long way; too much can make a bar gritty or cloud the base more than you intend.
Kraft soap boxes with clear windows for gifting
Window boxes turn a finished bar into a giftable product by protecting it while showing off the color or embedded design through a clear panel. Kraft paper gives a natural, artisan look that suits handmade soap. Check the interior dimensions against your mold so bars slide in without forcing, and buy a count that matches how much you plan to give away.
Between the botanicals, a skin-friendly exfoliant, and a stack of window boxes, you can hand someone a bar that looks bought and feels personal — which is the whole appeal, and part of why soap-making keeps showing up on lists of the best starter hobbies for adults. Start plain, add one decorative idea per batch, and your bars will improve faster than your shopping list grows.
Why Did My Soap Come Out Cloudy, Sweaty, or Weirdly Wrinkled?
Why does a white film or beaded "sweat" form on top of my bars?
That layer is glycerin dew: melt-and-pour soap is naturally humid, so it pulls moisture from the air and beads it on the surface as the bar cools. Left in a steamy bathroom, bars can keep sweating and feel slimy. Wrap each finished bar tightly in plastic within a few hours of unmolding, and store them somewhere dry rather than open on a shelf. This one habit fixes the most common complaint new soapers have.
Why did my scent fade, or the whole batch seize into a lump?
Two things trip people up: adding scent while the base is too hot, which flashes off the delicate top notes, and using an oil that was never meant for soap. Fragrance stirred in above roughly 140 degrees loses strength, and candle-only or diffuser oils can make a batch clump or refuse to set. Let the melted base cool until it is just fluid, use an oil rated skin-safe for soap, and measure by weight rather than eyeballing drops. Under-scented soap is almost always a temperature problem, not a quantity one.
Why won't my colors stay bright and evenly mixed?
Colorant dropped in dry tends to clump into speckles, and some pigments dull when the base gets scorched. Overheating in the microwave is the usual culprit, because the base can look fine while the color turns muddy. Melt in short bursts, stir the colorant into a small amount of base or a little glycerin first to disperse it, then blend that into the full batch. Add color gradually; it is far easier to deepen a pale bar than to rescue an over-pigmented one.
Why do my embedded flowers turn brown and sink?
Most fresh or thick botanicals discolor once sealed in soap, because the moisture trapped in the petal has nowhere to go, and dense flowers drift down to what becomes the top of the bar. Use thoroughly dried material, add it after a thin first pour so it sits where you want, and accept that a few varieties brown no matter what you do. Calendula petals are one of the few that reliably keep their color.
FORK_CTA_HINT
 RELATED_SETUPS_HEADING
RELATED_SETUPS_HEADING

AFFILIATE_DISCLOSURE_TITLE: AFFILIATE_DISCLAIMER