Buttercream Forgives Almost Everything You Do To It
Cake decorating starts after the baking. You stack cooled layers, spread buttercream over the outside, and drag it flat until the sides stop looking homemade. Most of it happens on kitchen counters, learned from a relative or a video rather than a pastry school. It's older than it looks, though - decorated cakes were a 17th-century European luxury, and cake decorator was a respected trade long before electric mixers existed. The odd part is how it reached ordinary kitchens: cake-mix companies pushed decorating hard in the 1950s, hunting for a reason people would keep buying boxes.
What trips up most first attempts isn't the piping. It's the sides. A cake frosted straight out of the bowl looks exactly like a cake frosted straight out of the bowl - streaky, flecked with crumbs, slumping a little at the top edge. Nearly everything on this page exists to fix that, and then to put a tidy border where your eye lands first. If you've done outline-and-flood work on royal icing cookies, this is a different animal: buttercream never sets hard, so a bad coat scrapes off and you go again instead of living with it.
Buy the fewest things that can actually produce a flat side. A turntable, one long offset spatula, a metal scraper, and a couple of bags and tips will carry you further than a drawer of gadgets. The rest can wait until you know you like this.
Nothing below costs enough to sulk about if your first cake comes out sideways and you never try again.
Where This Little Kit Can Take You
A few real moments and results from this hobby — made with tools no fancier than the ones below.
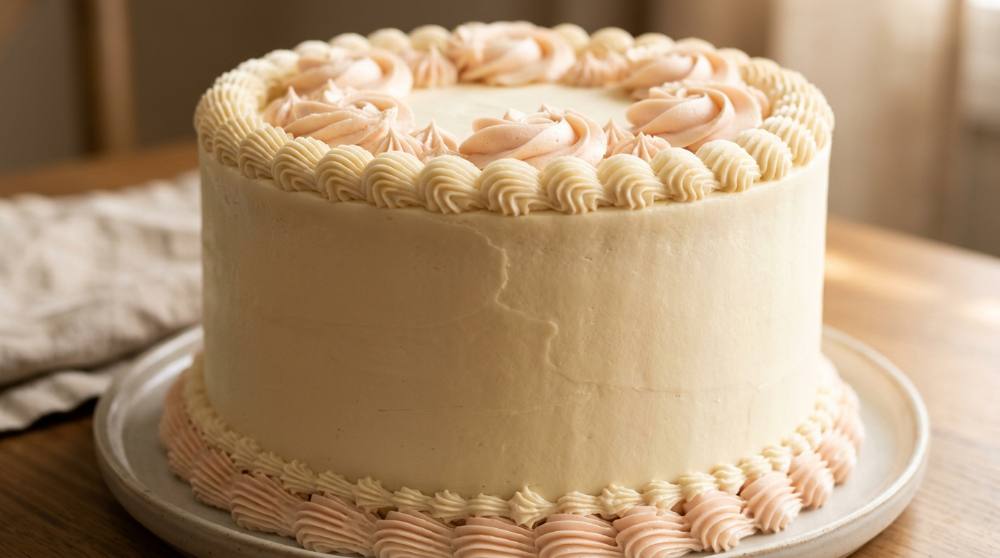
Smooth sides, piped pink borderThe chocolate script went on last, straight onto a chilled surface.
A star tip mid-squeezeEach rosette is one squeeze and a clean pull away, nothing more.
Give yourself two or three cakes before you decide how it's going. The first one teaches you how much buttercream the sides actually need, which is always more than feels sensible, and the second is usually the one that surprises you. If you're still weighing this against other first hobbies worth picking up as an adult, the thing cake has going for it is that the failures still get eaten.
The Short List That Makes a Side Go Flat
Beginners nearly always buy in the wrong order. A hundred-piece tip set turns up first, the turntable last, and then the cake gets frosted on a dinner plate while its owner shuffles around the kitchen table. Every reposition leaves a seam. The five things below do the opposite job: they let you keep the blade still and move the cake, which is the entire trick behind a flat side. One warning before you shop - whatever board you set the cake on wants to be a couple of inches wider than the cake itself, because your scraper needs somewhere to rest while it rides around.
Disclosure: This section may contain affiliate links to Amazon. We may earn a small commission from qualifying purchases at no extra cost to you.
01Pick 01 of 15
Rotating Cake Decorating Turntable
A turntable is a weighted disc on a bearing that spins the cake while your hands stay put. The plate is usually 11 to 12 inches across so a standard cake sits well inside the edge, and the better ones have a rubberised foot so the base doesn't travel across the counter. Look for a plate that spins freely under the weight of a loaded cake rather than stuttering, since every stutter shows up as a ridge in the buttercream.
Why we picked this exact one: The Kootek 12-inch aluminium alloy turntable is the one most home decorators seem to land on, and at a shade under thirty dollars it sits below the cast-iron bench models without feeling like a toy. The aluminium plate is flat and the bearing keeps turning once you give it a push, which is what you want when one hand is holding a scraper steady. It is light enough to slide if you lean on it hard, so a damp cloth or a non-slip mat underneath is worth the trouble.
An offset spatula has a thin blade that steps down from the handle, so your knuckles stay clear of the frosting while the blade lies flat against it. Sets usually run from about 6 to 10 inches, with the long one used for loading the top and sides and the short one for tidying corners and lifting piped decorations. A blade with some flex handles curves better than a rigid one.
Why we picked this exact one: The Kootek three-piece offset spatula set covers 6, 8 and 10 inches for about ten dollars, which means you aren't choosing between a blade that's too short for the sides and one too clumsy for the corners. Working decorators generally want roughly an 8-inch blade for the main sweep, and this set includes it rather than making it a separate purchase. The handles are plain plastic and nothing special to hold, but the blades are flat and that's the part that matters.
A cake scraper is a flat rectangle of steel with one perfectly straight working edge. You hold it still against the side of the cake at a slight angle and turn the turntable, so it shaves the buttercream to a single plane in one pass. Metal is worth choosing over plastic because it can be warmed under hot water for a final polishing pass, and because a thin steel edge stays straighter over time.
Why we picked this exact one: The Auswalar 8.6-inch stainless scraper is tall enough to cover a normal three-layer cake in one sweep, which matters more than brand here - a scraper shorter than the cake leaves a step where the passes meet. It is stainless rather than plastic, so you can run it under hot water, dry it, and do a last warm pass that melts out the fine lines. The trade-off at this price is a plain stamped edge with no handle, so it can feel slippery with buttercream on your fingers.
Piping bags are cones you fill with frosting and squeeze through a metal tip. Sixteen inches is the size most people settle on because it holds enough buttercream to pipe a whole border without a refill, and it can be cut down when you want a smaller bag. Thickness is the thing to check - a thin bag splits at the seam under pressure and empties itself down your wrist.
Why we picked this exact one: The Keenpioneer 16-inch disposable bags come 56 to a box for under nine dollars, and with thousands of ratings behind them they're about as proven as a consumable gets. The plastic is thick enough that it doesn't balloon at the seam when you lean on it, which is the usual failure of cheaper bags. They're single-use by design, so if that bothers you a reusable canvas bag is the greener call.
Piping tips are shaped metal nozzles that decide what the buttercream looks like coming out. An open star makes rosettes, swirls and rope borders; a closed star gives a softer, more ruffled swirl; a plain round tip writes and pipes beads. Large tips are the forgiving ones to learn on, because the texture in a star shape hides a wobbly hand in a way a smooth round line never does.
Why we picked this exact one: The Suuker set is built around the 1M and 2D tips, which are the two most decorators name when a beginner asks what to buy first - 1M for rosettes and rope borders, 2D for a softer ruffled swirl. It also ships with a reusable bag and a coupler, so you can swap between same-diameter tips without emptying the bag. Five tips is a deliberately small set, and that's the point; the hundred-piece boxes mostly contain shapes you won't touch.
With these five you can fill, stack, crumb coat, chill, frost and pipe a border, which is the whole job. Don't expect the first side to come out clean; expect to patch a gap, scrape again, and find it fine on the third pass. That same tidy-edge instinct shows up in stamping and embossing your own Christmas cards, where a clean border also does most of the work.
Or Buy The Whole Thing In One Box
The five picks above come to about sixty-six dollars, which is a real sum to spend on a hobby you haven't tried yet. All-in-one cake decorating boxes exist for exactly that reason, and they're the most common first purchase in this craft. Here's the honest comparison rather than a nudge in either direction.
The one-box alternative
Cake Decorating Tool Set
An all-in-one decorating box bundles the hardware and the consumables into a single purchase: a turntable, a spread of piping tips in large and standard sizes, spatulas, scrapers, couplers and a stack of disposable bags. The useful ones include enough piping bags to actually get through a few cakes rather than a token handful. Check that the turntable inside is metal rather than moulded plastic, since that is the piece that decides whether the whole box was worth it.
Why we picked this exact one: The Kootek 180-piece kit is the one I'd pick of the all-in-one boxes, mostly because the turntable inside it is the same aluminium alloy design Kootek sells on its own rather than a plastic stand-in. It carries 42 piping tips, four spatulas, three combs, a smoother, a leveler, couplers and 100 disposable bags, so nothing essential is missing on day one. The weak link is the spatulas and the leveler, which are thinner than the ones you'd buy separately.
Everything a beginner cake needs, and the 100 bags last through roughly a dozen cakes before you reorder anything.
The same cakes, but you run out of bags after about a dozen too - the five picks and the box cover the same ground here.
Quality of the tools
The turntable is genuinely good. The spatulas, scrapers and leveler are thinner stampings that flex when you lean on them.
Each piece was chosen on its own merits, so the scraper is tall enough for a three-layer cake and the spatulas don't bend mid-sweep. better here
The first evening
Open the box and start. Nothing to decide, and the 42 tips mean you can try shapes you'd never have thought to buy. better here
Five parcels, five decisions, and five tips to learn - a tidier start but a slower one.
Where it leads
The turntable and most of the tips carry forward. The thin spatulas and scraper get replaced within a few cakes.
All five pieces stay in use, and the next thing you buy is a leveler or boards rather than a replacement. better here
Our verdict: it depends. Buy the kit if you want to decorate this weekend and aren't sure you'll still care next month; build it from the picks if you already know you want flat sides more than you want forty-two piping tips.
The Things That Make The Second Cake Easier
None of this is needed to finish a cake, which is why it isn't above. It's all stuff you reach for once the novelty wears off and the annoyances start repeating. Domed tops that rock when you stack them. A finished cake welded to the turntable with no safe way to lift it. If you buy one thing here, make it the boards - they cost almost nothing and they fix the scariest moment of the whole process.
06Pick 06 of 15
Adjustable Cake Leveler
A leveler is a thin wire stretched across a wide frame with height notches on each leg. You set the wire to the height you want, rest the feet on the counter and saw gently through the layer, which shaves off the dome and leaves a flat top. The alternative is a long serrated knife and a steady eye, which works but drifts.
Why we picked this exact one: The Wilton adjustable leveler is the classic for a reason: the notched legs set the height for you, so every layer in the stack comes out the same thickness without you eyeballing it. Twelve thousand ratings is an unusual amount of real-world use for a tool this simple. The rating sits a little lower than the rest of this page at 4.4, and the common complaint is fair - the wire needs retensioning, and it will drag rather than cut on a warm, soft cake.
Cake boards are stiff cardboard circles you build the cake on top of, so the finished cake can be lifted off the turntable in one movement. Decorators generally want a board two to four inches wider than the cake, which gives the scraper a flat ledge to ride on while it smooths the sides. Greaseproof coating matters, otherwise buttercream soaks through and the board goes soft overnight.
Why we picked this exact one: This ONE MORE pack gives you 10 each of 8, 10 and 12-inch boards for under eighteen dollars, which is the right shape for this job - you want a board wider than the cake, so a mixed-size pack is more useful than thirty of one diameter. They are coated rather than bare cardboard, so an overnight cake doesn't leave a greasy ring. They're thin single-thickness rounds, so for a heavy or tiered cake you'd want to double them up.
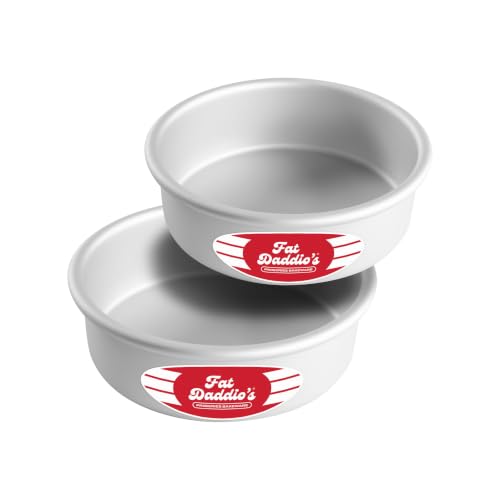
Anodized aluminium pans conduct heat quickly and evenly, and the pale surface reflects rather than absorbs it. The practical result is a layer that rises flatter and browns less at the edge than the same batter in a dark non-stick tin. Straight sides matter too: a pan that flares slightly gives you a layer that is wider at the top, which shows up as a lean once it's stacked.
Why we picked this exact one: Fat Daddio's anodized pans are what most working decorators have in the cupboard, and this two-piece 6-inch set is the sensible entry point rather than the 9-inch everyone already owns. Six inches is the size that makes a tall, photogenic little cake from a modest amount of batter, which is exactly what you want while practising. They have no non-stick coating at all, so you do have to grease and line them.
This is the professional version of the same tool: an aluminium plate on a cast-iron base that weighs enough to stay exactly where you put it. The mass does two things - it resists the sideways push of a scraper, and it keeps spinning on its own for a second or two after you let go, which lets you complete a full revolution in one unbroken pass. It will also outlast most of the kitchen.
Why we picked this exact one: The Ateco revolving stand is the step up from a lightweight aluminium turntable, and it's worth it once you know you're staying with this - the cast-iron base means you can lean a scraper into the cake without the whole thing shifting. If you're still deciding whether cake decorating sticks, wait; the cheaper turntable makes good cakes and this is a comfort upgrade, not a capability one. It's heavy and it takes a cupboard shelf permanently, which is the honest cost of that stability.
Spend on these in the order the problems actually annoy you, not all at once. Most people find the boards and the leveler earn their keep by the third cake, while the heavier turntable is a reward you give yourself later. A decorated cake also makes a fair contender if you're hunting for a Christmas project worth starting with, since the thing you make gets finished and eaten in the same week.
When You Want Sculpted Instead Of Piped
Fondant is a different craft wearing the same apron. Buttercream is soft and re-workable; fondant is a sheet of pliable sugar you roll out, drape over a chilled cake and smooth down like wallpaper, and once it's on, it's on. It gives you the glassy surface and the crisp edges that buttercream can't quite reach, plus modelled flowers and figures that hold their shape. The tools below are a small, specific set - and a warning worth having early: fondant tastes of sweetness and very little else, which is why plenty of decorators cover a cake in it and then peel it off before serving.
10Pick 10 of 15
Fondant Rolling Pin with Guide Rings
A fondant pin is smooth plastic rather than wood, so sugar paste releases instead of gripping, and the long ones span a whole sheet without seams from repositioning. Guide rings clip onto each end and lift the barrel a set distance off the bench, which forces an even thickness across the sheet. Most people roll fondant somewhere around an eighth of an inch - thick enough not to tear, thin enough not to look like a duvet.
Why we picked this exact one: The Wilton large fondant pin with guide rings is the piece that turns rolling from a judgement call into a measurement, which is the single biggest reason beginner fondant goes wrong. At 20 inches it covers a sheet for a normal round cake in one pass, so there's no seam where you shifted the pin. It is the most expensive thing on this page and it's bulky to store, so it only makes sense if you genuinely intend to work with fondant rather than just try it once.
A fondant smoother is a flat plastic paddle with a handle on the back. Once the sheet is draped over the cake you press and glide it across the surface to push out trapped air and burnish the sugar to a matte, even finish. Decorators usually use two at once on the sides, working them against each other to get a corner to sit square.
Why we picked this exact one: The Ateco 1301 is the standard white smoother you'll see in most decorating kitchens, and at four dollars there's no real argument for anything fancier. The edge is rounded rather than sharp, which matters because a hard corner scores a line into the fondant instead of polishing it. It's a simple moulded paddle, so don't expect it to survive being left against a hot oven door.
Plunger cutters stamp a shape out of rolled sugar paste and then push it free with a sprung plunger, usually pressing a vein or a curve into the petals on the way out. Working in graduated sizes lets you layer small blossoms over larger ones for something that reads as a real flower rather than a stamped disc. Let the cut shapes firm up for an hour before you move them.
Why we picked this exact one: PME's blossom plunger cutters are the set sugarcraft people name when the subject comes up, and the four graduated sizes are what let you build a layered flower instead of a flat one. The spring action releases the shape without you poking it out and distorting a petal, which is the usual failure of cheap open cutters. They're a single flower shape in four sizes, so if you want leaves and butterflies too you'll be buying again.
A modelling set is a handful of double-ended plastic tools - ball ends for cupping and thinning petals, a veining tool for pressing leaf ribs, a scriber for marking lines, a wheel for cutting strips. They exist because fingers are too warm and too blunt for work at this scale. Most sets also throw in a small brush for dusting cornflour or painting on water where pieces need to stick.
Why we picked this exact one: The Patelai 19-piece set is the inexpensive way to find out which three tools you actually use, which for most people turns out to be the ball tool, the veiner and the scriber. Nineteen pieces at eight dollars obviously means moulded plastic rather than turned hardwood, and the handles are light in the hand. For learning the motions that's fine; the ball ends are smooth and that's the part doing the work.
Try fondant on a chilled, already-crumb-coated cake rather than a bare one, because it needs something tacky and firm to cling to. Expect the first sheet to tear at a corner and expect to re-knead it and go again - that's the normal path, not a sign you've chosen the wrong hobby. If you enjoy the structural, sculpted end of sugar work, building a gingerbread house that stays standing scratches a very similar itch.
Two Books Worth Owning On Paper
Video is better than print for watching a scraper move, but it's useless when your buttercream has split and you need a reason why. A book you can leave open on the counter with flour on it does something a phone doesn't. These two cover different halves of the job and both turn up repeatedly when decorators talk about what they learned from.
14Pick 14 of 15Book worth reading
Layer Cake Decorating Book
A layer-cake handbook that takes the decorating half seriously rather than treating it as a paragraph at the end of a recipe. The useful ones walk through filling and stacking, crumb coating, getting a smooth finish and colouring buttercream as separate skills with their own troubleshooting, then give you recipes to practise each on. Photographs of what the wrong result looks like are worth more here than beauty shots.
Why we picked this exact one: Whitney DePaoli's Anyone Can Cake is the one to buy first, because it's structured around the sequence a beginner actually faces - bake, fill, stack, crumb coat, smooth, finish - rather than around a list of recipes. The first half is method and troubleshooting, including ganache drips and colouring buttercream, and the second half is recipes to practise it on. It is firmly a beginner-to-improver book, so if you already frost confidently you'll outgrow the front section quickly.
This is the reference end of the shelf: a thick, technical book about why cakes and buttercreams behave as they do, with weights alongside volumes and a great deal of detail on meringue buttercreams. It's the kind of book people keep for decades and return to when something fails rather than reading cover to cover. Expect explanation and precision rather than step-by-step decorating photos.
Why we picked this exact one: The Cake Bible by Rose Levy Beranbaum is the book working decorators still quote buttercream formulas out of decades after it came out, which is the recommendation that counts. The 35th anniversary edition is the current, in-print one and adds new material alongside the originals. Fair warning that it's a dense, weights-and-grams reference rather than a weekend read, and opinions on its cake recipes genuinely do split among decorators.
Start with the first one if you want to be decorating this month, and keep the second for when a recipe stops behaving and you want to know why. Decorating a cake and building a door wreath turn out to be the same trick in different materials: a plain base, a repeated motif, and an edge that hides where everything joins.
The Questions That Arrive Halfway Through The Second Coat
I've scraped the sides ten times and they look worse than when I started. What am I doing wrong?
Scraping feels like sanding, so the instinct is that more passes mean smoother sides. It's the opposite: every pass takes buttercream off, so a dip just gets deeper until you scrape straight through to the crumb coat and the cake shows. Go around once or twice, then stop and look. Spread a little fresh buttercream directly into any gap or indent, and scrape again - fill, scrape, fill, scrape, rather than scrape and hope.
Why does my top edge bulge instead of going sharp?
Once the sides are smooth you'll have a lip of buttercream standing proud of the top, and the fix is to swipe it inward toward the centre. The mistake is pushing down while you do it, which forces buttercream back out through the side and raises a ridge just under the rim. Push the blade sideways, not downward. Wipe the blade completely clean between every single swipe, because a blade carrying buttercream smears as much as it removes.
The cake looked perfect last night and the filling has bulged out of the sides by morning. Why?
Soft fillings get squeezed by the weight of the layers above them, and if there's nothing holding them back they creep sideways and push the frosting out into a belt. The fix is a dam: pipe a ring of stiffened buttercream around the edge of each layer before you spoon the soft filling inside it. Thicken that buttercream a little with extra powdered sugar first so it can actually take the load. A warm kitchen makes this far worse, since butter begins breaking down above about 75°F.
My buttercream is full of tiny holes, like a sponge. Where do they come from?
They're air, whipped in at high speed after the powdered sugar went in, and they don't go away on their own - they surface as pinholes in a finish you've just spent twenty minutes smoothing. Switch to the paddle attachment and run the mixer on low for a few minutes before you use it, which knocks the bubbles out without unmaking the frosting. Letting it sit in a sealed container for twenty minutes and then stirring by hand works too, just more slowly.
Can I skip the crumb coat if I'm careful?
Careful isn't the variable. The crumb coat isn't mainly about crumbs - it's about the chill that follows it, which sets the whole stack into one firm object you can push a scraper against without the layers shifting. Skip it and the cake moves under the blade, the layers slide, and you're chasing a target that keeps changing shape. It also doesn't need to look good, so don't waste time making it neat; just flatten the obvious ridges and get it cold.
People Worth Following Into This Hobby
Real practitioners we found while researching this setup — people who do the work, show their process, and publish on sites they run themselves. No sponsorships, no affiliations; we just think they're worth your time.
A self-taught Portland cake decorator who publishes her own step-by-step cake basics, including the buttercream consistency tests she works to.
Her consistency guide answers the exact failure behind two questions in this page's FAQ - buttercream that tears the layers and buttercream that lets a filling bulge - with the spatula peak test to check it by.
A pastry chef who documents cake technique as standalone tutorials, from baking flat layers to getting buttercream genuinely white.
The smooth sides this setup is built around start with layers that bake flat, and her flat-top tutorial covers the part that happens before any of the tools on this page come out.
Courtney Rich teaches layer cake making through online classes and a members' cake club, and sorts her own recipes by beginner, intermediate and advanced.
Her beginner category is a ready-made practice queue for someone who has just bought the turntable and scraper here and needs cakes to smooth.
Love what you see here? Save individual picks with on any item, or copy everything to a list of your own in one click — great for coming back to later, or dropping as a not-so-subtle hint.