
Beginner Acrylic Pour Setup: Create Fluid Art From Day One
What Is Acrylic Pouring — and Why It Works Immediately
Acrylic pouring is one of the very few art techniques where your first attempt can genuinely look finished. The process involves thinning acrylic paint with a pouring medium until it flows like warm honey, then pouring or tilting it across a canvas until the colors blend and swirl into abstract patterns entirely on their own. There is no brushwork to master, no color theory to memorize — the physics of the paint does most of the thinking for you. What surprised me when I researched this hobby was just how quickly it clicks: people who have never made art before regularly produce pieces they want to hang on the very first try. If you have been reading about common mistakes beginners make with acrylic painting, you will find that pouring sidesteps many of the most frustrating ones, because the fluid medium actually hides imprecision rather than punishing it.
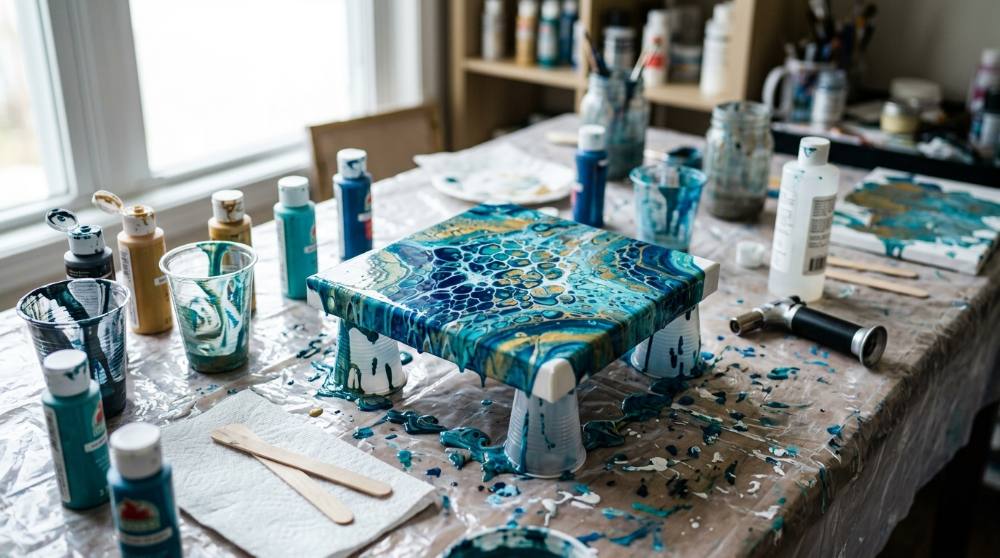
Setting up a dedicated space helps enormously — even a kitchen table corner covered with plastic sheeting becomes a functional studio once you know what to lay out. If you want to think more broadly about how to set up a beginner art space at home, there is a practical overview worth bookmarking alongside this guide. With the right essentials in place, your first pour can happen in under an hour from the moment you unbox everything.
What You Need to Pour Your First Canvas
These five items are genuinely non-negotiable for acrylic pouring — skip any one of them and the process either does not work or becomes frustrating. The most common beginner mistake is buying regular tube acrylic paint and hoping it will pour without any adjustment, only to find it sits in blobs rather than flowing. Pre-mixed pouring paints solve this immediately by coming pre-thinned to exactly the right consistency. Pouring medium is the second load-bearing ingredient: it extends the paint, controls how it flows, and is what creates those layered effects when two colors meet. A pack of canvases and a set of small mixing cups round out the core setup, and the canvas risers — small plastic cones you may not have heard of — are the detail most beginners miss entirely: without them, paint cannot drain off the edges properly and you end up with puddles collecting under the canvas rather than a clean drip edge. If you are exploring which art supplies beginners commonly waste money on, pre-mixed pouring sets consistently come up as a smarter starting point than assembling paints and medium separately.
pre-mixed acrylic pouring paint set

A ready-to-use set of fluid acrylic paints formulated specifically for pouring, already thinned to the right honey-like consistency so no additional mixing medium is required before your first pour. Sets typically include a curated palette of colors with complementary tones that blend well together on the canvas. When choosing a set, look for paints labeled ready-to-pour or pre-mixed with a consistency described as fluid or high-flow.
acrylic pouring medium for fluid art

A water-based paint conditioner that thins acrylic paint to a pourable consistency while extending open time, helping colors blend and flow without cracking as they dry. It is mixed directly into your paint at roughly a 1:1 ratio to achieve the honey-like viscosity needed for tilting techniques. When selecting a pouring medium, prioritize products that dry clear, do not change paint color, and have a strong track record among fluid art communities.
pre-stretched cotton canvas boards for pouring

Pre-stretched, gessoed canvases provide a firm, primed surface that holds poured acrylic without warping, absorbing too much medium, or leaking through the back. The 8x10 inch size is ideal for beginners because it requires less paint per session and dries more quickly than larger formats. When buying canvases for pouring, look for triple-primed cotton with a 5/8-inch profile frame — the depth gives dripping paint room to run off the edges cleanly.
disposable plastic mixing cups with wooden stir sticks

Graduated plastic cups with measurement markings make it easy to mix precise ratios of paint and medium without guessing, while wooden craft sticks allow thorough stirring without introducing air bubbles. A pack of 100 cups provides enough for many sessions without washing between colors. For acrylic pouring, look for 10–20 oz clear cups marked with volume gradations in both ounces and milliliters so you can recreate successful ratios.
plastic cone risers for elevating canvases during pouring

Small pyramid or cone-shaped plastic stands that hold a canvas a few centimeters above the work surface so excess paint can drain freely off all four edges without pooling underneath. They are reusable, easy to clean, and pack flat. Most beginners improvise with cups or jar lids, but purpose-made risers provide stable, non-slip support at the exact height needed for clean edge drips.
With these five items together, you have everything needed for the most popular beginner technique — the dirty pour, where all your colors go into one cup and are poured in one smooth motion onto the center of the canvas. I found that beginners who start with a pre-mixed paint set and proper pouring medium almost always get usable flow and movement on their first try, which is a much better outcome than experimenting with proportions from scratch. If acrylic pouring sparks an interest in working more broadly with paint, the beginner acrylic painting setup covers the transition into brushwork and traditional techniques naturally.
Take Your Pours Further
Once you have poured a few canvases with the basics, these four items open up new effects and make the whole experience cleaner and more polished. The most visually dramatic upgrade is silicone oil — just a few drops stirred into each color cup before pouring is what produces those round, lacy cells that many people associate with fluid art. A butane torch used briefly over the wet surface does two things at once: it pops air bubbles that would otherwise dry as craters, and it activates the silicone to push more cells to the surface. Disposable gloves are the low-cost quality-of-life item that makes cleanup painless — acrylic paint on skin is harmless but stubborn, and a box of nitrile gloves removes that problem entirely. The topcoat varnish is what transforms a dried pour from something that looks nice to something that looks professional: it eliminates the slight matte haze that can develop as acrylic dries, deepens the colors, and seals the surface against dust and handling. Acrylic pouring shares a lot of creative DNA with other fluid art forms — if the cell patterns and abstract results appeal to you, the beginner resin art setup is a natural next step that produces similar effects with a harder, more permanent finish.
refillable butane torch for fluid art and craft use

A small handheld torch producing an adjustable direct flame, with a safety lock to prevent accidental ignition. In acrylic pouring it is used by briefly waving the flame a few inches above wet paint to pop air bubbles and trigger silicone cells — the heat causes oils to rise and surface tension to break in ways that create distinctive rounded formations. When selecting a torch for fluid art, look for adjustable flame control and a sturdy base that allows hands-free standing between uses.
artist-grade silicone oil for creating cells in fluid art
A pure silicone lubricant added in small amounts — just two to five drops per color cup — to create the signature cell formations that appear in acrylic pour paintings: round, lacy shapes where one color pushes through another as pigments of different densities separate. It should be used sparingly and the dried surface wiped before varnishing, as residue can prevent topcoats from bonding properly. For fluid art, choose a product specifically formulated for painting use to ensure appropriate viscosity.
disposable nitrile gloves for art and craft protection

Powder-free, latex-free nitrile gloves that protect hands from paint and medium during mixing and pouring sessions. Nitrile is preferred over vinyl or latex for art use because it is more puncture-resistant, fits more snugly, and does not react with acrylic compounds. A box of 100 provides ample supply for many sessions and allows you to change gloves between color mixes without worrying about cross-contamination.
clear gloss varnish for sealing finished acrylic pour paintings

A water-based acrylic varnish applied as a final protective coat over a fully dried pour painting to add gloss, deepen color saturation, and seal the surface against dust, moisture, and handling. Non-yellowing formulas maintain the brightness of original colors long-term. For best results, apply over a painting that has cured for at least 48–72 hours and has been wiped free of any silicone residue from the pouring process.
None of these four items are required for your first pour, but most people find themselves wanting them after the second or third canvas. The silicone oil and torch in particular change the character of what you can make — without them, you get beautiful abstract flow; with them, you get those circular cell formations that look almost organic under close inspection. Finish each piece with a topcoat once it has fully dried — allow at least 48 to 72 hours for a thick pour to cure completely — and you will have something sturdy enough to frame, gift, or hang.
Love what you see here? Save individual picks with ⋮ on any item, or copy the whole list to your own wishlist in one click — great for coming back to later, or dropping as a not-so-subtle hint.
A Few More Beginner Setups We Carefully Put Together
Disclosure: Some product links may be affiliate links. If you make a purchase through one of these links, we may earn a small commission at no extra cost to you.