6 Acrylic Painting Mistakes That Hold Beginners Back
The six structural mistakes behind muddy color, cracked layers and a dried-out palette in beginner acrylics — and the simple fix behind each one.
Acrylics have a reputation for being easy — and then beginners hit a wall of muddy colors, cracked layers, and dried-out palettes. The frustrating part? Every one of those problems has a simple structural cause. Fix the pattern, not the painting.
Why acrylics feel easy right up until they don't
Acrylics earn their beginner-friendly reputation honestly: they need only water to thin, dry fast enough to keep working, and clean up without solvents. That same forgiving nature is exactly why the early problems feel so confusing. Muddy color, cracked layers, and a palette that turns to rubber halfway through a session don't look related, but they trace back to a handful of structural habits, not a lack of skill.
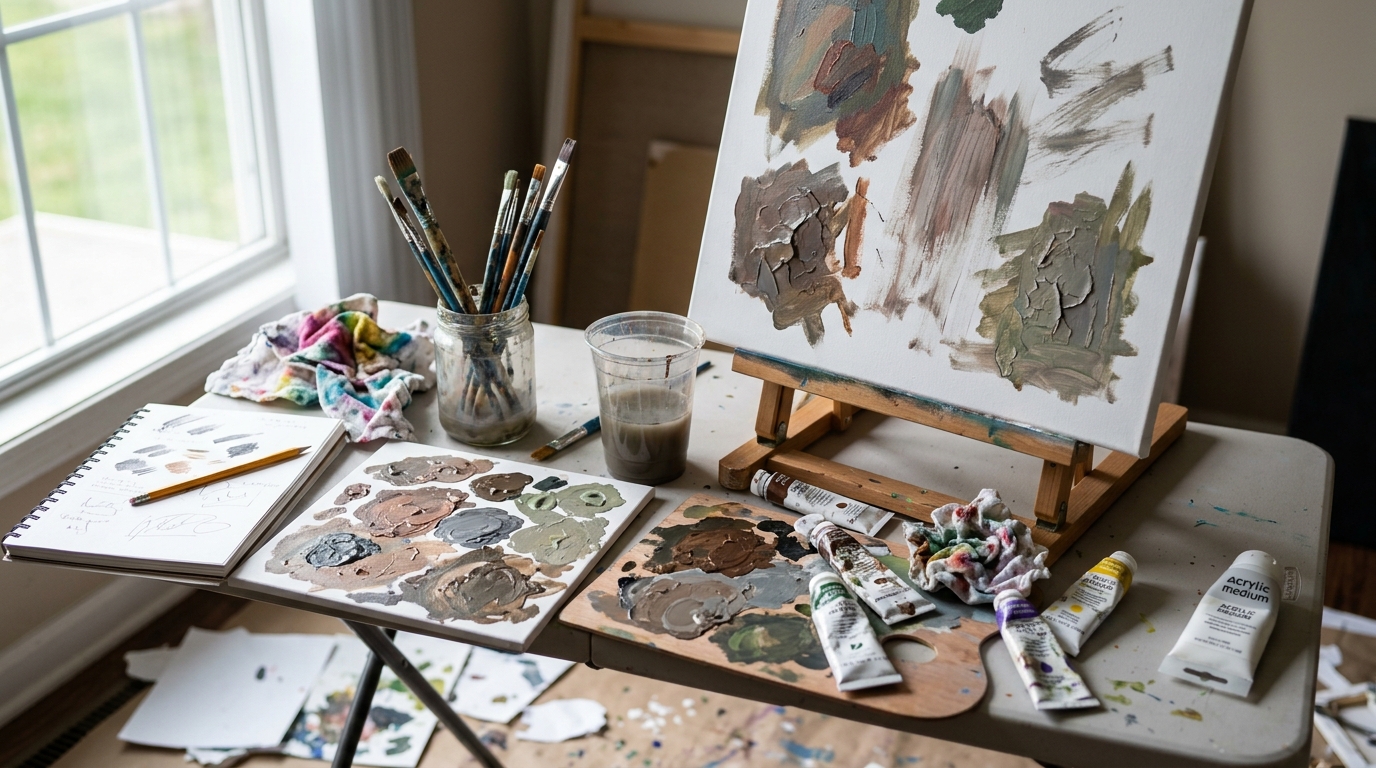
Each of the six mistakes below has one concrete cause and one concrete fix. Sort the cause and the symptom disappears for good. If you're still gathering materials, a beginner acrylic painting setup with the essential supplies covers the basics these fixes rely on.
Mistake 1: You thin your paint with water until the film falls apart
Cracked, flaky, or chalky dried paint almost always comes from too much water. Acrylic paint is pigment suspended in an acrylic binder, and water doesn't just thin the color — it dilutes that binder. Once water makes up much more than about a third of the mix, there isn't enough binder left to hold the pigment to the surface, so the dried layer loses strength, adhesion, and depth of color.
Thin with a fluid or gloss acrylic medium instead of water once you want a properly runny mix, because a medium dilutes the paint while keeping the binder intact. Cracking also appears when a thick layer is piled over one that's still wet underneath: the surface dries and shrinks faster than the base, and the tension splits it. Keep early layers thin, let them dry, and save thick paint for the top. Better-pigmented paint tolerates thinning far better than the cheapest tubes, which is worth knowing before you read about the art supplies beginners most often waste money on.
Mistake 2: Your palette dries out before you finish a section
Acrylics dry by evaporation, and on a bare plastic or paper palette that can mean a skin within minutes. Beginners notice it as paint that won't blend, mixtures they can't recreate, and a surprising amount of color scraped straight into the bin. The fast drying isn't the enemy here — an unprotected palette is.
A stay-wet palette solves this by feeding moisture up to the paint from a damp sponge beneath a thin membrane, keeping colors workable for hours and sealed mixes usable for days. Put out only the paint you'll use in the next stretch, mist it occasionally, and work one area at a time so a mixed color is still alive when you reach for it again.
Mistake 3: Your colors keep sliding into mud
Muddy color rarely means bad paint. It comes from three habits that stack up: mixing too many pigments into one puddle, rinsing in water that's already gray, and dragging a brush back through a layer that hasn't fully dried so the colors re-blend on the canvas. Combine three or more pigments — especially complementary ones — and they neutralize toward a flat brown-gray every time.
Keep most mixtures to two or three colors, change your rinse water far more often than feels necessary, and use the fast drying time to your advantage by letting each layer set before you work over it. Clean water and a short wait do more for your color than any upgrade in paint.
Mistake 4: You forget acrylics dry darker than they look
Acrylic paint dries noticeably darker than it appears when wet, and the shift catches almost every beginner. The cause is the binder: it looks milky and slightly white while wet, which lightens the color you see, then dries clear and reveals the pigment's true, deeper value. The change is most dramatic in dark colors and easy to miss in pale ones.
Mix your colors a step lighter than the value you actually want, then confirm by brushing a test swatch on scrap and letting it dry before you commit. Keeping a small wet reference of an important mix also lets you match wet-to-wet rather than guessing. Plan for the shift and your values stop drifting muddy and flat.
The tools that quietly fix most of this list
Several of these mistakes are really equipment problems in disguise. A few dependable basics remove the cracking, the dried-out palette, and the ruined brushes before you make a single stroke.
Sta-Wet Handy Palette, Airtight, 8.5 x 7 Inches

Eine verschließbare Kunststoffschale, in der ein feuchter Schwamm unter einer durchlässigen Membran liegt und die Farbe von unten mit Feuchtigkeit versorgt – so bleibt Acryl weich, statt eine Haut zu bilden. Der Deckel schnappt fest zu und hält die Farben zwischen den Malsessions einsatzbereit. Achte beim Kauf auf einen luftdichten Verschluss sowie austauschbare Schwamm- und Papiernachfüllungen.
Professional Fluid Medium, Gloss, 237ml (8-oz)
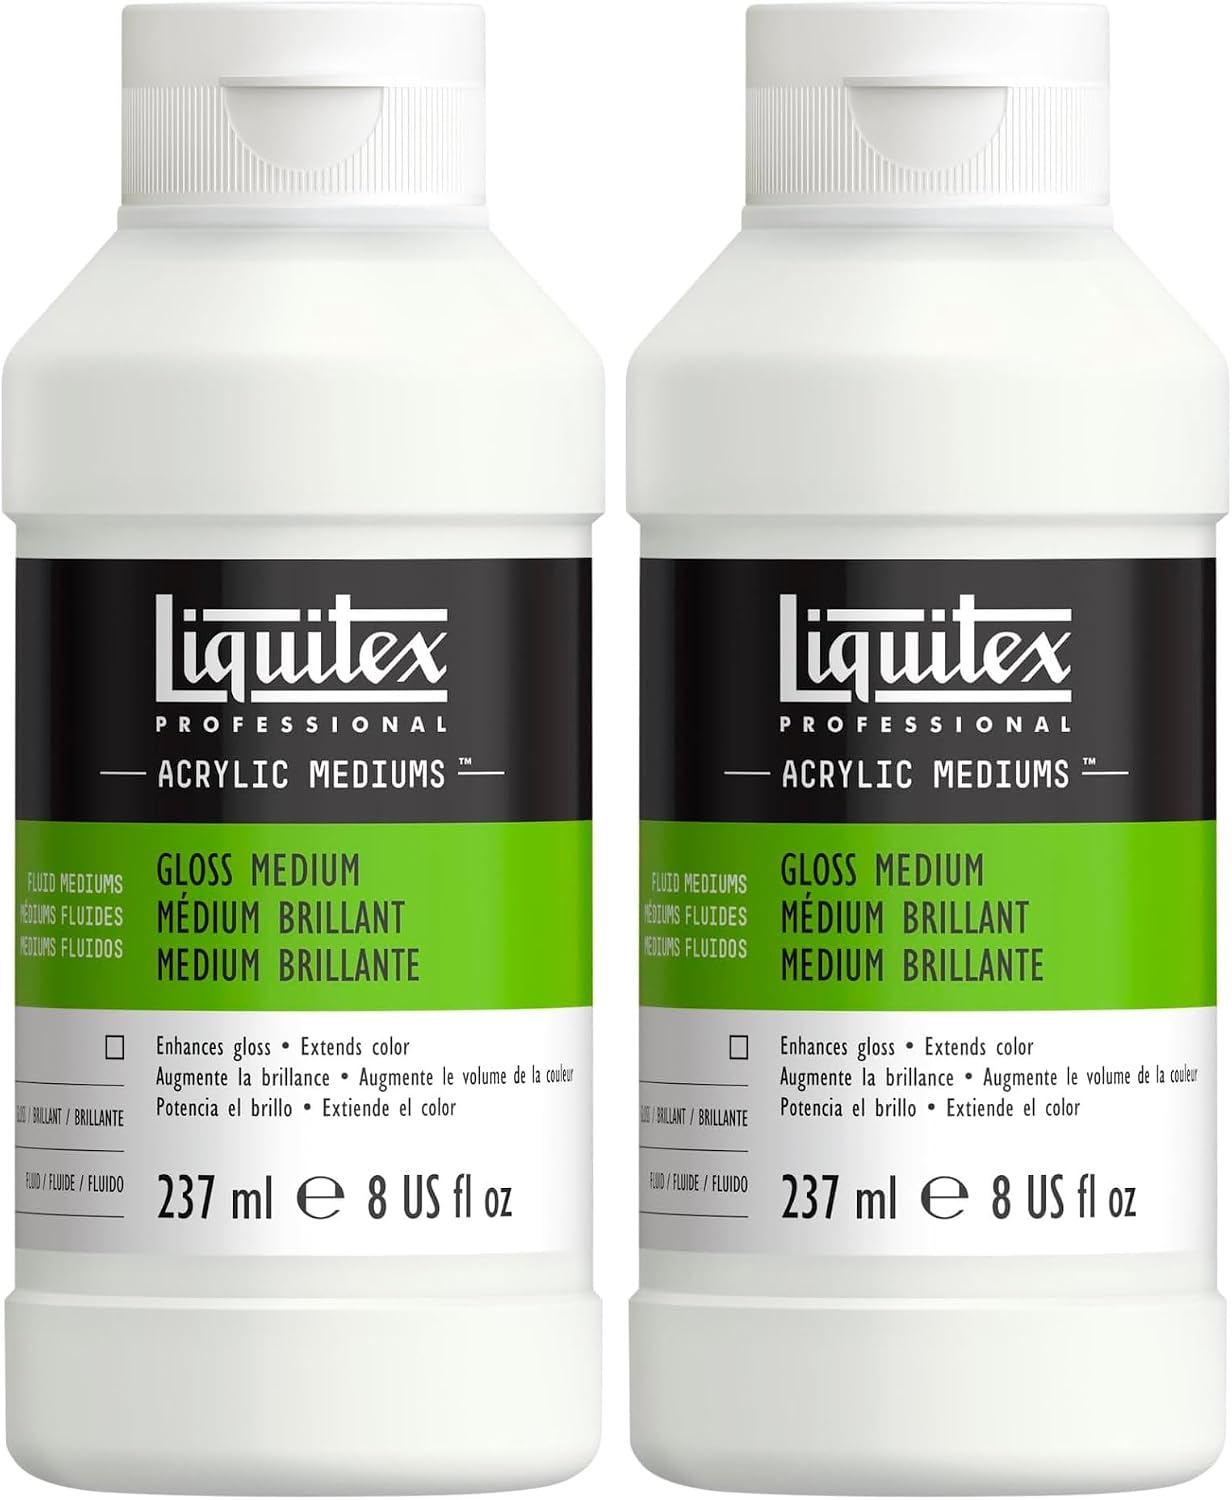
Ein gießfähiges Acrylmedium aus demselben Bindemittel wie die Farbe selbst, mit dem du Töne verdünnst und den Farbfluss verbesserst, während die getrocknete Schicht stark und gut haftend bleibt. Anders als Wasser verdünnt es die Farbe, ohne das Bindemittel anzugreifen, das die Pigmente an der Oberfläche hält. Die glänzende Variante hält die Farben kräftig, matte Varianten nehmen den Glanz zurück.
Paint Brushes Set of 12, Synthetic Hair, Birch Handles

Ein Set Synthetikpinsel in verschiedenen Formen – Flach-, Rund- und Katzenzungenpinsel – auf Holzgriffen. Synthetikhaar springt zurück in Form und hält den scharfen Lösungsmitteln und dem häufigen Auswaschen stand, die beim Acrylmalen dazugehören, während weiches Naturhaar schneller verschleißt. Die Auswahl an Formen und Größen deckt alles ab, vom großflächigen Anlegen bis zum feinen Detail.
Brush Cleaner & Restorer, 4.0-oz Bottle

Ein flüssiger Reiniger, der eingetrocknete Acryl- und Ölfarbe in den Borsten aufweicht und löst, sodass du Pinsel rettest, die nahe der Zwinge schon hart geworden sind. Du weichst den Pinsel ein, arbeitest den Reiniger durch und spülst ihn aus, um die ursprüngliche Form wiederherzustellen. Gedacht ist er für die gelegentliche Tiefenreinigung, nicht fürs tägliche Ausspülen.
Mistake 5: You try to finish in one layer instead of building up
Beginners often fight to blend and correct everything in a single wet pass, then grow frustrated when the paint sets before they're done. Acrylic's fast drying makes that approach a losing battle — but the same speed is a gift once you switch tactics. Block in your shapes and values first, let them dry, then refine with opaque layers and glazes on top. This is one place acrylics behave very differently from oils, which stay open and blendable for hours.
Treat drying time as a feature, not a flaw: each dry layer becomes a stable base you can paint over cleanly, correct mistakes on, and deepen gradually. If you find you genuinely prefer slow, wet-into-wet blending and long working times, that's useful information — an oil painting beginner setup is built around exactly that pace.
Mistake 6: You let paint dry in your brushes
Ein ruinierter Pinsel ist meistens eine Frage der Pflege, nicht der Qualität. Acryl trocknet zu einem unlöslichen Kunststoff aus, und wenn Farbe in die Zwinge kriecht und dort hart wird, spreizen sich die Borsten für immer – da hilft auch das schönste Ausspülen nichts mehr. Anfänger verlieren mehr Pinsel, weil sie sie mitten in der Arbeit vergessen, als aus jedem anderen Grund.
Halte einen Wasserbecher in Reichweite, spüle oft aus und lass niemals einen vollgesogenen Pinsel zum Trocknen liegen. Wasch ihn am Ende jeder Sitzung mit Seife oder einem speziellen Reiniger aus – und ein Pinselretter kann manchmal sogar einen schon verloren geglaubten wieder zum Leben erwecken. Gute Gewohnheiten zählen hier mehr als der Preis, aber genau sie machen auch den Unterschied zwischen Künstlermaterialien, die halten, und billigem Kram, der das nicht tut.
Ein 60-Sekunden-Check, bevor du den Pinsel ansetzt
- Richte dir eine Feuchtpalette ein oder zumindest eine feuchte Unterlage, damit deine Farbe keine Haut bekommt.
- Halte den Wasseranteil bei jeder Mischung bei etwa einem Viertel; greif zu einem Medium, wenn du es dünner haben willst.
- Fülle einen sauberen Wasserbecher und wechsle ihn oft, damit dein Spülwasser nie trüb wird.
- Misch jede Farbe eine Spur heller, als du sie haben willst, denn sie trocknet dunkler nach.
- Beschränke dich auf zwei oder drei Pigmente pro Mischung, damit die Farben sauber bleiben.
- Leg deine Schichtreihenfolge fest – dünn und trocken unten, dicker oben –, bevor du loslegst.
- Lass nie einen Pinsel mit Farbe drin einfach liegen.
Fragen zur Acrylmalerei, die Anfänger wirklich stellen
Warum reißt meine Acrylfarbe beim Trocknen?
Risse entstehen meistens durch zu viel Wasser oder weil dicke Farbe auf eine Schicht aufgetragen wird, die darunter noch feucht ist. Zu viel Wasser verdünnt das Bindemittel, sodass der Film nicht zusammenhält, und eine dicke Deckschicht trocknet und schrumpft schneller als der Untergrund – unter der Spannung reißt sie dann auf. Verdünne lieber mit einem Acrylmedium statt mit Wasser und lass jede Schicht trocknen, bevor du eine dickere darüberlegst.
Wie viel Wasser darf ich zur Acrylfarbe geben?
Als grobe Faustregel: Halte den Wasseranteil unter etwa einem Viertel bis einem Drittel der Mischung. Darüber hinaus wird das Bindemittel zu dünn, um an der Oberfläche zu haften, und du bekommst einen schwachen, kreidigen oder abblätternden Film. Wenn du es noch dünner brauchst, wechsle zu einem Fluid- oder Gießmedium, das die Farbe verdünnt, ohne sie zu schwächen.
Warum werden meine Acrylfarben matschig?
Matsch entsteht, wenn du zu viele Pigmente auf einmal mischst, in eine noch nicht getrocknete Schicht malst oder mit schmutzigem Wasser spülst. Beschränke dich auf zwei oder drei Farben pro Mischung, lass jede Schicht trocknen, bevor du darübergehst, und wechsle dein Spülwasser oft. Acryl trocknet schnell, das Warten auf eine Schicht dauert also nur ein paar Minuten.
Trocknen Acrylfarben wirklich dunkler nach, und wie geh ich damit um?
Ja. Das Bindemittel sieht nass milchig und blass aus und trocknet klar auf, deshalb werden die Farben beim Trocknen tiefer – am deutlichsten bei dunklen Tönen. Misch deine Farben eine Spur heller, als du sie willst, und teste eine Probe auf einem Stück Papier, das du komplett durchtrocknen lässt, bevor du den Farbwert beurteilst. Es ist viel einfacher, diese Verschiebung von vornherein einzuplanen, als sie hinterher zu korrigieren.
Wie verhindere ich, dass meine Acrylfarben auf der Palette austrocknen?
Nimm eine Feuchtpalette, die die Farbe durch einen feuchten Schwamm unter einer Membran feucht hält, und leg nur so viel Farbe auf, wie du bald verbrauchst. Wenn du die Oberfläche leicht besprühst und den Deckel zwischen den Sitzungen schließt, bleiben gemischte Farben tagelang brauchbar. Auf einer nackten Palette bekommt Acryl schon nach wenigen Minuten eine Haut.